Caring for the garden star-of-bethlehem
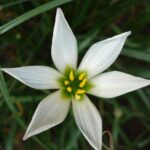
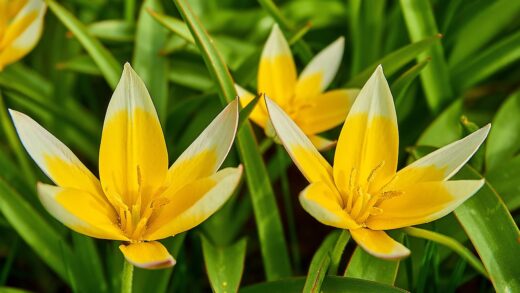
The garden star-of-bethlehem, a member of the Asparagaceae family, is a truly rewarding plant for any gardener willing to understand its fundamental needs. This bulbous perennial is celebrated for its clusters of star-shaped white flowers that bring a touch of elegance to late spring and early summer gardens. Native to parts of Europe, North Africa, and the Middle East, it has naturalized in many other regions, a testament to its resilience and adaptability. Successful cultivation hinges on replicating its preferred natural conditions, which primarily involve well-drained soil and a sunny disposition. Understanding its life cycle, from spring growth and flowering to summer dormancy, is the cornerstone of providing excellent care and ensuring its vigorous return year after year.
Proper care begins with selecting an appropriate location, which is perhaps the most critical decision in the entire cultivation process. These plants thrive in full sun to partial shade, with the former promoting the most prolific flowering. While they are not overly demanding, they do have a clear preference for soil that drains well, as waterlogged conditions can lead to bulb rot, a common issue for many bulbous species. Amending heavy clay soils with organic matter like compost or well-rotted manure can significantly improve drainage and provide essential nutrients. This initial soil preparation creates a healthy foundation that supports the plant throughout its active growth period and subsequent dormancy.
Once established, the garden star-of-bethlehem is remarkably low-maintenance, a quality that endears it to both novice and experienced gardeners. Its needs are simple and align with the natural rhythms of the seasons. During its spring growth phase, it requires consistent moisture to support the development of its foliage and flowers. However, as the weather warms and the plant enters dormancy after flowering, its water requirements diminish significantly. This ability to withstand dry summer conditions is a key survival adaptation from its native Mediterranean-like climates.
It is also important to consider its growth habit, as this plant can be quite vigorous and has the potential to spread. The bulbs multiply readily underground by producing offsets, gradually forming dense clumps over several years. While this makes it an excellent choice for naturalizing in informal areas, lawns, or woodland gardens, it may require management in more formal border settings. Understanding this tendency to spread allows you to plan accordingly, either by giving it ample space to roam or by periodically dividing the clumps to maintain control and propagate new plants. This proactive approach ensures it remains a welcome feature rather than an invasive nuisance.
Soil and site selection
Choosing the right location is paramount for the long-term health and vitality of the garden star-of-bethlehem. The ideal site receives at least six hours of direct sunlight per day, as ample light is crucial for robust growth and abundant flowering. While the plant can tolerate partial shade, particularly in hotter climates where afternoon sun can be intense, its flowering performance may be somewhat reduced in shadier spots. Observe your garden throughout the day to identify a location that offers this optimal balance of light, ensuring the plants have the energy they need to produce their characteristic starry blooms.
More articles on this topic
The soil composition is the next critical factor to address. This species has a strong preference for soil that is loose, fertile, and, most importantly, well-draining. It struggles in heavy, compacted clay soils that retain excessive moisture, which can quickly lead to bulb rot and other fungal diseases. To improve poor soil, incorporate generous amounts of organic matter such as compost, leaf mold, or aged manure. This not only enhances drainage but also enriches the soil with vital nutrients, creating an ideal environment for the bulbs to establish strong root systems and thrive.
When preparing the planting area, it is beneficial to work the soil to a depth of at least eight to ten inches. This ensures that the entire root zone is loosened, allowing for easy penetration by the developing roots and proper water percolation. Removing any weeds, rocks, or other debris from the bed is also an essential step. Creating a clean, well-aerated planting bed gives the bulbs the best possible start and minimizes competition for water and nutrients, allowing them to channel all their resources into healthy growth and flowering.
Consider the plant’s naturalizing tendency when selecting a site. Because the garden star-of-bethlehem readily multiplies and spreads, it is perfectly suited for areas where this behavior is desired, such as woodland edges, meadows, or under deciduous trees. In a formal garden bed, this spreading habit might become problematic over time. If you wish to keep it contained, consider installing underground barriers or plan to divide the clumps every few years to manage their spread and maintain the desired garden design.
Watering practices
Effective watering for the garden star-of-bethlehem is a matter of timing and understanding the plant’s life cycle. During the active growth period in spring, from the moment the first green shoots emerge until the flowers fade, the plant requires consistent and adequate moisture. The soil should be kept evenly moist but never waterlogged. This consistent water supply is essential to support the rapid development of leaves and the energy-intensive process of producing flowers. A deep watering once a week is generally sufficient, though this may need adjustment based on your specific climate and soil type.
More articles on this topic
The key is to monitor the soil moisture rather than adhering to a rigid schedule. You can check the soil by inserting a finger about two inches deep; if it feels dry at that depth, it is time to water. Always water the plants at the base, avoiding the foliage and flowers as much as possible. Wetting the leaves can create a conducive environment for fungal diseases, such as powdery mildew, especially in humid conditions. Morning watering is ideal as it allows any moisture on the leaves to evaporate quickly as the day warms up.
A significant shift in watering strategy is required once the flowering period is over. As the foliage begins to yellow and die back in late spring or early summer, the plant is entering its natural dormancy period. During this phase, its water needs decrease dramatically. It is crucial to reduce and eventually cease watering altogether once the leaves have fully withered. The dormant bulbs prefer to be kept dry throughout the summer, a condition that mimics their native habitat and is essential for preventing rot.
For plants grown in containers, watering practices need to be more closely monitored. Container soil can dry out much more quickly than garden soil, especially during warm and windy weather. You may need to water potted specimens more frequently during their spring growth phase. However, the principle of ensuring excellent drainage is even more critical in pots. Ensure the containers have ample drainage holes and use a high-quality potting mix designed for bulbs to prevent the soil from becoming saturated and causing the bulbs to rot.
Fertilization and nutrition
The garden star-of-bethlehem is not a heavy feeder and can thrive in average garden soil without extensive fertilization. However, providing a balanced supply of nutrients can significantly enhance its growth and flowering performance, leading to more robust plants and a more spectacular floral display. The best time to apply fertilizer is in the early spring, just as the new shoots are beginning to emerge from the soil. This timing ensures that the nutrients are readily available to the plant during its most active period of growth.
A balanced, slow-release granular fertilizer formulated for bulbs is an excellent choice. These fertilizers are designed to provide a steady supply of essential nutrients over an extended period. Look for a product with a balanced N-P-K ratio, such as 10-10-10, or one that is slightly higher in phosphorus (the middle number), which promotes strong root development and abundant flowering. Sprinkle the granular fertilizer around the base of the plants according to the package instructions and gently work it into the top inch of soil.
Alternatively, you can enrich the soil with organic matter, which serves as a natural, slow-release fertilizer. Amending the soil with compost, well-rotted manure, or bone meal at the time of planting provides a nutrient-rich foundation for the bulbs. You can also top-dress the area with a layer of compost each spring. This not only feeds the plants but also improves soil structure, moisture retention, and drainage, contributing to the overall health of the garden ecosystem.
It is important to avoid over-fertilizing, as this can lead to excessive foliage growth at the expense of flowers. Too much nitrogen, in particular, can encourage lush, green leaves but inhibit blooming. Furthermore, excessive fertilizer can harm the bulbs and the beneficial microorganisms in the soil. Adhering to the recommended application rates and focusing on building healthy soil through organic amendments is the most sustainable and effective approach to nourishing your garden star-of-bethlehem plants.
Managing growth and spread
One of the defining characteristics of the garden star-of-bethlehem is its propensity to naturalize and spread. The plant multiplies primarily through the production of small offset bulbs, also known as bulbils, which form around the base of the parent bulb. Over time, these offsets develop into mature plants, leading to the formation of dense and ever-expanding clumps. This vigorous growth habit makes it an excellent candidate for filling in large areas, creating a carpet of green foliage and white flowers in the spring.
While this spreading nature is often a desirable trait, particularly in woodland gardens, meadows, or for groundcover purposes, it can become a challenge in more controlled settings like formal borders or rock gardens. If left unchecked, the plant can outcompete less vigorous perennials for space, water, and nutrients. Therefore, it is essential to have a management plan in place if you intend to grow it in a mixed planting scheme. Regular monitoring and intervention can keep the clumps within their intended boundaries.
The most effective way to manage the spread is by dividing the clumps every three to four years. Division is best performed in late summer or early autumn when the plants are dormant. Carefully lift the entire clump with a garden fork, being gentle to avoid damaging the bulbs. Once lifted, you can easily separate the individual bulbs and offsets by hand. This process not only controls the size of the original clump but also provides you with a surplus of bulbs that can be replanted elsewhere in the garden or shared with fellow gardeners.
When replanting the divided bulbs, ensure they are placed at the correct depth, typically about three to four inches deep, with the pointed end facing upwards. Space them several inches apart to give them room to multiply. If you are concerned about them spreading into adjacent areas, you can consider installing physical barriers underground, such as plastic or metal edging, around the planting area. This can be an effective, albeit more labor-intensive, method for containing their growth in a formal garden design.
Post-flowering care
The care you provide after the garden star-of-bethlehem has finished flowering is just as crucial as the care you provide during its growth and bloom period. Once the last of the star-shaped flowers have faded, the plant’s energy is redirected towards replenishing the bulb for the following year’s display. The foliage, which may start to look a bit untidy, plays a vital role in this process through photosynthesis. It is absolutely essential to allow the leaves to die back naturally without cutting them down prematurely.
During this post-flowering phase, the leaves absorb sunlight and convert it into energy, which is then stored in the bulb. This stored energy is what fuels the initial growth and flowering in the subsequent spring. If you cut the foliage back while it is still green, you deprive the bulb of this critical energy-gathering period, which will result in weakened plants and diminished flowering in the future. Resist the temptation to tidy up the area until the leaves have turned completely yellow or brown and have withered on their own.
As the foliage begins to yellow, you should also significantly reduce watering. The plant is entering its summer dormancy phase and requires a period of relative dryness. Continuing to water heavily at this stage can promote rot in the dormant bulbs, which is one of the most common reasons for their failure. In most climates, natural rainfall will be sufficient, and supplemental irrigation should be stopped entirely. This dry dormancy is a key adaptation that allows the plant to survive hot summer conditions.
Once the foliage has completely died back, it can be easily removed by gently pulling it away from the base or by cutting it down to the ground level. At this point, you can apply a layer of mulch, such as shredded bark or leaf mold, over the area. Mulching helps to suppress weeds, conserve any residual soil moisture, and protect the dormant bulbs from extreme summer heat. This final step in the annual care cycle ensures the bulbs are well-protected and ready to rest until they re-emerge the following spring.
Common issues and solutions
Despite being a relatively robust and trouble-free plant, the garden star-of-bethlehem can occasionally encounter a few problems, primarily related to cultural conditions. The most significant issue is bulb rot, which is almost always caused by poor drainage and excessive moisture. If the soil remains waterlogged, especially during the plant’s dormant period, the bulbs are highly susceptible to fungal and bacterial decay. Symptoms include yellowing foliage that collapses prematurely, and bulbs that are soft, mushy, and discolored when dug up.
The best solution for bulb rot is prevention. Ensure you plant the bulbs in a location with excellent drainage from the outset. If you have heavy clay soil, amend it generously with organic matter to improve its structure and porosity. For container-grown plants, use a potting mix specifically formulated for bulbs and ensure the pots have adequate drainage holes. If you suspect rot, carefully lift the affected bulbs, discard any that are soft or diseased, and allow the healthy ones to dry out before replanting them in a more suitable, better-draining location.
Another potential issue, though less common, is infestation by pests such as aphids or spider mites, particularly if the plants are stressed. Aphids are small, sap-sucking insects that can cluster on new growth, while spider mites are tiny arachnids that can cause a stippled or bronzed appearance on the leaves. A strong jet of water from a hose can often be enough to dislodge these pests. For more persistent infestations, applications of insecticidal soap or neem oil can be effective, but always follow the product label’s instructions carefully.
In terms of diseases, fungal leaf spots or rust can sometimes appear on the foliage, especially during prolonged periods of wet and humid weather. These diseases typically manifest as spots or pustules on the leaves. To minimize the risk, ensure good air circulation around the plants by spacing them appropriately and avoiding overhead watering. If fungal diseases do appear, remove and destroy the affected leaves to prevent the spores from spreading. In most cases, these foliar diseases are cosmetic and do not seriously harm the long-term health of the bulbs.