Success in establishing a new variegated snake plant begins with the careful execution of the initial planting process and a strategic approach to expansion. You will find that while these plants are hardy, their root systems are specialized and require specific conditions to thrive immediately after a move. Whether you are starting with a nursery-bought specimen or preparing to expand your collection, the foundation you lay today will dictate the plant’s health for years. A professional gardener understands that the transition from a seedling or a pup to a mature plant is the most critical phase of its lifecycle.
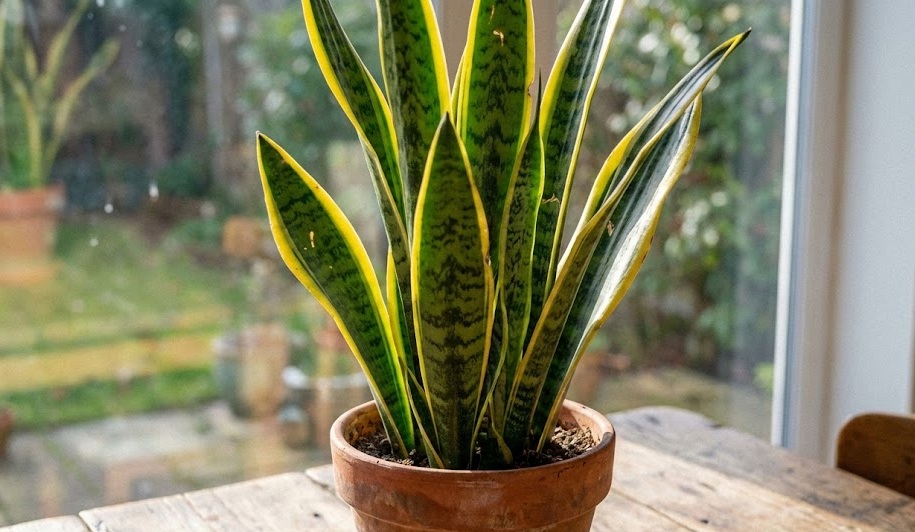
The first step in planting involves selecting a container that accommodates the current root mass with only a small amount of extra space. You should avoid the common mistake of choosing a pot that is too large, as this leads to “perched water tables” where moisture lingers far from the roots. A snug environment promotes a healthy density of roots and encourages the plant to focus its energy on upward leaf growth. This focused energy is what produces the tall, rigid blades that enthusiasts find so appealing in this specific variety.
As you prepare to plant, you must also consider the quality and composition of the soil medium you are using. You should aim for a mixture that mimics the well-draining soils of its natural habitat, which are often rocky or sandy. A blend of high-quality potting soil, perlite, and coarse sand in equal parts is often the gold standard for these types of succulents. This mixture ensures that air can reach the roots even after a thorough watering, which is vital for preventing the dreaded root rot.
Handling the plant during the process requires a gentle but firm touch to avoid damaging the delicate rhizomes. You will notice that the roots are often orange or bright white, and any snapping of these structures can invite pathogens into the plant’s system. It is best to perform your planting or propagation during the early spring when the plant is just entering its most active metabolic phase. This timing allows the plant to recover quickly and establish itself before the heat of summer or the cold of winter.
Soil preparation and potting techniques
Before you even touch the plant, you should have your soil mix ready and slightly moistened to ensure it settles evenly. You might find it helpful to pre-mix your components in a large bucket to ensure the perlite and sand are distributed throughout the medium. A professional tip is to avoid using garden soil from outdoors, as it often contains pests or pathogens that can devastate an indoor plant. Sterile, store-bought components are always the safest bet for high-value variegated specimens.
More articles on this topic
When you are ready to pot the plant, place a layer of the prepared mix at the bottom of the container. You should position the plant so that the top of the root ball sits about an inch below the rim of the pot. This space, known as “headroom,” allows you to water the plant thoroughly without the water spilling over the edges. Fill the space around the roots with more soil, pressing down gently but firmly to remove any large air pockets.
It is important to ensure that the plant is centered and standing perfectly upright during the potting process. You can use your fingers to stabilize the leaves while you add soil to the sides of the container. Once the pot is filled, you should not water the plant immediately, especially if you have had to trim any damaged roots. Giving the plant a few days to “callous” over any minor wounds prevents bacteria from entering the system through the fresh cuts.
The final touch in a professional potting job is to clean the exterior of the pot and the leaves of the plant. You want to make sure no soil is trapped between the leaf bases, as this can hold moisture and lead to crown rot. After a few days of rest in a shaded spot, you can give the plant its first light watering to settle the soil further. This methodical approach ensures that your variegated snake plant starts its new life in the best possible condition.
Propagation by division of rhizomes
Division is the most reliable method for propagating the variegated snake plant if you wish to maintain the beautiful yellow margins. You will notice that as the plant matures, it produces thick, horizontal underground stems called rhizomes from which new leaves grow. To divide the plant, you must remove the entire specimen from its pot and gently shake away the excess soil. Identifying the natural points where the rhizomes connect the different clusters of leaves is the key to a successful split.
More articles on this topic
Using a clean, sterilized knife or pruning shears, you should cut the rhizome between two established leaf clusters. You must ensure that each new division has its own set of roots and at least one healthy leaf, though two or three are better for stability. If the roots are tightly intertwined, you can use a gentle stream of water to help separate them without causing excessive breakage. This process might seem aggressive, but the plant is designed to handle this type of separation in the wild.
After making the cuts, you should leave the new divisions in a dry, shaded area for twenty-four to forty-eight hours. This allows the cut surface of the rhizome to dry out and form a protective scab, which is essential for preventing rot. You should then pot each division into its own small container using the same well-draining soil mix discussed previously. Treat these new plants as miniature versions of the parent, providing them with slightly more humidity but less direct light for the first few weeks.
The benefit of division is that the new plants are genetically identical to the parent, meaning they will retain the variegation. You will see that these divisions often grow faster than plants started from scratch because they already have an established root system. It is a rewarding way to expand your collection or create gifts for friends who appreciate architectural indoor plants. Success in division is a true mark of an experienced indoor gardener who understands plant anatomy.
Propagation through leaf cuttings
While leaf cuttings are a popular way to propagate many succulents, you must be aware of a specific quirk with variegated snake plants. If you take a leaf cutting from a variegated variety, the resulting new plant will almost always revert to a solid green color. You will lose the striking yellow margins because the variegation is held in the outer layers of the leaf which do not contribute to the new pup’s genetics. However, if you simply want more plants and don’t mind the loss of color, this is a very simple and productive method.
To start, select a healthy, mature leaf and cut it into several sections, each about three or four inches long. You must keep track of which end of the leaf was originally pointing down, as the sections will only grow roots if planted “right side up.” Just like with rhizome division, you should let these sections dry out for a few days until the cut ends feel firm and dry. This step is non-negotiable if you want to avoid the sections turning to mush in the soil.
Once calloused, insert the bottom inch of each section into a pot filled with moist sand or a very light seed-starting mix. You should keep the soil slightly more moist than you would for a mature plant, but never soggy. Place the container in a warm spot with bright, indirect light and wait for several months. Patience is required here, as it can take a long time for the leaf section to develop roots and eventually send up a new pup.
When the new pups emerge from the base of the cutting, they will look like miniature versions of the non-variegated species. You should wait until the pups are a few inches tall before separating them from the original leaf section. This method is a great way to practice your propagation skills and observe the fascinating way these plants regenerate. Even though the variegation is lost, the resulting plants are just as hardy and beneficial for your indoor air quality.
Aftercare for young plants and newly potted divisions
The first month after planting or propagating is a period of adjustment where the plant is vulnerable to environmental stress. You should avoid placing newly potted divisions in direct, harsh sunlight, as they do not yet have the root capacity to handle high transpiration rates. A bright spot with indirect light is perfect for encouraging root growth without scorching the foliage. You should also resist the temptation to fertilize the plant during this time, as the roots are not yet ready to process concentrated nutrients.
Watering should be done with extreme care during the establishment phase of a new plant. You should only water when the soil is completely dry, and even then, use a smaller amount than you would for a mature specimen. Overwatering a newly potted plant is the fastest way to kill it, as the damaged roots are highly susceptible to fungal infections. Think of this phase as a recovery period where “less is more” in terms of intervention.
You might notice that the leaves of a new division look slightly wrinkled or less turgid for a few weeks. This is normal as the plant redirects its internal water stores to support the development of new roots. You should not panic and pour on more water; instead, trust the plant’s natural resilience to pull through. Once you see a new leaf begin to emerge from the center, you can be confident that the plant has successfully established itself.
As the young plant matures, you can gradually move it into its permanent location and resume a standard care routine. You have successfully navigated the most difficult part of the plant’s journey, and now you can enjoy the fruits of your labor. Watching a small division grow into a majestic, variegated specimen is a testament to your skills as a professional grower. Proper planting and propagation are the skills that separate the amateur from the expert in the world of indoor gardening.

A critical technical point for those looking to propagate the variegated varieties of Sansevieria (now officially Dracaena) is that leaf cuttings will almost always result in a loss of the variegation. The new plantlets will emerge as solid green. To maintain those beautiful yellow margins, you must propagate via rhizome division. I recommend using a sterilized, sharp knife to separate the “pups” from the parent plant, ensuring that each division has at least one healthy leaf and a portion of the root system. Allowing the cut surface to callus for 24-48 hours before potting is essential to prevent fungal rot. This is the only reliable way to preserve the genetic chimera that produces the variegation.
I recently repotted my large variegated snake plant and I was shocked at how tight the roots were. I had to actually break the ceramic pot to get it out! I used a specialized succulent mix with extra pumice and perlite to ensure the drainage was top-notch. I’ve found that these plants actually seem to enjoy being a bit root-bound, but there comes a point where it’s just too much. How often do you recommend repotting for a healthy, growing specimen? Mine hadn’t been moved in about four years.
Four years is actually a very reasonable timeframe for a snake plant! I usually aim for every 3-5 years, depending on how many new pups the plant is producing. You’re right that they like being snug, and often they won’t even flower unless they are a bit tight in the pot. The breaking of the pot is a classic Sansevieria move—the rhizomes are incredibly powerful! For the next time, you might want to try a sturdy plastic nursery pot inside a decorative one. It makes it much easier to squeeze the pot and slide the plant out without any casualties.
When planting, I’ve found that a “heavy” pot is almost a requirement for the taller varieties like ‘Laurentii’. They can become very top-heavy and will easily tip over a light plastic pot. I usually go for a heavy terracotta or ceramic vessel. I also add a layer of decorative pebbles on the surface of the soil. This not only looks professional but also provides a little extra weight and keeps the foliage from touching the moist soil. It’s a small detail that really elevates the aesthetic of the plant.