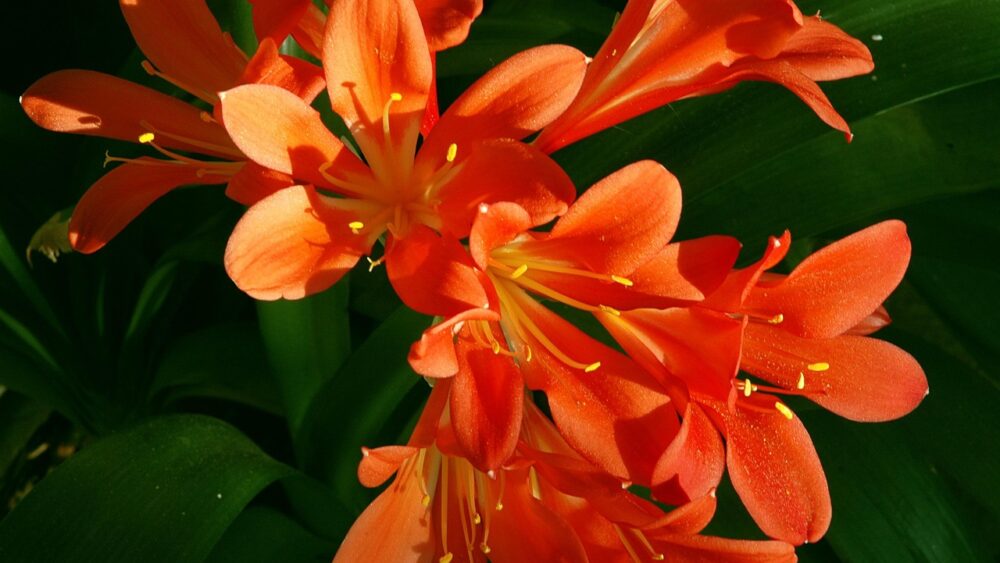
The clivia, with its vibrant, trumpet-shaped flowers and lush, dark green foliage, is a truly remarkable houseplant that can bring a touch of the extraordinary to any indoor space. Native to the woodlands of South Africa, this plant is cherished not only for its stunning beauty but also for its resilience and relatively low-maintenance nature. Unlike many other flowering houseplants, the clivia thrives in lower light conditions, making it an ideal candidate for areas of the home that might not be suitable for sun-loving species. Proper care is, however, essential to encourage its spectacular blooms and ensure its long-term health and vitality, transforming it from a simple green plant into a breathtaking floral display year after year.
Properly understanding the clivia’s natural habitat is the first step toward successful cultivation, as it provides crucial insights into its basic needs. In the wild, these plants grow on the forest floor, sheltered by the canopy of larger trees, which means they are accustomed to dappled sunlight rather than harsh, direct rays. This inherent preference for indirect light is a key factor to replicate in a home environment to prevent leaf scorch and stress. Furthermore, their root system, which consists of thick, fleshy roots, is designed to seek out moisture and nutrients in the loose, organic-rich soil of their native environment, a characteristic that heavily influences watering and potting requirements.
The life cycle of the clivia is another fascinating aspect that guides its care routine, particularly concerning its blooming period. These plants are known for their spectacular clusters of flowers that typically appear in late winter or early spring, providing a welcome burst of color during the colder months. This flowering is not a random occurrence but is instead triggered by a specific period of dormancy during the autumn and early winter. Providing the right conditions during this rest period, which involves cooler temperatures and reduced watering, is absolutely critical for stimulating the development of flower stalks.
Special tips for this topic
Finally, beyond its aesthetic appeal, the clivia is a plant with a rich history and cultural significance, having been cultivated for centuries. It was named in honor of Lady Charlotte Clive, Duchess of Northumberland, in the 19th century, and has since become a symbol of elegance and perseverance. Appreciating this heritage can add another layer of enjoyment to the process of caring for these magnificent plants. They are slow-growing and long-lived, often passed down through generations as a living heirloom, a testament to their enduring nature and the rewarding experience of their cultivation.
Understanding the clivia’s basic needs
To truly thrive, the clivia requires a thoughtful approach to its environment, starting with the selection of an appropriate location within the home. The ideal spot is one that receives bright, indirect light for most of the day, such as near an east-facing window where it can enjoy the gentle morning sun. Direct sunlight, especially during the intense afternoon hours from a south or west-facing window, should be strictly avoided as it can cause unsightly scorch marks on the broad, strap-like leaves. If the leaves start to develop yellow or brown patches, it’s a clear indication that the light is too intense, and the plant should be moved to a more shaded position immediately.
More articles on this topic
Temperature plays a vital role in the overall health and flowering cycle of the clivia. During its active growing season in the spring and summer, it prefers typical indoor temperatures ranging from 18 to 24 degrees Celsius. It is crucial to protect the plant from sudden temperature fluctuations and drafts from open windows, doors, or air conditioning vents, as these can cause significant stress. As autumn approaches, a period of cooler temperatures is necessary to initiate bud formation for the upcoming flowering season, a critical phase in its annual cycle.
The choice of potting medium is another fundamental aspect of clivia care, directly impacting the health of its robust root system. These plants demand excellent drainage to prevent the fleshy roots from succumbing to rot, which is one of the most common issues in their cultivation. A well-aerated, coarse potting mix is essential; a blend specifically formulated for orchids or a mix of high-quality potting soil, perlite, and pine bark is an excellent choice. This type of substrate allows water to pass through freely while retaining just enough moisture to keep the roots hydrated without becoming waterlogged.
Lastly, providing adequate air circulation around the plant helps to prevent the development of fungal diseases. While clivias are not overly demanding in terms of humidity, they do appreciate an environment that isn’t completely dry. Grouping them with other houseplants can help to create a more humid microclimate, but it’s important to ensure there is enough space between plants for air to move freely. Stagnant air can create a breeding ground for pests and diseases, so a location with gentle air movement is always beneficial for maintaining a healthy plant.
Light and location for optimal growth
Choosing the correct location for your clivia is arguably one of the most critical decisions for its long-term well-being and blooming potential. An east-facing window is often considered the gold standard, as it provides the plant with several hours of relatively gentle morning sunlight, which is not strong enough to burn the leaves. This exposure mimics the filtered light conditions of its native woodland habitat, encouraging robust growth without causing harm. A north-facing window can also be suitable, though the lower light levels may result in slower growth and potentially fewer flowers, so monitoring the plant’s progress is key.
More articles on this topic
If the only available locations receive more direct sun, such as a south or west-facing window, it is imperative to filter the light to protect the plant. This can be easily achieved by hanging a sheer curtain or placing the plant a few feet away from the window, effectively diffusing the intensity of the sun’s rays. The leaves of the clivia serve as a reliable indicator of light conditions; deep green leaves signify that the light levels are appropriate, whereas yellowish leaves or scorched brown spots are definitive signs of excessive light exposure. It’s a simple yet effective way to gauge the plant’s comfort.
During the summer months, many growers choose to move their clivias outdoors to a shaded patio or under the canopy of a large tree. This can be highly beneficial, providing the plant with improved air circulation and the natural, dappled light it loves, often resulting in more vigorous growth. When placing the plant outside, it is absolutely essential to ensure it is in a location that is protected from direct midday and afternoon sun at all times. Furthermore, the transition from indoors to outdoors, and back again in the autumn, should be done gradually over a week or two to prevent shock.
It is also important to consider the plant’s orientation to its light source for symmetrical growth. Clivia plants have a tendency to lean towards the light, which can result in a lopsided appearance over time. To encourage even, upright growth, it is a good practice to rotate the pot by a quarter turn every week or two. This simple action ensures that all sides of the plant receive equal light exposure, promoting a more balanced and aesthetically pleasing form with its elegant, arching leaves radiating uniformly from the center.
Watering practices for a healthy plant
Proper watering is a cornerstone of successful clivia care, and mastering the right technique is essential to avoid the common pitfall of root rot. The fundamental rule is to water thoroughly but infrequently, allowing the top two to three inches of the potting mix to dry out completely before watering again. This approach ensures that the thick, fleshy roots receive adequate moisture without being subjected to the constantly soggy conditions they detest. When you do water, do so generously until you see water draining freely from the bottom of the pot, which confirms that the entire root ball has been moistened.
The frequency of watering will naturally vary depending on several factors, including the time of year, the ambient temperature, the humidity level, and the size of the pot. During the active growing season of spring and summer, the plant will require more frequent watering as it is actively producing new leaves and, in the spring, flowers. Conversely, during the autumn and winter rest period, its water needs decrease significantly. During this crucial dormant phase, watering should be reduced to just enough to prevent the leaves from wilting, perhaps once every four to six weeks.
The type of water used can also have an impact on the plant’s health over the long term. Clivias can be sensitive to the chemicals, such as chlorine and fluoride, often found in tap water, as well as the buildup of mineral salts. Allowing tap water to sit out overnight before use can help some of the chlorine to dissipate. For best results, however, using filtered, distilled, or rainwater is the ideal choice, as it prevents the accumulation of potentially harmful salts in the soil that can burn the sensitive root tips and affect nutrient uptake.
Observing the plant itself is one of the best ways to determine its watering needs. The leaves will give you subtle clues; if they start to droop or lose their turgidity, the plant is likely thirsty. Another reliable method is to check the weight of the pot; a pot with dry soil will feel significantly lighter than one with moist soil. It’s always better to err on the side of underwatering rather than overwatering, as a clivia can recover much more easily from a period of dryness than it can from the devastating effects of root rot.
The importance of a winter rest period
The winter rest period is not merely a dormant phase for the clivia; it is an absolute prerequisite for inducing the spectacular floral display for which the plant is prized. This period of dormancy, typically lasting from October to January, is a critical part of its annual life cycle and directly stimulates the development of the flower stalk, or inflorescence. Without this dedicated time of cool, dry conditions, the plant will likely continue to produce lush foliage but will fail to bloom, which can be a source of great disappointment for any grower. Therefore, simulating this natural rest is essential for success.
To initiate the rest period, the plant must be moved to a location where it will experience cooler temperatures, ideally between 7 and 12 degrees Celsius. An unheated porch, a cool basement with a window, or a minimally heated guest room can serve as a perfect environment for this purpose. It is crucial that the temperature remains consistently cool but does not drop below freezing, as this could cause permanent damage to the plant. The location should still provide bright, indirect light, as the plant is not completely dormant and continues to photosynthesize, albeit at a much slower rate.
During this cooling period, watering must be drastically reduced. The soil should be allowed to become almost completely dry, and water should only be provided very sparingly, perhaps once a month or even less frequently, just enough to prevent the leaves from shriveling. This mimics the dry season in its native South African habitat and signals to the plant that it is time to prepare for flowering. Fertilizing should be completely stopped during this time, as feeding the plant would encourage vegetative growth and counteract the goal of inducing dormancy.
After approximately 12 to 14 weeks of this cool, dry treatment, you can begin to inspect the base of the plant, nestled between the central leaves, for the first sign of an emerging flower stalk. Once the tip of the bud becomes visible, it is the signal to end the dormancy period. At this point, you can move the plant back to its warmer growing location and gradually resume your regular watering schedule. This transition signals the plant that spring has arrived, prompting the flower stalk to elongate and the beautiful blooms to develop.
Feeding and fertilizing your clivia
Proper nutrition is key to supporting the clivia’s robust growth and vibrant flowering, but its needs are quite specific and change throughout the year. The primary feeding season coincides with its period of active growth, which typically runs from early spring, after the flowering cycle has finished, through to the end of summer. During this time, the plant is investing energy into producing new leaves and strengthening itself for the next year’s bloom. Providing a balanced supply of nutrients is essential to replenish the energy it expended during flowering and to build up reserves for the future.
A balanced, water-soluble fertilizer is the best choice for feeding your clivia. Look for a formulation where the N-P-K (nitrogen-phosphorus-potassium) ratio is relatively even, such as a 20-20-20, or one slightly higher in potassium to encourage strong root development and overall plant vigor. It is crucial to dilute the fertilizer to half the strength recommended on the packaging, as clivias have sensitive roots that can be easily burned by overly concentrated solutions. This diluted fertilizer should be applied approximately every two to four weeks during the active growing season.
The method of application is just as important as the choice of fertilizer. Always water the plant thoroughly with plain water before applying the fertilizer solution. Applying fertilizer to dry soil is a common mistake that can lead to severe root damage and chemical burn, as the roots absorb the concentrated salts too quickly. By watering first, you ensure the soil is moist, which helps to distribute the fertilizer evenly and allows the roots to absorb the nutrients more gently and effectively, preventing potential harm.
As summer comes to a close and autumn approaches, it is imperative to cease all fertilization. This signals to the plant that its growing season is ending and it is time to prepare for the crucial winter rest period. Continuing to fertilize into the autumn would encourage new, tender leaf growth at a time when the plant should be entering dormancy. This new growth would be susceptible to the cooler temperatures and would ultimately inhibit the plant’s ability to set flower buds for the following spring, undermining the entire purpose of the rest period.
Repotting and soil requirements
Repotting a clivia is an infrequent but necessary task, as these plants famously prefer to be somewhat root-bound and bloom best under such conditions. They have a slow-growing root system, and disturbing them too often can set back their flowering for a season or more. As a general rule, a mature clivia only needs to be repotted every three to five years, or when it becomes clear that the plant is excessively pot-bound. Signs that it’s time to repot include roots growing out of the drainage holes, the plant pushing itself up out of the pot, or water running straight through without seeming to moisten the soil.
The best time to repot a clivia is in the spring, immediately after it has finished flowering. This timing allows the plant the entire summer growing season to recover from the stress of repotting and establish its root system in the new container before it needs to prepare for its winter dormancy. Avoid repotting just before or during the flowering period, as the shock can cause the plant to drop its buds and flowers prematurely. The goal is to minimize stress and provide a smooth transition.
When selecting a new pot, choose one that is only slightly larger in diameter, typically just one to two inches wider than the current one. Moving a clivia into a pot that is too large is a common error that can lead to serious problems. The excessive volume of soil will retain too much moisture for too long, creating an environment that is highly conducive to root rot. A snug fit encourages a healthier root system and better blooming performance, so resisting the urge to ‘over-pot’ is crucial for the plant’s long-term health.
The process of repotting requires a gentle hand, as the thick, fleshy roots are quite brittle and can be easily damaged. Carefully remove the plant from its old pot, and gently tease apart any circling roots at the bottom of the root ball. Inspect the roots for any that are soft, mushy, or dark brown, which are signs of rot, and trim these away with a sterile knife or pruning shears. Place a layer of fresh, well-draining potting mix in the new pot and position the plant so that the top of the root ball sits about an inch below the rim. Fill in around the sides with more of the mix, firming it gently, and then water lightly to settle the soil.

Clivias are truly the royalty of low-light houseplants, but so many people struggle to get them to rebloom. The secret, as hinted at in the South African woodland origin, is the dry winter rest period. From roughly November to February, I completely stop watering my Clivias and move them to a cooler room, around 10 degrees Celsius. This mimics the natural seasonal cycle and triggers the development of the flower spike. If they stay in a warm, brightly lit room all year, they often remain strictly foliage plants. Once you see the flower stalk emerging in early spring, that is your cue to resume watering and feeding. It’s a patient person’s plant, but the reward is incomparable.
That winter rest period advice is absolutely essential, Beatrix! I made the mistake of pampering mine for three years with no flowers before I learned about the “tough love” approach. One thing I’d add is that they really don’t like to have their roots disturbed. I’ve found that they bloom much better when they are slightly pot-bound. When I finally had to repot mine, it took two years for it to settle back in and start flowering again. So, for anyone reading this, don’t rush to move your Clivia into a bigger container. Wait until the roots are literally pushing the plant out of the pot.
From a biological perspective, the dark green foliage of the Clivia miniata is an adaptation to the deep shade of its native canopy. This means that direct sunlight is actually quite damaging, causing unsightly scorch marks on the leaves that never fully heal. I always recommend a north-facing window or a spot several feet away from a bright south window. Furthermore, the sap of the Clivia contains small amounts of lycorine, making it mildly toxic. While it’s rarely fatal, it’s a good idea to keep these out of reach of curious pets or toddlers. Always wear gloves when dividing the fleshy roots if you have sensitive skin. It’s better to be safe while enjoying these stunning specimens.
Thank you so much for the warning about toxicity, Dr. Shao! I have two cats who love to nibble on anything green, so I’ll be moving my Clivia to a high shelf immediately. I hadn’t realized the sap was an irritant as well. Besides the safety aspect, I’ve noticed my leaves are getting a bit dusty. Is it safe to wipe them down with a damp cloth, or does that interfere with the leaf’s surface? I want to keep them looking glossy without causing any damage.
I have a Clivia that has been in my family for over twenty years, and it is remarkably hardy. One thing I’ve noticed is that they are very susceptible to mealybugs, which love to hide deep in the base of the strap-shaped leaves. I use a cotton swab dipped in rubbing alcohol to spot-treat any white, cottony spots as soon as I see them. If you let an infestation get out of control, it can be very difficult to reach the pests in those tight crevices. Regular inspection is the best defense for long-term health. It’s also worth mentioning that they appreciate a bit of humidity, especially in heated homes during the winter. A pebble tray underneath the pot can provide just enough moisture without rotting the roots.
Has anyone experimented with different types of potting media for Clivias? I’ve moved away from standard peat-based mixes to a chunkier bark and perlite blend, similar to what you might use for orchids. I felt that the traditional soil stayed too wet for too long, especially during the dormant season. Since switching, the root growth has been much more explosive and healthy. I also find that the bark allows for better aeration around the crown. It’s interesting how these plants can adapt, but finding that perfect substrate seems to be the key to longevity. I’d love to hear if others are using specialized mixes.