The care of the striped squill
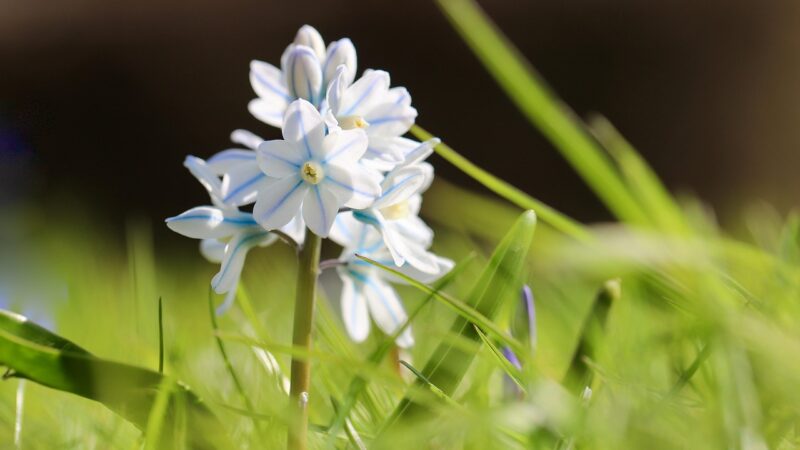
Striped squill, a delightful early spring bloomer, is a relatively low-maintenance bulb that brings a touch of delicate beauty to any garden setting. Its charming, pale blue to white flowers, each adorned with a distinct darker blue stripe, create a carpet of color when mass-planted. To ensure these gems thrive and return year after year, a fundamental understanding of their basic needs is essential. This involves providing the right soil conditions, appropriate moisture levels, and an optimal location that mimics their native, often woodland, habitat. Providing these core requirements will set the stage for a spectacular and reliable floral display. The plant’s adaptability makes it a forgiving choice for novice gardeners, yet its subtle elegance is appreciated by seasoned horticulturists alike. Successful cultivation hinges on appreciating its natural life cycle, from spring emergence to summer dormancy.
Proper care begins long before the first shoots appear, starting with the selection of a suitable planting site in the autumn. These bulbs flourish in a location that receives full sun to partial shade, a common characteristic of deciduous woodland environments where they would naturally receive ample sunlight before the tree canopy leafs out. The soil should be well-draining to prevent bulb rot, a common issue for many bulbous species. Amending heavy clay soils with organic matter like compost or leaf mold will significantly improve drainage and provide essential nutrients. This initial site preparation is arguably the most critical step in the long-term health and vigor of the striped squill colony.
Once established, striped squill requires minimal intervention, making it an ideal candidate for naturalizing in lawns, under trees, or in rock gardens. During their active growth and flowering period in the spring, they appreciate consistent moisture, but the soil should never become waterlogged. After the flowers fade, it is crucial to allow the foliage to die back naturally. This period is when the bulb replenishes its energy stores for the following year’s bloom, so cutting the leaves prematurely can severely weaken the plant and reduce future flowering. This patient approach is a cornerstone of successful bulb cultivation.
Over time, striped squill clumps will expand, creating denser and more impressive displays. While they are not aggressive spreaders, they will gently multiply through the production of offset bulbs. This natural expansion is a sign of a healthy, thriving colony. For the most part, care is a matter of providing the right conditions initially and then allowing the plants to follow their natural rhythm with minimal disturbance. This hands-off approach allows them to establish a permanent and cherished presence in the early spring garden landscape.
Soil preparation and improvement
The foundation for a thriving stand of striped squill lies in the soil. These bulbs are not overly demanding, but they have a clear preference for soil that is fertile and, most importantly, well-draining. Poor drainage is the primary adversary of bulb health, leading to waterlogged conditions that promote fungal diseases and bulb rot. Before planting, it is highly recommended to assess the soil structure. If the soil is heavy clay, which retains excessive moisture, incorporating organic amendments is a non-negotiable step for long-term success.
More articles on this topic
To improve heavy soil, generously work in materials such as well-rotted compost, leaf mold, or coarse horticultural sand. These amendments help to create air pockets within the soil, allowing excess water to drain away from the bulbs’ root zone. The ideal soil pH for striped squill is in the neutral to slightly acidic range, approximately 6.0 to 7.0. Most garden soils fall within this range, but a simple soil test can provide valuable information if there are concerns. The goal is to create a loose, friable soil structure that allows roots to penetrate easily and access water and nutrients without being suffocated.
For gardeners with naturally sandy or loamy soils, less preparation is typically required. These soil types generally offer the excellent drainage that striped squill prefers. However, even in these ideal conditions, adding a layer of compost at planting time is beneficial. This not only provides a slow-release source of essential nutrients but also helps to improve the soil’s ability to retain just the right amount of moisture, preventing it from drying out too quickly during the crucial spring growth period.
Ultimately, the effort invested in soil preparation before planting pays dividends for years to come. A well-prepared bed will support a robust and multiplying colony of striped squill that requires very little ongoing maintenance. It ensures the bulbs have the perfect environment to establish a strong root system, which is vital for absorbing the necessary resources to produce their beautiful spring flowers. Neglecting this initial step can lead to disappointing performance and the gradual decline of the planting.
Location and light conditions
Choosing the right location is paramount for the successful cultivation of striped squill. These plants originate from habitats such as alpine meadows and the edges of woodlands, which informs their light preferences. They perform best in a position that receives full sun to partial shade. The “full sun” aspect is particularly relevant for their early spring growth period, as they often emerge and flower before deciduous trees and shrubs have fully developed their leaves. This allows them to capitalize on the available sunlight to fuel their growth and flowering.
More articles on this topic
An ideal scenario is planting them underneath deciduous trees or among shrubs. In early spring, this area is bathed in sunlight, providing the bulbs with the energy they need. As spring progresses and the canopy above fills in, the resulting shade helps to keep the soil cool and moist as the bulbs enter their summer dormancy phase. This mimics their natural woodland edge environment perfectly. Planting in a location that is in deep shade year-round will result in poor growth and a significant reduction in flowering.
When considering a spot in a border or rock garden, think about the sun’s path throughout the day. A location that receives morning sun and some afternoon shade is often perfect. The intense heat of the late afternoon sun can sometimes be too stressful, particularly in warmer climates, potentially causing the foliage to yellow prematurely. However, in cooler regions, they can tolerate full sun exposure throughout their growing season without issue, provided the soil remains adequately moist.
Avoid planting striped squill in waterlogged or boggy areas of the garden. While they appreciate moisture during their growth phase, their bulbs are susceptible to rot if the soil remains saturated for extended periods. Similarly, avoid areas that become extremely dry and baked in the summer sun, as this can desiccate the dormant bulbs. A thoughtful choice of location is a one-time decision that will ensure the plants’ happiness and longevity for many seasons.
Post-flowering care
The period immediately following the bloom is a critical phase in the life cycle of the striped squill, and proper care during this time directly impacts the quality of the following year’s display. Once the delicate, star-shaped flowers have faded, it is of utmost importance to resist the temptation to tidy up by cutting back the foliage. The leaves, though they may start to look a bit untidy as they yellow, are performing the vital function of photosynthesis. They are actively creating and storing energy in the bulb, which will fuel the emergence and flowering of the plant next spring.
Allow the foliage to remain on the plant until it has completely yellowed and withered on its own. This process can take several weeks, but it is a natural and necessary part of the bulb’s rejuvenation cycle. Prematurely removing the leaves, either by cutting or braiding them, effectively starves the bulb and will lead to diminished vigor and fewer, smaller flowers in subsequent years. Once the leaves have died back completely, they can be gently raked or pulled away without harming the dormant bulb below the soil surface.
During this post-flowering period, it is also beneficial to ensure the soil does not become completely bone dry, though watering can be reduced significantly compared to the active growth phase. Light spring rains are often sufficient to provide the necessary moisture. This is also an opportune moment to apply a light feeding, which can further assist the bulb in its energy storage process. A balanced, low-nitrogen fertilizer or a top-dressing of bone meal can be gently worked into the soil surface around the plants.
Once the foliage has fully died back, the striped squill enters its summer dormancy period. During this time, it requires no active care. The bulbs will rest beneath the soil, awaiting the cooler temperatures of autumn to begin root development anew. This hands-off approach during summer is ideal for low-maintenance garden designs, as the space can be occupied by later-emerging perennials or annuals that will mask the area where the bulbs are dormant.
Division and rejuvenation
Over several years, a single planting of striped squill will mature into a dense clump through the formation of new offset bulbs. While this creates a wonderfully full and impactful display, there may come a time when the clump becomes overcrowded. This overcrowding can lead to increased competition for resources such as water and nutrients, which may eventually result in a decline in the size and number of flowers produced by each bulb. This is a natural signal that it is time to divide the clump to rejuvenate the planting.
The best time to divide striped squill is in late summer or early autumn, after the foliage has completely died back and the bulbs are fully dormant. This timing allows the newly separated bulbs to establish their root systems before the ground freezes, giving them a strong start for the following spring. To divide a clump, carefully lift the entire mass from the ground using a garden fork, taking care to dig wide and deep enough to avoid damaging the bulbs.
Once the clump is lifted, gently crumble the soil away from the bulbs with your hands. You will see that the original bulbs have produced many smaller offset bulbs attached to them. These offsets can be carefully teased apart from the parent bulbs. Discard any bulbs that appear soft, diseased, or damaged. The goal is to have a collection of healthy, firm individual bulbs ready for replanting.
Replant the divided bulbs immediately to prevent them from drying out. They can be planted back in the same area after enriching the soil with some fresh compost, or they can be used to start new colonies in other parts of the garden. Plant them at the same depth as before, typically around 8-10 centimeters deep, and space them several centimeters apart to allow room for future growth. Water the newly planted bulbs well to settle the soil around them and encourage new root development. This simple process of division not only invigorates the original planting but also provides a sustainable way to increase your stock of these charming spring flowers.
Pest and disease management
Fortunately, striped squill is a relatively robust and trouble-free plant, not often bothered by significant pest or disease problems. Its resilience is one of the qualities that makes it such a popular choice for low-maintenance gardens. However, like any plant, it is not entirely immune, and being aware of potential issues can help in maintaining a healthy collection. The most common problems are typically related to environmental conditions rather than specific pathogens or insects.
The primary threat to striped squill health is bulb rot, which is a direct consequence of poor drainage and excessively wet soil. Fungal pathogens thrive in waterlogged conditions and can cause the bulbs to turn soft and mushy, leading to the collapse of the plant. Prevention is the best cure; ensuring the bulbs are planted in well-draining soil from the outset is the most effective strategy. If bulb rot is suspected, it is best to lift the affected bulbs and discard them to prevent the fungus from spreading to healthy neighbors.
In terms of pests, slugs and snails can sometimes be a nuisance during the early spring when the tender new foliage is emerging. They can chew holes in the leaves and occasionally damage the flowers, detracting from the plant’s appearance. These can be managed through various methods, including beer traps, crushed eggshells or diatomaceous earth barriers around the planting, or simply by hand-picking them off the plants during damp evenings when they are most active.
Rodents such as squirrels, chipmunks, and voles can also occasionally cause problems. They may dig up and eat the bulbs, particularly soon after they have been planted in the autumn. To deter them, some gardeners find success in planting the bulbs in wire cages or by interplanting them with other bulbs that are known to be rodent-resistant, such as daffodils (Narcissus) or fritillaries (Fritillaria). In most cases, however, striped squill is not a primary food source for these animals and significant damage is rare.
Companion planting strategies
Striped squill’s early blooming season and relatively small stature make it an excellent companion for a wide variety of other plants in the garden. Its ephemeral nature, where the foliage dies back by early summer, means it can share space with later-emerging perennials without competition. Thoughtful companion planting can create a seamless and long-lasting display of interest, extending the season of color and texture in a garden bed. This layering of plants is a key principle of sophisticated garden design.
An excellent strategy is to plant striped squill among groundcover plants that will fill in the space as the bulbs go dormant. Perennials like creeping phlox (Phlox subulata), vinca minor, or ajuga provide a green carpet that suppresses weeds and offers a beautiful backdrop for the squill’s delicate flowers. The groundcover’s foliage will then take center stage after the squill has finished its display, ensuring the area does not look bare during the summer months. This creates a living mulch that also helps to keep the soil cool and moist for the dormant bulbs.
Pairing striped squill with other early-spring-blooming bulbs creates a vibrant and varied tapestry of color. They combine beautifully with snowdrops (Galanthus), crocuses, winter aconites (Eranthis hyemalis), and early-blooming dwarf irises (Iris reticulata). Planting these bulbs together in drifts or clusters results in a naturalistic and dynamic display. The contrasting colors and forms—the pure white of snowdrops, the rich purples and yellows of crocuses, and the pale blue of the squill—work in harmony to celebrate the arrival of spring.
For a longer succession of blooms, interplant striped squill with mid-to-late spring flowering bulbs like daffodils, tulips, and grape hyacinths (Muscari). The squill will provide the first wave of color, fading just as the larger bulbs begin their show. They can also be planted at the base of early-flowering shrubs such as forsythia or magnolia, where their cool blue tones provide a stunning contrast to the warmer yellows and pinks of the woody plants above. This multi-layered approach to planting ensures continuous interest from the very first days of spring through to the beginning of summer.