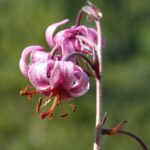
Pruning and cutting back the regal pelargonium

Pruning is a fundamental horticultural practice that extends far beyond the simple act of making a plant smaller; for the regal pelargonium, it is an essential technique for promoting robust health, encouraging a desirable shape, and, most importantly, stimulating the production of flowers for the following season. When you strategically cut back the stems, you are sending a signal to the plant to redirect its energy from simply growing longer to producing new lateral (side) shoots from the nodes below the cut. This process is what transforms a potentially tall and spindly plant into one that is compact, bushy, and full of life.
One of the primary goals of pruning is to prevent the plant from becoming “leggy,” a term used to describe a plant with long, bare stems and foliage concentrated only at the very top. This is a natural tendency for unpruned pelargoniums. A regular pruning regimen encourages branching lower down on the plant’s framework, resulting in a much fuller and more aesthetically pleasing appearance. A dense, well-branched structure provides more sites for potential flower development, leading to a more spectacular overall display when the plant comes into bloom.
Critically, pruning plays a direct role in the flowering cycle of the regal pelargonium. These plants develop their flower buds on mature wood that has grown and hardened during the previous season. By cutting the plant back after it flowers, you stimulate the growth of numerous new stems over the late summer and autumn. It is these new stems that will mature over the winter and carry the flower buds for the next spring’s show. Therefore, pruning is not about removing potential flowers but is instead the very process that creates the new growth on which future flowers will form.
Beyond shaping the plant and promoting blooms, pruning also serves a vital role in maintaining its health. Removing excess growth from the center of the plant opens up its structure, which significantly improves air circulation among the leaves and stems. This increased airflow helps the foliage to dry more quickly after watering and reduces humidity within the plant’s canopy. These conditions are much less favorable for the development of common fungal diseases like botrytis (grey mould), making a well-pruned plant a healthier plant.
Timing the prune correctly
The single most important rule in pruning regal pelargoniums relates to timing: the major, structural pruning must be done after the plant has completed its main flowering cycle. This typically falls in the late summer or early autumn. This timing is absolutely crucial because it allows the plant sufficient time to produce a new flush of growth before it enters its winter dormancy. These new stems will then mature during the cool overwintering period and will be primed to produce flower buds for the following spring.
More articles on this topic
A common and costly mistake made by inexperienced growers is to prune the plant hard in the spring. While this might seem intuitive as a way to “tidy up” the plant before the growing season, it is the worst possible time to do it. The flower buds for the upcoming season have already formed on the old stems during the winter. Pruning the plant in the spring means you are literally cutting off all of the season’s potential flowers, resulting in a healthy green plant that will produce no blooms. The only cutting that should be done in spring is the removal of any dead or clearly damaged stems.
Throughout the blooming season, you can and should practice a different kind of pruning known as “deadheading.” This is the simple process of removing flower clusters as soon as they begin to fade and look untidy. By removing these spent blooms, you prevent the plant from wasting energy on developing seeds and instead encourage it to channel that energy into producing new flower buds. Consistent deadheading can help to extend the flowering period and keeps the plant looking neat and attractive.
While major pruning is reserved for the autumn, a light “pinching” can be done in the very early spring, just as new growth is starting to emerge but well before flower buds are visible. Pinching involves using your fingertips to remove the very tip of a new growing shoot. This can be a useful technique to encourage even more branching on a young plant or on a stem that looks like it might become too long. However, this should be done sparingly and with caution, as excessive pinching in the spring can delay flowering.
Essential pruning techniques
The quality of your pruning cuts depends heavily on the tools you use. It is essential to use a pair of clean and very sharp bypass-style secateurs or pruning shears. Bypass pruners have two curved blades that pass by each other like a pair of scissors, which makes a clean, precise cut without crushing the plant’s stem tissue. Anvil-style pruners, which have a single blade that closes onto a flat surface, can crush the stem, damaging the plant’s vascular system and creating a wound that is more susceptible to disease. Always sterilize your tools with rubbing alcohol before you begin.
More articles on this topic
When performing the main autumn prune, the general rule of thumb is to cut the plant back by approximately one-third to one-half of its current size. The goal is to create a strong, compact framework of stems that will support the next season’s growth. Step back and look at the overall shape of the plant, and then begin to selectively shorten the main stems. Don’t be timid; this “hard prune” may look severe at first, but it is necessary to rejuvenate the plant and ensure a bushy habit.
Every cut should be made strategically, just above a leaf node. A node is the small, slightly swollen point on a stem where a leaf is or was attached. This is where dormant buds are located, and making your cut about 0.5 cm (1/4 inch) above a node will encourage a new shoot to grow from that point. It is often best to make the cut just above an outward-facing node, as this will encourage the new branch to grow outwards, helping to open up the center of the plant rather than creating congested, inward-growing branches.
During the pruning process, take the opportunity to perform some general maintenance and thinning. Inspect the plant thoroughly and remove any stems that are dead, weak, or show any signs of disease. You should also prune out any branches that are crossing over each other or growing towards the center of the plant. The objective of this thinning is to create a more open structure that allows light and air to penetrate all parts of the plant, which contributes significantly to its overall health and vigor.
📷Velq1958, CC BY-SA 3.0, via Wikimedia Commons