Pruning and cutting back siberian squill is a simple but important part of maintaining a tidy and healthy spring garden. Unlike larger shrubs or perennials, these small bulbs require very little actual cutting to look their best. The most important rule to remember is that the plant’s leaves are its source of life and energy for the future. You should approach pruning with patience and a focus on the long-term health of the bulbs hidden underground.
Managing the post bloom phase
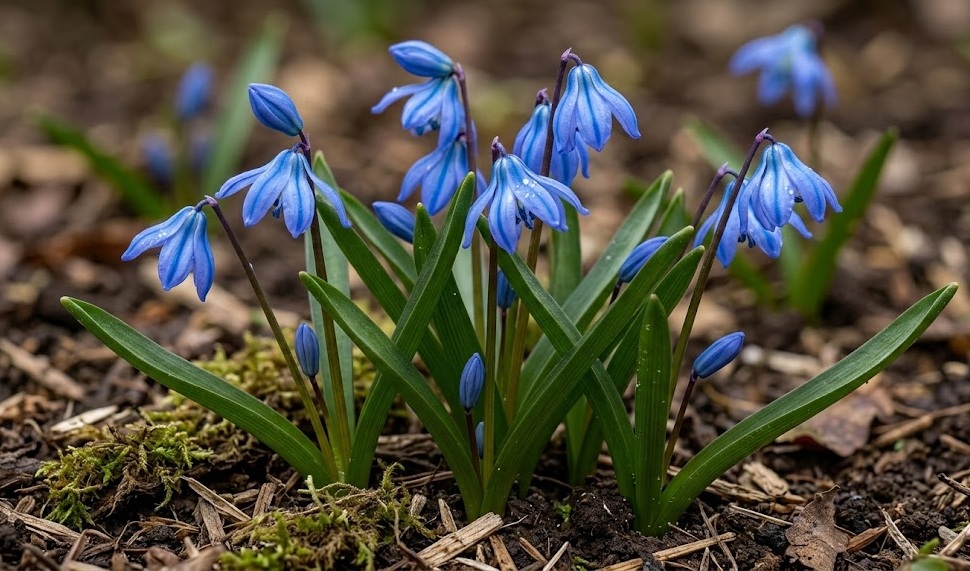
Once the vibrant blue flowers of the siberian squill begin to fade, you might be tempted to cut the stems back immediately. However, it is better to wait until the flower stalks have completely dried up and turned brown before removing them. If you don’t want the plants to self-seed, you can snip off the developing seed pods as soon as the petals fall. This process, known as deadheading, directs more of the plant’s energy back into the bulb rather than into seed production.
Removing the spent flower stems helps to keep the garden looking neat and prevents the formation of messy, decaying stalks. Use a pair of sharp, clean garden scissors to make clean cuts near the base of the stem, being careful not to damage the leaves. If you have a very large naturalized area, you can simply let the stems collapse and decompose on their own. In a more formal garden bed, a quick cleanup can make a big difference in the overall appearance.
If you are hoping to see your squill population spread and multiply, you should avoid deadheading the flowers entirely. Allowing the seed pods to mature and burst open is essential for the naturalization process that many gardeners desire. The seeds will fall to the ground and eventually grow into new plants, creating a larger and more impressive display each year. You have to decide between a perfectly tidy garden and a more natural, expanding population of blue flowers.
Whatever you decide regarding the flower stems, the most critical thing is to leave the green foliage untouched during this stage. The leaves are the “powerhouse” of the plant, capturing sunlight and converting it into stored energy for the next spring. Cutting them back while they are still green will significantly weaken the bulb and may even kill it over time. Patience is the most valuable tool for a gardener during this transitional period in the spring season.
More articles on this topic
The importance of leaf preservation
The green leaves of the siberian squill should be allowed to remain on the plant until they have completely turned yellow or brown. This yellowing process is a sign that the plant has successfully moved all its nutrients from the foliage back down into the bulb. It usually takes several weeks after the flowers have disappeared for the leaves to finish their work and enter dormancy. You can think of this time as the bulb’s “recharging” phase, which is vital for its long-term survival.
If you find the yellowing foliage unsightly, you can try to hide it by planting later-emerging perennials nearby. Plants like hostas, daylilies, or hardy geraniums have large leaves that will naturally cover the fading squill as they grow. This “masking” technique allows you to keep your garden looking beautiful without harming the health of your spring bulbs. It is a much better solution than cutting the leaves too early or tying them into knots, which can also be harmful.
Never pull the leaves off the plant until they come away easily with a very gentle tug from your hand. If there is any resistance, it means the plant is still drawing nutrients from that leaf and is not ready to let go. Once the leaves are completely dry and “straw-like,” they can be easily raked up or removed by hand. This final cleanup marks the end of the plant’s active season and the beginning of its summer dormancy period.
If you accidentally mow over the leaves before they have turned yellow, don’t panic, but try to avoid making it a habit. A single early cutting might not kill a healthy bulb, but repeated stress will definitely reduce the number and size of the flowers. In areas where squill is growing in the lawn, wait until the foliage has completely died back before the first mowing of the season. This careful management ensures that your blue lawn return year after year with even more vigor.
More articles on this topic
Seasonal cleanup and garden hygiene
After the foliage has been removed, the area where the siberian squill was growing can be lightly tidied and mulched. Removing the dead leaves helps to prevent the buildup of pests or diseases that might overwinter in the organic debris. You can add a thin layer of fresh compost or bark to the soil surface to keep it looking neat and well-maintained. This simple autumn cleanup prepares the ground for the next cycle of growth that will begin in just a few months.
If you are planning to move or divide your bulbs, the best time to do so is just as the foliage is finishing its yellowing phase. This allows you to see exactly where the bulbs are located while they are still connected to the visible remains of the plant. Dig them up carefully, perform your divisions, and replant them immediately at the same depth they were before. This is the only time of year when “pruning” involves the actual root and bulb structure of the colony.
Keep your garden tools clean and sharp throughout the pruning and cleanup process to ensure the best results for your plants. Dull scissors can crush the stems and create ragged wounds that are more susceptible to infection by various pathogens. A quick wipe with a disinfectant between different patches of bulbs is also a good practice for maintaining overall garden hygiene. These small details contribute to the long-term success and health of your entire ornamental landscape.
In summary, the most important part of pruning siberian squill is knowing when to stop and leave the plant alone. Focus on removing spent flower stems if you want a tidy look, but always prioritize the health of the green leaves. By following these simple professional guidelines, you will ensure that your siberian squill remains a highlight of your garden every spring. Let the natural cycle of the plant guide your gardening tasks for the most beautiful and sustainable results.