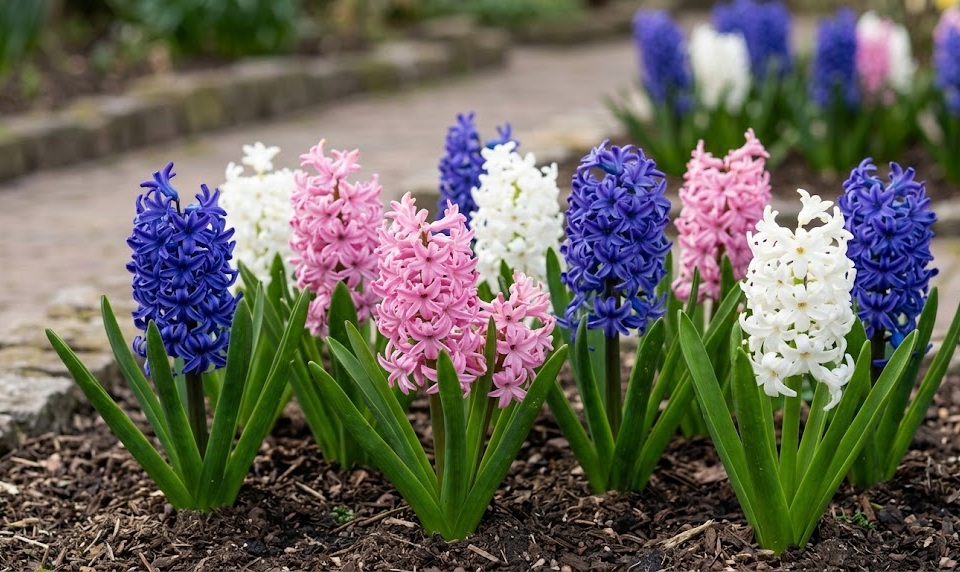
The practice of pruning and cutting back hyacinths is an essential skill that focuses on directing the plant’s energy and maintaining a clean, professional aesthetic. Unlike woody shrubs, these bulbous perennials require a different approach that respects their unique energy storage and dormancy cycles. Knowing exactly when and how to remove spent flowers and fading foliage can make the difference between a declining collection and one that thrives for many years. Professional horticulturalists use specific techniques to ensure that every cut supports the long-term vitality of the bulb. By following these expert guidelines, you can keep your spring garden looking its best while preparing for future success.
The first phase of the pruning process begins as soon as the individual florets on the flower spike start to wither and turn brown. This is known as “deadheading,” and its primary purpose is to prevent the plant from wasting energy on seed production. When a hyacinth produces seeds, it diverts valuable carbohydrates away from the bulb, which can lead to smaller flowers in the subsequent season. To deadhead properly, you should use a sharp pair of shears to snip off the entire flower stalk near its base, being careful not to damage the surrounding leaves.
Deadheading also significantly improves the visual quality of the garden by removing decaying organic matter that can detract from the overall display. A spent flower spike can become a breeding ground for gray mold or other fungal pathogens, especially during a damp spring. By removing these old stalks promptly, you maintain a professional standard of garden hygiene and reduce the need for chemical fungicides. This simple task is one of the most effective ways to keep your garden looking fresh and well-maintained throughout the season.
It is important to emphasize that you should only remove the flower stalk at this stage and leave all the green foliage intact. The leaves are the primary “engine” of the plant, responsible for capturing sunlight and converting it into the energy stores needed for the bulb. Cutting back the leaves too early is one of the most common mistakes made by novice gardeners and will inevitably lead to a decline in plant health. A professional approach requires the patience to let the natural biological processes of the plant run their full course.
As you work through your garden beds, always ensure that your pruning tools are clean and sharp to prevent the spread of diseases. A ragged cut can take longer to heal and provides an easy entry point for bacteria or fungi that could harm the bulb. Wiping your blades with a disinfectant between plants is a professional habit that protects your entire collection from accidental contamination. Maintaining your equipment is just as important as the actual work of pruning when it comes to achieving high-quality results.
More articles on this topic
Managing the transition to dormancy
As the spring progresses into early summer, you will notice the hyacinth foliage starting to turn yellow and eventually brown. This color change indicates that the plant has finished its energy-storage phase and is moving the remaining nutrients back into the underground bulb. You should resist the urge to tidy up the garden by cutting these yellowing leaves, as they are still providing some benefit to the plant. Only when the foliage is completely dry, brittle, and can be easily pulled away with a gentle tug should it be removed.
If you find the sight of yellowing leaves unattractive, there are professional design strategies you can use to hide them without harming the bulbs. Planting hyacinths among “inter-planting” species like hostas, ferns, or late-blooming perennials can provide a natural screen for the fading foliage. As the later plants grow and expand their leaves, they will naturally cover the dormant hyacinths, keeping the garden looking lush and green. This layered approach to garden design is a hallmark of professional landscape planning and maintenance.
Removing the dried foliage is a satisfying task that marks the final step in the hyacinth’s active yearly cycle. At this stage, the leaves are no longer attached to the bulb’s living tissue and can be cleared away to make room for summer plantings or to tidy the bed for mulch. You can compost this material if it is free from diseases, returning the organic matter to the garden ecosystem in a different form. A clean, well-prepped bed is the perfect foundation for the next stage of your garden’s seasonal evolution.
Sometimes, you may notice that some leaves are diseased or heavily infested with pests even before they naturally die back. In these specific cases, a professional judgment must be made to remove the affected tissue to protect the rest of the plant. If the damage is localized, you can prune away just the infected parts, but if the whole leaf is compromised, it is often better to remove it entirely. This “sanitary pruning” is an exception to the rule of leaving foliage intact and is a vital part of integrated pest management.
More articles on this topic
Specialized techniques for container-grown plants
Container-grown hyacinths require a slightly more focused approach to pruning because of the limited space and resources available to them. Because the bulbs are in a more controlled environment, you can often deadhead them with even greater precision to maintain a pristine appearance. For indoor displays, removing the spent flower spike as soon as it loses its beauty is essential for keeping the arrangement looking professional. This also prevents the messy drop of old florets onto furniture or flooring, maintaining a clean indoor environment.
If you plan to transition your container bulbs to the garden for the following year, the care of the foliage becomes even more critical. Keep the pots in a bright, sunny location after the flowers are gone and continue to water and lightly fertilize them until the leaves die back naturally. This ensures the bulbs have every opportunity to recharge their energy stores despite the constraints of the container. Professional horticulturists often move these “recharging” pots to a less visible part of the nursery or garden while the process takes place.
When it comes time to cut back the foliage on container plants, you should also take the opportunity to inspect the soil surface for any signs of pests or moss. Cleaning the top layer of soil and removing any debris helps maintain the health of the dormant bulbs during their rest period. If the bulbs have become too crowded for the pot, you can also plan to lift and divide them at this stage. Professional container gardening involves this holistic approach to maintenance, where pruning is just one part of a larger care routine.
Finally, remember that the goal of all pruning and cutting back is to support the natural lifecycle of the hyacinth. By working with the plant’s biology rather than against it, you ensure a sustainable and beautiful garden for years to come. Every cut you make should be purposeful and informed by a professional understanding of how the plant responds to its environment. With these techniques, your hyacinths will continue to be a highlight of your spring garden, year after year.