Proper pruning techniques are essential for maintaining the aesthetic appeal and biological vigor of these unique spring perennials. While they do not require the extensive structural pruning of woody shrubs, the timely removal of spent tissues and damaged foliage is a key part of professional care. These actions help prevent the spread of disease, encourage the plant to focus its energy on vital functions, and keep the garden looking tidy throughout the growing season. Understanding when and how to intervene with your garden shears is a fundamental skill for any dedicated horticulturist.
Deadheading benefits and timing
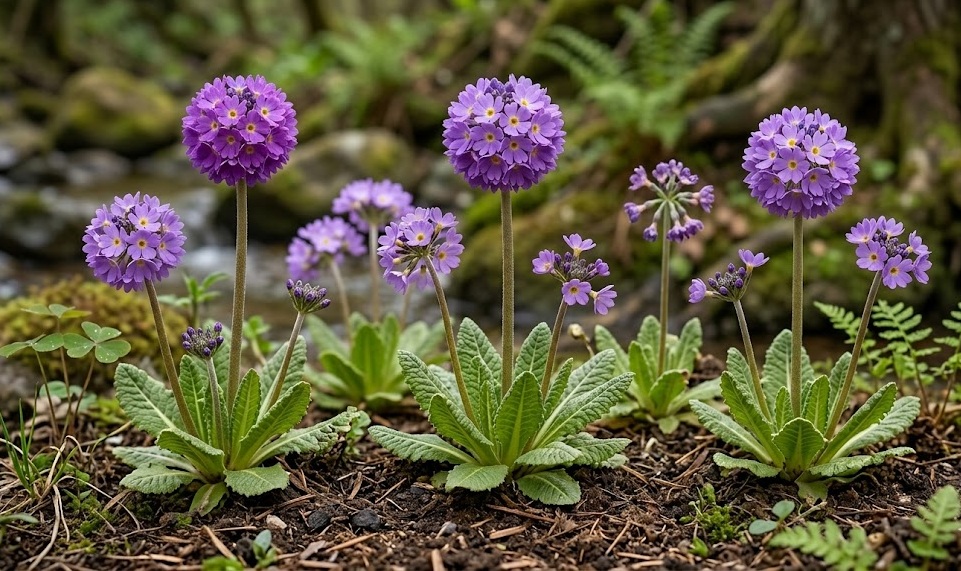
The process of removing spent flower stalks, commonly known as deadheading, is the most important pruning task for this species during the spring and early summer. Once the vibrant globe-shaped flower heads begin to brown and lose their luster, they should be cut back as close to the base of the plant as possible. This prevents the plant from dedicating its limited resources to seed production, which can be an exhausting process for a perennial. A professional approach to deadheading ensures that the plant redirects that saved energy back into its roots and the following year’s flower buds.
Deadheading also significantly improves the visual quality of the plant as it transitions from its blooming phase into its role as a foliage perennial. The sturdy stalks that once held the impressive flowers can look quite ragged as they wither, detracting from the lush green rosettes of leaves. By removing them promptly, you maintain a clean and professional appearance in your garden beds. It is important to use sharp, clean tools to make these cuts, as tearing the stalks can create ragged wounds that are more susceptible to infection.
If you wish to allow the plant to self-seed, you can leave a few of the best-looking flower heads to mature, but be aware that this may reduce the vigor of the parent clump over time. Most professional gardeners prefer to control the propagation themselves through division or deliberate seed collection, allowing the main plants to remain as strong as possible. Deadheading also provides a good opportunity to inspect the center of the crown for any hidden pests like slugs or signs of early-season rot. This close attention to detail is what defines a professional level of garden maintenance.
Regularly walking through the garden and performing these small pruning tasks keeps the workload manageable and ensures that no plant is left in a state of decline for long. It is a satisfying way to interact with your collection and stay informed about the health of each individual specimen. The timing of deadheading will vary depending on the local weather and the specific variety you are growing, but the general rule is to act as soon as the decorative value of the bloom has passed. By following this simple professional rhythm, you support the long-term productivity and health of your drumstick primulas.
More articles on this topic
Post-bloom foliage management
As the summer progresses, the large, crinkled leaves of the drumstick primula may begin to look tired or suffer from minor damage due to insects or environmental stress. While the leaves are the plant’s primary source of energy through photosynthesis, removing those that are significantly yellowed, diseased, or shredded is a professional way to keep the plant healthy. This thinning allows for better air circulation around the crown, which is essential for preventing fungal issues during the humid months. Always ensure that you leave enough healthy green foliage to support the plant’s metabolic needs.
In some cases, the entire outer ring of leaves may naturally decline as the plant focuses on newer growth at the center of the rosette. This “self-cleaning” behavior is normal, but manually removing the old, decaying leaves prevents them from becoming a breeding ground for slugs or mold. When cutting back the foliage, be careful not to damage the emerging leaves or the central growing point of the plant. A gentle touch and a professional eye for the plant’s structure will ensure that your pruning always benefits the specimen’s overall development.
If a plant has suffered a severe attack from pests or a period of extreme drought, it may be tempted to cut the whole plant back to the ground to “start over.” While primulas are resilient, this drastic measure should be used with caution and only as a last resort in a professional setting. It is usually better to remove only the most damaged parts and provide extra water and shade to help the plant recover naturally. Observation over the following weeks will tell you if your conservative pruning approach was successful or if further action is needed.
In the autumn, as the plant enters its natural decline toward dormancy, the pruning tasks shift toward cleaning up for the winter. This process, as discussed in the overwintering section, involves removing all the dead foliage once it has completely withered. Professional gardeners view this as the final pruning task of the year, preparing the site for a clean start in the spring. By managing the foliage consistently throughout the year, you ensure that your drumstick primulas remain a beautiful and healthy part of your landscape from start to finish.
More articles on this topic
Tool sterilization and technique
The quality of the tools you use and the way you maintain them are just as important as the pruning itself when it comes to professional horticulture. Using dull blades can crush the plant tissues rather than cutting them cleanly, which slows down the healing process and increases the risk of disease. Regularly sharpening your bypass pruners or garden scissors ensures that every cut is smooth and precise, which is much better for the long-term health of the primula. Investing in a high-quality set of tools is a hallmark of a professional approach to gardening.
Sterilizing your tools between plants is a critical step that is often overlooked by casual gardeners but is standard practice in a professional environment. Many plant diseases, especially viral and bacterial infections, can be easily spread through the sap left on the blades of your pruners. A quick dip or spray with a disinfectant like seventy-percent isopropyl alcohol is all it takes to keep your collection safe. This simple habit can save your entire garden from a widespread outbreak and is well worth the few seconds it takes to perform.
When making a cut, try to position the blade so that it is as close to the base of the stem as possible without cutting into the main body of the crown. Cutting too high leaves a “stub” that can rot and potentially introduce decay into the heart of the plant. A clean, flush cut allows the plant to seal the wound quickly and efficiently using its natural defenses. Understanding the anatomy of the drumstick primula allows you to prune with confidence and professional precision.
Finally, always clean and dry your tools at the end of the day to prevent rust and ensure they are ready for the next use. Storing them in a dry place and occasionally applying a light coat of oil to the moving parts will keep them in top condition for years. A professional gardener takes pride in their tools and understands that they are an extension of their skill and care for the plants. By combining the right techniques with well-maintained equipment, you provide the best possible support for your drumstick primula collection.