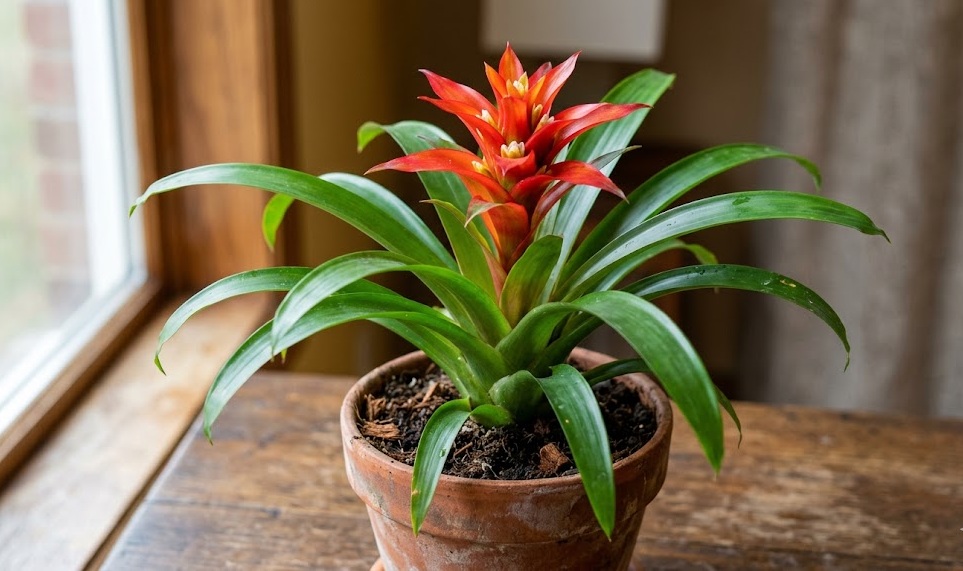
Successful planting of a guzmania bromeliad begins with selecting the appropriate materials that support its unique epiphytic lifestyle. Unlike many common houseplants, these tropical beauties require a substrate that prioritizes air circulation over moisture retention. Providing the right environment from the very first day ensures that the root system develops correctly without the risk of decay. When you approach planting with technical precision, you set the stage for years of vibrant growth and successful future propagation.
The initial step in planting is choosing a container that is proportionate to the size of the plant’s root ball. These plants generally have relatively small and shallow root systems that do not require deep or oversized pots. Using a pot that is too large can lead to excess moisture staying in the soil for too long, which is a major cause of rot. A clay or terracotta pot is often an excellent choice because its porous nature helps excess water evaporate more efficiently.
Before placing the plant in the pot, ensure that you have prepared a high-quality epiphytic potting mix. A standard mix usually includes orchid bark, perlite, and a small amount of peat moss to create a loose and chunky texture. This combination allows water to flow through the root zone quickly while still providing enough humidity for the plant to thrive. Never use garden soil or heavy potting compost, as these materials will suffocate the roots and lead to the plant’s eventual decline.
When you are ready to plant, handle the guzmania gently to avoid damaging the leaves or the central water tank. Position the plant in the center of the pot so that the base of the leaves is just above the soil line. Firm the potting mix around the roots with your fingers, but avoid packing it down too tightly to maintain the essential air pockets. After planting, give the specimen a light misting and fill the central tank with a small amount of fresh water.
Dividing and separating offsets for new growth
Propagation of these bromeliads is most commonly achieved through the separation of pups, which are the small offsets that grow at the base. This process allows you to expand your collection or share these beautiful plants with friends and family members. You should wait until the pups have reached a significant size and have developed a few of their own leaves. Typically, a pup that is about one-third the size of the parent plant is ready for successful independent growth.
More articles on this topic
To begin the separation, you will need a sharp, sterilized knife or a pair of gardening shears to prevent the spread of disease. Carefully remove the entire plant from its pot to get a clear view of where the pup is attached to the parent. You want to make a clean cut as close to the parent stem as possible while ensuring the pup retains some of its own roots. If the pup has no roots yet, it can still be propagated, but it will require more careful monitoring during the rooting phase.
Once the pup is removed, you may want to let the cut end callus over for a few hours before planting it in its own pot. Use a small container and the same airy potting mix that you would use for a mature specimen. Support the young plant with a small stake if it feels unstable until its root system becomes more established in the new substrate. Keep the newly potted pup in a warm, humid environment with bright, indirect light to encourage rapid root development.
It is important to remember that the mother plant will eventually die after it has produced its offsets and finished flowering. This is not a failure of your care, but a natural conclusion to the plant’s biological life cycle. By propagating the pups, you are essentially continuing the life of the plant in a new form. With proper care, these young offsets will grow into impressive specimens and eventually produce their own stunning floral displays.
Professional techniques for repotting mature specimens
Repotting a mature guzmania is usually only necessary if the plant has outgrown its current container or the substrate has started to break down. Over time, the organic components of the potting mix will decompose and become more compact, which reduces the amount of air reaching the roots. If you notice that water is taking longer to drain through the pot, it is likely time for a refresh. Most experts recommend repotting every two to three years to maintain optimal conditions for the root system.
More articles on this topic
When repotting, choose a new container that is only one size larger than the previous one to avoid the issues associated with oversized pots. Carefully slide the plant out of its old container and gently shake off the old potting mix from the roots. Inspect the roots for any signs of damage or rot, trimming away any soft or black parts with sterilized tools. This is also a perfect opportunity to check the base of the plant for any hidden pests that might be hiding in the substrate.
Place a layer of fresh, chunky potting mix at the bottom of the new pot before centering the plant. Fill in the gaps around the edges with more mix, ensuring that the plant sits at the same depth as it did previously. Do not bury the base of the leaves, as this can lead to crown rot and the eventual loss of the entire plant. Once the repotting is complete, place the plant in its usual spot and avoid fertilizing for a few weeks while it acclimates.
The best time to repot or propagate your bromeliads is during the spring or early summer when growth is most active. The increased light and warmth of the season help the plant recover more quickly from the stress of being handled. During this period, the roots are naturally more inclined to grow and establish themselves in the new potting medium. Following these professional steps will ensure that your guzmania remains healthy and continues to be a highlight of your indoor garden.
Growing bromeliads from seeds for the patient gardener
While propagation through offsets is the most common method, it is also possible to grow these plants from seeds. This approach requires a great deal of patience and precision, as the seeds are small and the seedlings grow very slowly. You will need to obtain fresh seeds from a pollinated flower, which can be a challenging task in a typical indoor environment. If you decide to try this method, be prepared for a long-term project that can take several years to reach fruition.
Start by sowing the seeds on the surface of a moist, sterile seed-starting mix that is specifically designed for fine seeds. Do not cover the seeds with soil, as they require light to germinate properly and begin their growth. Place the seed tray in a warm location and cover it with a clear plastic lid or bag to maintain high humidity levels. Mist the surface regularly to keep it moist, but be careful not to wash away the tiny seeds with heavy droplets.
Germination can take several weeks, and the young seedlings will be extremely delicate and prone to damping off if conditions are not perfect. Once they have developed a few leaves, you can slowly begin to introduce them to less humid conditions by venting the plastic cover. Thinning the seedlings may be necessary if they are growing too closely together and competing for resources. It will be many months before they are large enough to be moved into individual pots of their own.
Growing from seed is a fascinating way to observe the entire life cycle of the guzmania from the very beginning. It allows you to see how the rosette structure develops and how the unique water tank forms in the center of the plant. While it is not the most practical method for most home gardeners, it offers a deep level of satisfaction for those interested in botanical science. Successful seed propagation is a testament to a gardener’s skill and commitment to understanding these incredible tropical plants.