Planting and propagation of the golden rose

Successfully establishing a golden rose in the garden begins with proper planting techniques, which lay the groundwork for a healthy and long-lived shrub. The process is more than simply digging a hole; it involves careful site selection, thoughtful soil preparation, and precise placement of the plant to ensure its roots can quickly and effectively establish themselves. A well-planted rose is better equipped to handle environmental stresses, resist diseases, and produce the spectacular flush of spring blooms for which it is known. Similarly, understanding the methods of propagation allows a gardener to create new plants, sharing the beauty of this species or expanding its presence within the landscape. Both planting and propagation are rewarding endeavors that connect the gardener intimately with the life cycle of this remarkable plant.
Selecting the ideal planting site
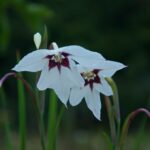
The first and most critical step in planting the golden rose is choosing the right location. This decision will have a lasting impact on the plant’s health and performance. The primary consideration is sunlight. Rosa xanthina is a sun-loving species that requires a minimum of six hours of direct sunlight each day to thrive and produce an abundance of its signature yellow flowers. A location with full sun exposure, particularly morning sun which helps to dry dew from the leaves quickly, is ideal. While it can survive in partial shade, flowering will be significantly diminished, and the plant may become more susceptible to fungal diseases due to increased moisture retention on the foliage.
Equally important is the quality and drainage of the soil. The golden rose prefers rich, loamy soil that is well-drained. Before committing to a spot, it is wise to observe how the area handles water after a heavy rain. If water stands for several hours, the drainage is likely poor, and another site should be considered, or significant soil amendments will be necessary. Avoid low-lying areas where cold air and moisture tend to collect. The plant also needs good air circulation to help prevent common rose diseases, so do not plant it too close to walls, fences, or other dense plantings that could impede airflow.
Consider the mature size of the shrub when selecting a site. Rosa xanthina is not a small plant; it develops into a substantial, arching shrub that can easily reach six to nine feet in height and spread even wider. It is crucial to provide it with ample space to grow to its natural size without being crowded by other plants or structures. Crowding can lead to poor air circulation and competition for resources like light, water, and nutrients. Planning for its future size at the time of planting prevents the need for difficult relocation later and allows the shrub to develop its beautiful, natural form.
Finally, think about the role of the golden rose in the overall garden design. Its brilliant spring display makes it an excellent specimen plant or a standout feature in a mixed shrub border. The fine, ferny foliage provides a pleasing texture throughout the growing season, and the reddish hips add color in the autumn and winter. Planting it where its seasonal attributes can be fully appreciated will enhance the enjoyment of the garden. Consider its visibility from windows or outdoor living spaces to maximize its ornamental impact.
More articles on this topic
Preparing the soil for planting
Once the ideal site has been chosen, the next step is to prepare the soil to create a welcoming environment for the rose’s roots. Proper soil preparation is a key factor in the successful establishment and long-term health of the plant. The goal is to create a loose, fertile, and well-drained medium. Begin by clearing the selected area of any weeds, grass, or other debris. For a single shrub, a planting area of at least three feet in diameter should be prepared to give the roots plenty of room to expand into improved soil.
The next task is to excavate the planting hole. The hole should be dug significantly wider than the plant’s root ball, but not necessarily deeper. A good guideline is to make the hole at least twice as wide as the container or root system and about as deep as the root ball itself. This is because the majority of a shrub’s roots grow outwards into the upper layers of soil. Digging a wide hole and loosening the soil on the sides encourages these roots to spread out from the plant, rather than circling within the confines of the original planting hole.
With the hole dug, the focus shifts to amending the soil. The soil that was removed from the hole should be mixed with a generous amount of organic matter. Compost, well-rotted manure, leaf mold, or peat moss are all excellent choices. A good ratio is approximately one-third amendment to two-thirds native soil. This enriched backfill mixture improves the soil’s structure, enhances its ability to retain moisture while still allowing for good drainage, and provides a slow-release source of essential nutrients for the newly planted rose.
It is also a good time to consider adding a small amount of a balanced, slow-release fertilizer or bone meal to the backfill mixture. This provides a gentle boost of nutrients, particularly phosphorus, which is essential for strong root development. Be careful not to overdo it, as too much fertilizer can burn the delicate new roots. Once the amendments and any fertilizer have been thoroughly mixed with the excavated soil, you are ready for the final step of placing the plant in the ground.
The planting process
With the site selected and the soil prepared, the actual process of planting the golden rose can begin. If the rose is in a container, water it thoroughly an hour or so before planting to ensure the root ball is well-hydrated. Carefully remove the plant from its pot, trying to keep the root ball as intact as possible. Gently tease out any roots that are circling the bottom or sides of the root ball. This encourages them to grow outwards into the surrounding soil rather than continuing to grow in a constricted pattern.
Position the rose in the center of the prepared hole. The most crucial aspect of this step is setting the plant at the correct depth. The top of the root ball should be level with or slightly above the surrounding soil surface. Planting too deeply can lead to the crown of the plant rotting, while planting too high can cause the roots to dry out. Use a straight edge, such as a shovel handle, placed across the top of the hole to accurately gauge the correct depth before you begin backfilling.
Once the rose is positioned correctly, begin backfilling the hole with the amended soil mixture. Gently but firmly press the soil down around the root ball as you go to eliminate any large air pockets. Air pockets can cause the roots to dry out and hinder the plant’s establishment. Fill the hole completely, ensuring the soil is level with the surrounding grade. It can be beneficial to create a shallow basin or “well” of soil around the outer edge of the planting area to help direct water to the root zone during the initial watering.
Immediately after planting, water the rose thoroughly and deeply. This is a critical step that helps to settle the soil around the roots, eliminating any remaining air pockets and providing essential moisture. Apply water slowly to allow it to soak in rather than run off. For the first few weeks after planting, the soil should be kept consistently moist to help the plant recover from the stress of transplanting and to encourage the growth of new roots into the surrounding soil.
Methods of propagation
Propagating the golden rose is a rewarding way to create new plants. The most common and reliable method for propagating this shrub is through semi-hardwood cuttings. This technique is best performed in late summer or early autumn when the current season’s growth has begun to mature but is not yet fully woody. Select a healthy, vigorous stem from the plant, choosing a section that is about the thickness of a pencil. The ideal cutting should be taken from a stem that has flowered during the season.
To prepare the cutting, use a clean, sharp knife or pruning shears to cut a six to eight-inch section of the stem. The bottom cut should be made at a slight angle just below a leaf node, while the top cut should be straight across, just above a leaf node. Remove all the leaves from the lower half of the cutting to reduce moisture loss and prevent rotting. You may also want to gently wound the bottom inch of the cutting by scraping off a small slice of the outer bark on one or two sides, which can encourage root formation.
To increase the chances of success, dip the bottom end of the cutting into a rooting hormone powder or gel. This product contains hormones that stimulate root development. After applying the hormone, insert the cutting into a pot filled with a sterile, well-draining rooting medium, such as a mix of perlite and peat moss or coarse sand. The cutting should be inserted deep enough so that at least two nodes are buried beneath the surface of the medium.
After planting the cutting, water the medium thoroughly and place the pot in a warm, bright location out of direct sunlight. To maintain high humidity, which is crucial for rooting, you can cover the pot with a clear plastic bag or place it in a propagator. Check the cutting periodically and ensure the medium remains moist but not waterlogged. Roots typically begin to form within several weeks to a few months. Once a strong root system has developed, the new plant can be gradually acclimatized to normal conditions and eventually transplanted into the garden.
📷 Meneerke bloem, CC BY-SA 3.0, via Wikimedia Commons