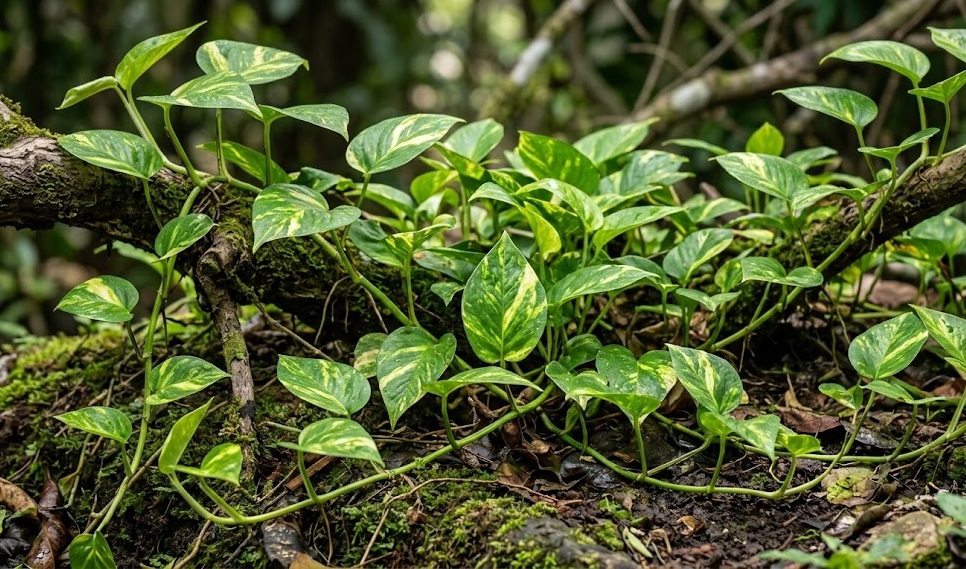
Starting your journey with a new golden pothos begins with the critical step of planting it into a stable and nourishing environment. You need to select a container that provides ample room for the initial root ball while allowing for future expansion as the vines begin to grow. The choice of potting soil is equally important, as it must offer a balance between moisture retention and essential aeration for the root system. Proper planting techniques ensure that the specimen establishes itself quickly and avoids the common pitfalls of transplant shock or root suffocation.
When you first bring a new plant home, it is often a good idea to let it acclimate to your indoor environment before rushing to repot it. You should observe the plant for a week or two to see how it reacts to the light and humidity levels in its new designated spot. If the roots are not visibly crowded and the plant looks healthy in its original nursery pot, you can delay the transition until the start of the next growing season. This period of observation helps reduce the overall stress on the plant during the initial move into your living space.
The actual process of planting involves carefully removing the plant from its old container and loosening the roots to encourage outward growth. You should place a layer of fresh potting mix at the bottom of the new pot and position the plant so that the top of the root ball sits slightly below the rim. Filling in the gaps with additional soil requires a gentle touch to avoid compacting the medium too tightly around the delicate roots. A thorough watering after planting helps settle the soil and ensures that there are no large air pockets left inside the container.
Choosing the right time of day for planting can also make a difference in how well the plant recovers from the transition. You might find that working in the early morning or late afternoon, when the light is less intense, prevents the leaves from wilting during the process. Keeping the newly planted pothos in a slightly shaded area for a few days can further assist in its recovery before moving it back to its permanent location. These small considerations contribute to a much higher success rate for both novice and experienced indoor gardeners.
Master the art of water propagation
Propagating the golden pothos in water is perhaps the simplest and most visually satisfying way to expand your plant collection. You start by selecting a healthy vine and cutting a section that includes at least two or three nodes, which are the small bumps where leaves emerge. Removing the lower leaves ensures that no foliage is submerged, which prevents rot and keeps the water clear during the rooting process. Placing the cutting in a glass jar filled with clean, room-temperature water allows you to watch the new roots develop in real-time.
More articles on this topic
You should change the water every few days to maintain high oxygen levels and prevent the buildup of algae or bacteria. Placing the jar in a spot with bright, indirect light will provide the energy the cutting needs to produce roots without burning the young tissues. Within a few weeks, you will see thin white roots starting to emerge from the submerged nodes, signaling that the propagation is successful. It is a fascinating process that serves as a great introduction to plant biology for anyone interested in the natural world.
The timing of when to move your water-rooted cuttings into soil is a common point of discussion among plant enthusiasts. You should wait until the roots are at least two to three inches long and have started to develop their own secondary lateral branches. Moving them too early can make the transition to soil difficult, as the young roots may not be strong enough to anchor the plant. Conversely, waiting too long can make the roots “lazy,” as they become too accustomed to the ease of absorbing water directly from the jar.
Transitioning from water to soil requires a bit of extra care to ensure the roots adapt to the denser medium without drying out. You should keep the soil consistently moist for the first two weeks after transplanting to help the water-grown roots bridge the gap. Gradually reducing the watering frequency over time will encourage the plant to develop the more robust root system necessary for life in a pot. This method is highly effective for creating new plants to give as gifts or to fill in empty spots in your own home.
Soil propagation for stronger initial growth
Propagating directly in soil is an alternative method that often results in a more resilient root system from the very beginning. You can take stem cuttings in the same way as you would for water propagation, making sure each piece has a healthy node. Instead of a jar, you place the cuttings directly into a small pot filled with a light and airy seed-starting mix or a blend of peat and perlite. Dipping the cut end in a bit of rooting hormone can accelerate the process, although it is not strictly necessary for this vigorous species.
More articles on this topic
Keeping the soil warm and slightly damp is the most important factor in ensuring that your soil cuttings take root successfully. You might consider creating a “mini-greenhouse” by placing a clear plastic bag over the pot to trap humidity around the leaves. This prevents the cutting from losing too much moisture through its foliage while it is still unable to take up water through roots. Be sure to provide some ventilation every day to prevent mold from forming in the high-humidity environment you have created.
One of the main advantages of this method is that the plant does not have to go through the stress of a medium transition later on. The roots that develop in soil are naturally adapted to searching for moisture and nutrients within a substrate, making them tougher than water-grown roots. You will know the cuttings have successfully rooted when you see new leaf growth appearing at the tip of the stem. A gentle tug on the cutting can also confirm the presence of roots if you feel a slight resistance from the soil.
This technique is particularly useful if you want to create a fuller, bushier plant by planting multiple cuttings into a single large pot. By spacing the cuttings evenly around the container, you ensure that the future growth will be balanced and lush from the base upward. It is a great way to recycle the trimmings from your regular pruning sessions and turn them into something beautiful and productive. Growing multiple stems together creates an instant impact that would take a single cutting much longer to achieve.
Advanced propagation and long-term establishment
Air layering is a more advanced technique that allows you to root a section of a vine while it is still attached to the parent plant. This method is highly successful because the cutting continues to receive water and nutrients from the main root system while it develops its own. You simply wrap a damp ball of sphagnum moss around a node and secure it with plastic wrap to keep the moisture inside. Once you see a healthy cluster of roots through the plastic, you can snip the vine below the new roots and plant it.
This approach is ideal for propagating particularly thick or old stems that might struggle to root using traditional water or soil methods. Because the new plant is already quite large by the time it is separated, it establishes itself much faster than a small cutting would. It is also a very safe method, as there is no risk of losing the cutting if the rooting process takes longer than expected. Mastering air layering adds a professional tool to your gardening repertoire and opens up new possibilities for managing large specimens.
Once your new plants are established, the focus shifts to providing them with the long-term stability they need to grow into mature vines. You should avoid moving them around too frequently, as plants often take time to settle into the specific light and airflow of a new spot. Regular inspections for pests and monitoring the soil quality will ensure that your propagated plants remain as healthy as the originals. With consistent care, your small cuttings will eventually become the source of your next generation of propagation projects.
The cycle of planting and propagation is one of the most fulfilling cycles in the world of indoor gardening and agriculture. It allows you to understand the life force of your plants on a deeper level and share that joy with others in your community. Whether you are starting with a single leaf or an entire vine, the principles of patience and observation remain the same. Enjoy the process of watching life unfold from a simple cutting and take pride in the green oasis you are building.