Planting and propagation of the garden star-of-bethlehem
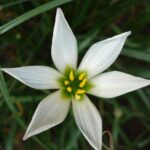
Successfully establishing the garden star-of-bethlehem begins with proper planting techniques and an understanding of its natural growth cycle. This charming, spring-flowering bulb is a resilient and rewarding addition to the garden, known for its ability to naturalize and create beautiful drifts of white, star-like flowers. The key to success lies in planting the bulbs at the right time of year, in the right location, and at the correct depth. Autumn is the ideal planting season, as this allows the bulbs sufficient time to develop a strong root system before the ground freezes, setting them up for a spectacular display the following spring. Choosing a site with well-drained soil and adequate sunlight is equally crucial for their long-term health and vigor.
The process of planting is straightforward, making it an excellent choice for gardeners of all experience levels. Before you begin, it is essential to prepare the planting area thoroughly. This involves loosening the soil to a depth of at least eight inches and amending it with organic matter like compost or well-rotted manure. This preparation improves soil structure, enhances drainage, and provides a nutrient-rich environment for the bulbs to thrive. Proper soil preparation is not just about initial success; it lays the groundwork for the plants to establish a healthy, self-sustaining colony for years to come.
Once the soil is prepared, the bulbs should be planted at a depth of approximately three to four inches, measuring from the base of the bulb to the soil surface. Spacing is also an important consideration. For a dense, massed effect, place the bulbs about three to four inches apart. If you prefer a more naturalized look, you can scatter them randomly and plant them where they fall. Always ensure the pointed end of the bulb is facing upwards, as this is where the shoot will emerge. After planting, water the area well to settle the soil around the bulbs and encourage root development.
Propagation is one of the most satisfying aspects of growing the garden star-of-bethlehem, as it is remarkably easy to multiply your stock. The primary method of propagation is through the division of its bulb offsets, which the plant produces prolifically. Over time, a single bulb will develop into a dense clump, which can be lifted and separated to create new plantings. This simple process not only provides you with more plants but also helps to rejuvenate overcrowded clumps, ensuring they remain healthy and continue to flower profusely.
Optimal planting time and location
The timing of planting is a critical factor that significantly influences the success of the garden star-of-bethlehem. The ideal window for planting the bulbs is in the autumn, typically from September to November, before the ground freezes solid. Planting during this period allows the bulbs to establish their root systems throughout the winter months. This underground activity, though unseen, is vital for anchoring the plant and enabling it to absorb the necessary water and nutrients for vigorous growth as soon as the soil warms in the spring.
More articles on this topic
Selecting the right location is just as important as the timing. This species thrives in a position that receives full sun to partial shade. Full sun, meaning at least six hours of direct sunlight per day, generally results in the most prolific and impressive flower display. However, in regions with very hot summers, a location with some afternoon shade can be beneficial, as it helps to protect the foliage from scorching and stress. Consider planting them under deciduous trees, where they will receive ample sun in the spring before the trees leaf out fully.
The chosen site must have excellent soil drainage. The garden star-of-bethlehem is intolerant of waterlogged conditions, which can quickly lead to bulb rot, a fatal issue. To assess your soil’s drainage, you can perform a simple test: dig a hole about a foot deep and fill it with water. If the water drains away within a few hours, the drainage is adequate. If the water stands for an extended period, you will need to amend the soil by incorporating organic matter like compost, peat moss, or coarse sand to improve its porosity.
When planning the layout, think about the plant’s naturalizing habit. It is an excellent choice for creating drifts of color in woodland settings, informal borders, rock gardens, or even in lawns that are not mowed until the foliage has died back. Its ability to spread and form colonies over time makes it a low-maintenance option for filling in larger areas. However, in a more formal garden bed, you may need to consider this spreading tendency and plan for periodic division to keep it within its designated space.
Soil preparation and planting depth
Thorough soil preparation is the foundation for a thriving colony of garden star-of-bethlehem. Before planting, the soil should be worked to a depth of at least 8 to 10 inches using a garden fork or tiller. This process loosens compacted soil, which allows the bulbs’ roots to penetrate deeply and easily, and it also improves aeration and drainage. As you work the soil, remove any weeds, stones, or other debris that could impede the growth of the bulbs or compete with them for resources.
More articles on this topic
Incorporating organic matter is a crucial step in preparing the planting bed. Adding a two- to three-inch layer of well-rotted compost, leaf mold, or aged manure and mixing it into the loosened soil will work wonders. Organic matter improves the soil’s structure, making heavy clay soils lighter and more friable, while helping sandy soils retain more moisture and nutrients. This creates a fertile and well-drained medium that is ideal for bulb health and encourages strong, vigorous growth in the spring.
The correct planting depth is vital for the bulbs’ performance and winter survival. A general rule of thumb for bulbs is to plant them at a depth that is two to three times their height. For the garden star-of-bethlehem, this typically translates to a planting depth of about three to four inches, measured from the bottom of the bulb. Planting too shallowly can expose the bulbs to frost damage and temperature fluctuations, while planting too deeply can delay or prevent their emergence in the spring.
Proper spacing is also important to consider, depending on the desired effect. For a dense, carpet-like display, space the individual bulbs approximately three to four inches apart. This close spacing allows the plants to grow together quickly, creating a full and impactful visual. If you aim for a more scattered, naturalized appearance, you can toss the bulbs gently over the prepared area and plant them where they land. After placing the bulbs in their holes with the pointed end up, backfill with the prepared soil, gently firming it down, and water the area thoroughly.
Propagation through division
Propagation of the garden star-of-bethlehem is most commonly and effectively achieved through division. This method takes advantage of the plant’s natural tendency to produce numerous small offset bulbs, or bulbils, around the base of the main bulb. Over a few seasons, a single bulb can multiply into a large, dense clump. Division not only allows you to increase your stock of plants for free but is also beneficial for the health of the plant, as it relieves overcrowding and stimulates renewed vigor.
The best time to divide the clumps is during the plant’s dormancy period, which occurs in late summer or early autumn after the foliage has completely died back. Attempting to divide them during their active growth phase in spring can cause undue stress and damage the plants. Waiting until they are dormant ensures that all the energy has been stored back in the bulbs and that they can be handled and replanted with minimal disruption to their life cycle.
The process of division is quite simple. Begin by carefully lifting the entire clump out of the ground using a garden fork or spade, inserting it well away from the center of the clump to avoid spearing the bulbs. Once the clump is lifted, gently shake off the excess soil to expose the mass of bulbs. You will find that they can be easily teased apart by hand. Separate the larger parent bulbs from the smaller offsets, ensuring each division has at least one healthy bulb.
After separating the bulbs, you can immediately replant them in new locations or in the original spot after amending the soil. Plant the divided bulbs at the same depth and spacing as you would with new bulbs, approximately three to four inches deep and three to four inches apart. Water them in well to help settle the soil and encourage new root growth. This simple act of division every three to four years will ensure your garden star-of-bethlehem plants remain healthy, productive, and beautifully displayed in your garden.
Propagation from seed
While division is the most common and reliable method, it is also possible to propagate the garden star-of-bethlehem from seed, though this method requires more patience. After the flowers fade, the plant will produce seed capsules. You can collect the seeds once these capsules have dried and begin to split open. It is important to harvest them promptly, as the capsules can dehisce and scatter the seeds naturally. The seeds are small and black and should be stored in a cool, dry place until you are ready to sow them.
The optimal time for sowing the seeds is in the autumn. You can sow them directly into a prepared seedbed outdoors or in pots or trays filled with a well-draining seed-starting mix. Lightly cover the seeds with a thin layer of soil or fine grit, as they need some light to germinate effectively. The seeds require a period of cold stratification, meaning they need to be exposed to cold winter temperatures to break their dormancy and trigger germination. Sowing them outdoors in autumn naturally provides this necessary cold treatment.
If you are starting the seeds indoors, you will need to mimic this cold period artificially. Sow the seeds in a pot, moisten the soil, and place the entire pot in a plastic bag. Store it in a refrigerator for a period of 6 to 8 weeks. After the cold stratification period, move the pot to a cool, bright location. Germination can be slow and sometimes erratic, so patience is key. Keep the soil consistently moist but not wet as you wait for the seedlings to emerge.
It is important to understand that plants grown from seed will take several years to reach flowering size. The first year, the seedling will produce a small, grass-like leaf as it begins to form a tiny bulb underground. It will typically take at least three to four years of growth before the bulbs are mature enough to produce their first flowers. For this reason, most gardeners prefer the much faster and more certain method of propagation by division.