Planting and propagation of the Dahlberg daisy
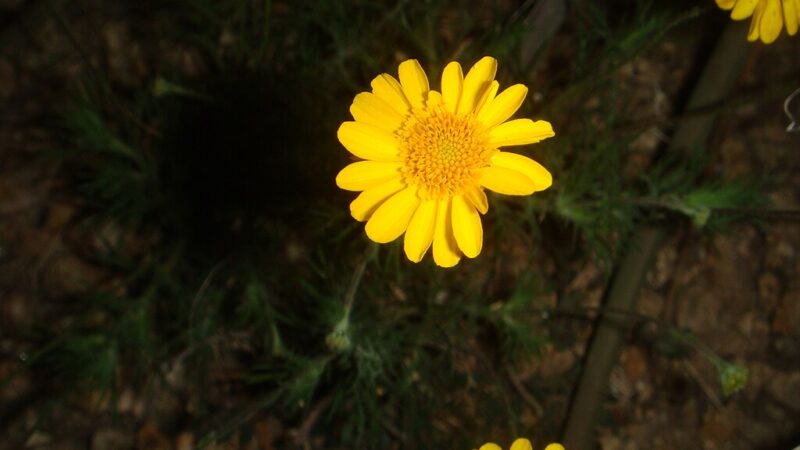
The process of planting and propagating the Dahlberg daisy is straightforward, making it an accessible and rewarding experience for gardeners of all skill levels. This resilient annual is typically grown from seed, offering a cost-effective way to fill garden beds, borders, and containers with its cheerful yellow blossoms and delicate, feathery foliage. Successful planting begins with understanding the plant’s fundamental requirements for sunlight and soil, as establishing it in the right environment is the most critical step for a season of vibrant growth. Whether starting seeds indoors for a head start or sowing them directly into the garden, a few key techniques will ensure strong germination and healthy development from the very beginning.
Before any seeds are sown, careful consideration must be given to the planting site. The Dahlberg daisy is native to arid regions and absolutely thrives in full, direct sunlight, so a location that receives at least six to eight hours of sun per day is non-negotiable for optimal performance. The soil must be exceptionally well-draining, as the plant is highly susceptible to root rot in heavy, waterlogged conditions. Sandy or gravelly soils are ideal, but heavier clay soils can be amended with coarse sand or perlite to improve drainage and create a more hospitable environment for its roots.
Propagation of the Dahlberg daisy is most commonly achieved through seeds, but it can also be propagated via cuttings, offering another method to increase plant stock. Starting from seed is a simple process that allows for a large number of plants to be grown economically. The seeds are fine and require light to germinate, so they should be sown on the surface of the soil and only very lightly pressed in, rather than being buried deep. This careful attention to its light and soil preferences at the planting stage will pay dividends in the form of robust, healthy plants that flower profusely throughout the summer.
Once the seedlings have emerged and developed a few sets of true leaves, proper spacing is important to allow each plant enough room to grow to its full potential. This not only ensures they receive adequate sunlight and resources but also promotes good air circulation, which is vital for preventing fungal diseases. Whether planting seedlings purchased from a nursery or those started at home, giving them the right start in a well-prepared bed or container is the foundation of a successful and beautiful display of Dahlberg daisies in the garden.
Starting from seed
Growing Dahlberg daisies from seed is the most popular and economical method of propagation. The seeds can be started indoors approximately six to eight weeks before the last expected frost date in your region. This gives the seedlings a significant head start, allowing them to be transplanted into the garden as sturdy young plants ready to bloom much earlier in the season. Use a sterile seed-starting mix in shallow trays or individual pots to provide a clean and lightweight medium for germination.
More articles on this topic
To sow the seeds, moisten the seed-starting mix thoroughly and allow any excess water to drain away. Because the seeds of the Dahlberg daisy are very fine and require light to germinate, they should not be covered with soil. Simply sprinkle the seeds evenly over the surface of the prepared mix and gently press them down to ensure good contact with the soil. After sowing, lightly mist the surface with water and cover the tray with a clear plastic dome or plastic wrap to maintain high humidity, which aids in germination.
Place the seed tray in a warm location with plenty of bright, indirect light. A consistent temperature of around 21 to 24 degrees Celsius is ideal for germination, which typically occurs within seven to fourteen days. Once the first seedlings begin to emerge, remove the plastic cover to increase air circulation and prevent damping-off disease. The seedlings will then need to be moved to a location where they will receive plenty of direct light, such as a south-facing windowsill or under a grow light, to prevent them from becoming weak and leggy.
Once the seedlings have developed their first set of true leaves (the second set of leaves that appear), they can be thinned out to ensure the strongest ones have room to grow. If they were sown in a tray, this is also the time to carefully transplant them into individual small pots to continue growing. Continue to keep the soil lightly moist and provide strong light until it is time to harden them off and plant them outdoors after all danger of frost has passed.
Direct sowing in the garden
For gardeners in warmer climates with a long growing season, or for those who prefer a more low-maintenance approach, Dahlberg daisies can be sown directly into the garden. The key to success with this method is timing; the seeds should be planted in the spring after the last frost has passed and the soil has begun to warm up. Sowing too early in cold, wet soil can lead to poor germination rates and seed rot. Waiting for the right conditions will ensure a much higher rate of success.
More articles on this topic
Preparing the garden bed is a crucial first step for direct sowing. Clear the area of all weeds and debris, and lightly rake the soil surface to create a fine, crumbly texture. As with indoor sowing, the soil should be well-draining. If necessary, amend the area with sand or fine gravel to improve its porosity. There is no need to add rich compost or fertilizer at this stage, as the Dahlberg daisy prefers lean soil conditions which encourage better flowering.
Once the bed is prepared, lightly moisten the soil. Scatter the fine seeds as evenly as possible over the surface of the planting area. To help with even distribution, the tiny seeds can be mixed with a small amount of sand before broadcasting them. After sowing, walk over the area or use a flat board to gently press the seeds into the soil, ensuring good seed-to-soil contact without burying them. A very light dusting of fine soil or vermiculite over the seeds is acceptable, but do not cover them deeply, as they need light to germinate.
Keep the seedbed consistently moist but not waterlogged until the seedlings emerge, which should take one to two weeks depending on the weather. A fine mist from a spray bottle or a gentle setting on a hose nozzle is best to avoid dislodging the seeds. Once the seedlings are a few inches tall and have several sets of leaves, they should be thinned to their recommended spacing, typically about six to eight inches apart. This thinning is vital to prevent overcrowding and allow each plant to develop a healthy, mounded shape.
Propagation through cuttings
While growing from seed is the most common method, the Dahlberg daisy can also be successfully propagated from stem cuttings. This technique is particularly useful later in the season if you wish to create new plants from a particularly healthy and vibrant specimen or to overwinter plants indoors in colder climates. Vegetative propagation through cuttings ensures that the new plants will be genetically identical clones of the parent plant, preserving its desirable traits.
The best time to take cuttings is during the active growing season, from late spring to mid-summer, when the stems are vigorous but not yet woody. Select healthy, non-flowering shoots for the cuttings. Using a clean, sharp knife or pruning shears, take cuttings that are about three to four inches long from the tips of the stems. Make the cut just below a leaf node, which is the point on the stem where a leaf emerges, as this is where roots will most readily form.
Once the cuttings have been taken, carefully strip the leaves from the bottom half of each stem. This portion of the stem will be inserted into the growing medium, and removing the leaves prevents them from rotting underground. To enhance the chances of successful rooting, you can dip the cut end of the stem into a rooting hormone powder, though this step is not always necessary as Dahlberg daisies often root quite easily without it.
Prepare a small pot or tray with a moist, sterile rooting medium, such as a mix of perlite and peat moss or coarse sand. Insert the prepared cuttings into the medium, burying the leafless portion of the stem. Place the pot in a warm location with bright, indirect light and cover it with a plastic bag or dome to create a humid environment. Keep the medium consistently moist, and roots should begin to form within a few weeks. Once the cuttings show signs of new growth and have developed a healthy root system, they can be transplanted into their own pots.
📷Miwasatoshi, CC BY-SA 4.0, via Wikimedia Commons