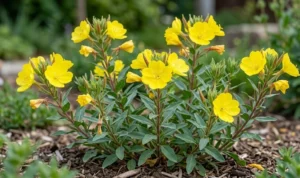
Starting a new journey with rose rockcress begins with the critical step of selecting the perfect location within your landscape. You must find a spot that offers exceptional drainage, as the roots of this plant are highly sensitive to standing water. The ideal site is often a raised bed, a rock wall, or a sloping area where gravity assists in moving moisture away from the crown. Without the right foundation, even the most careful planting techniques will likely result in failure.
Before you dig your first hole, you should assess the soil composition and be prepared to make necessary adjustments. If your ground is primarily clay, you will need to incorporate significant amounts of coarse sand or fine gravel to open up the structure. Professional gardeners often create a custom planting pocket by removing the native soil and replacing it with a specialized rock garden mix. This ensures that the young plant has the best possible start in its new home.
When you are ready to put the plant in the ground, ensure the hole is twice as wide as the root ball but no deeper. You want the top of the root ball to sit slightly above the surrounding soil level to prevent water from pooling around the main stem. Gently tease out any circling roots if the plant was pot-bound to encourage them to explore the new soil. Once the plant is situated, backfill the hole and firm the soil gently with your hands to remove large air pockets.
The final step in the planting process is to apply a thin layer of grit or small stones around the base of the plant. This mulch serves multiple purposes, including suppressing weeds and preventing soil from splashing onto the leaves during rain. It also helps to keep the neck of the plant dry, which is a major factor in preventing fungal infections. Water the new transplant lightly to settle the soil, but avoid saturating the area completely during this initial phase.
Sowing seeds for future displays
Propagating rose rockcress from seed is a fulfilling way to increase your collection while maintaining genetic diversity. You should ideally sow the seeds in late winter or early spring when temperatures are still cool but the light levels are increasing. Use a well-draining seed starting mix and barely cover the tiny seeds with a thin dusting of fine grit or sand. These seeds often benefit from a period of cold stratification to break their dormancy and trigger uniform germination.
More articles on this topic
Keeping the seed trays in a bright, cool location is essential for developing sturdy seedlings that are not overly elongated. You should maintain a consistent but light level of moisture, using a misting bottle rather than a heavy watering can. If the air is too stagnant, the young plants may fall victim to damping-off, a common fungal disease that kills seedlings at the soil line. Providing a gentle breeze from a small fan can help strengthen the stems and improve air circulation around the trays.
As the seedlings develop their first set of true leaves, you can begin to introduce a very weak liquid fertilizer to support their growth. You must be careful not to over-stimulate them, as the goal is to produce compact plants rather than rapid, soft growth. Once the plants have three or four sets of leaves, they are usually ready to be transplanted into individual small pots. This stage allows the root systems to become more robust before they face the challenges of the open garden.
Hardening off the young plants is a professional technique that slowly acclimates them to outdoor conditions. You should start by placing them outside in a sheltered, shady spot for a few hours each day, gradually increasing their exposure to sun and wind. This process typically takes about ten to fourteen days and is crucial for preventing transplant shock. Once they can spend a full night outdoors without stress, they are ready to be moved into their permanent positions in your rock garden.
Techniques for successful division
Dividing established plants is an excellent way to rejuvenate older specimens and create new starts for other parts of your garden. You should typically perform this task in early autumn or immediately after the flowering season has ended in late spring. Carefully dig up the entire plant, taking care to keep as much of the root system intact as possible. Shake off the excess soil so you can clearly see the points where the plant can be naturally separated into smaller units.
More articles on this topic
Using a sharp, clean knife or a pair of garden scissors, cut the plant into several sections, ensuring each piece has a healthy set of roots and several green shoots. You should discard any old, woody centers that no longer produce vigorous growth, as these parts are unlikely to thrive. The new divisions should be replanted immediately to prevent the roots from drying out in the air. This process not only provides new plants but also prevents the original specimen from becoming too congested.
When replanting the divisions, follow the same careful procedures you would for a brand-new nursery plant. Firm the soil around the roots and provide a light watering to help them settle into their new environment. You might notice some minor wilting in the first few days, but the plants should recover quickly if the weather remains mild. Keeping the newly divided plants slightly shaded for the first week can help them focus their energy on root establishment rather than moisture retention.
Division is also a great opportunity to inspect the health of the root system and check for any hidden pests or diseases. If you notice any mushy or blackened roots, trim them away before replanting to ensure you are starting with clean material. Professionals recommend dividing rose rockcress every three to four years to maintain the best appearance and flowering potential. This simple maintenance task keeps your garden looking fresh and prevents the plants from losing their compact shape.
Propagation through stem cuttings
Stem cuttings offer a reliable method for cloning your favorite plants and ensuring the new additions are identical to the parent. You should take these cuttings in late spring or early summer when the plant is actively growing but not yet in full bloom. Select healthy, non-flowering shoots that are about two to three inches long and remove the leaves from the bottom half of the stem. A clean, angled cut at the base will increase the surface area available for new root development.
Using a rooting hormone can increase your success rate, though it is not strictly necessary for this species. Insert the prepared cuttings into a pot filled with a very porous medium, such as a mix of perlite and peat moss. You should space them so that their leaves do not touch, which helps to reduce the risk of rot. Firm the medium around each stem to ensure good contact and provide a very light watering to settle the material.
Covering the cutting tray with a clear plastic dome can help maintain the high humidity levels needed until roots form. You must be diligent about venting the dome daily to prevent the buildup of excessive heat or stagnant air. Place the tray in a location with bright, indirect light, as direct afternoon sun can quickly overheat and kill the unrooted stems. Most cuttings will begin to show signs of new growth within three to five weeks if conditions are optimal.
Once you see new leaves appearing and the cuttings resist a gentle tug, you know that roots have successfully developed. At this point, you should gradually remove the humidity cover and begin to treat them like young seedlings. Moving them into individual pots with a standard rock garden soil mix will allow them to build strength for the coming months. Within a season, these clones will be ready to take their place alongside the other established perennials in your landscape.