Planting and propagation of Persian onion
The successful establishment of Allium aflatunense begins with proper planting, a crucial step that sets the stage for years of spectacular spring displays. These ornamental onions, with their striking globes of purple flowers, are planted as dormant bulbs in the autumn, a period that allows them to establish a strong root system before the onset of winter. Understanding the nuances of timing, site selection, and planting technique is fundamental to unlocking their full potential. Furthermore, learning how to propagate these alliums, whether through the simple act of dividing established clumps or the more patient process of growing from seed, empowers a gardener to multiply their stock and create ever more impressive drifts of this architectural plant. This guide provides a detailed exploration of the methods for planting and propagating Persian onions, ensuring a thriving and expanding collection.
Optimal timing and site selection for planting
The ideal time to plant Allium aflatunense bulbs is in the autumn, typically from September to November, depending on your specific climate. The goal is to plant them early enough so they can develop a robust root system before the ground freezes solid, but not so early that they are prompted to send up significant top growth. Planting in this autumn window ensures that the bulb is well-anchored and ready to burst into vigorous growth as soon as the soil begins to warm in the spring. This timing mimics the plant’s natural cycle and is critical for its successful establishment and perennialization in the garden.
Site selection is equally as important as timing. As a sun-loving species, Allium aflatunense requires a location that receives full sun, meaning at least six to eight hours of direct sunlight each day. This ensures the development of strong, upright stems that can support the large, heavy flower heads without staking. Inadequate sunlight will result in weaker, leggier plants that may fail to flower well. The chosen site must also have excellent drainage, as the bulbs are prone to rotting in soil that remains waterlogged, especially during their winter dormancy.
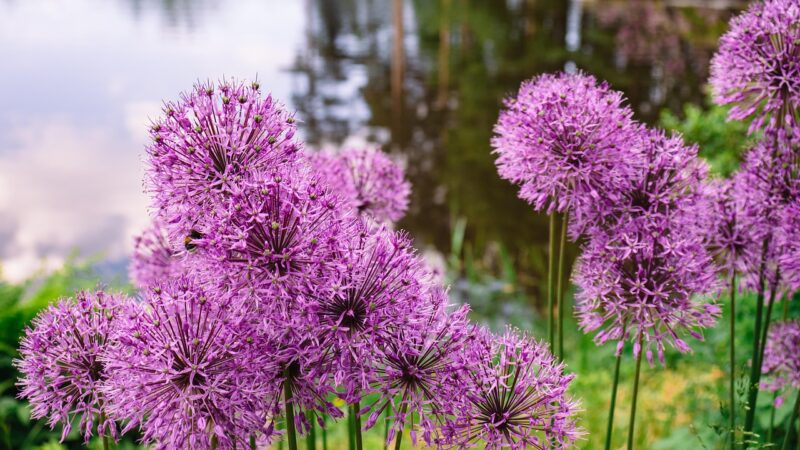
When integrating Persian onions into a garden design, consider their growth habit. Their foliage emerges early in the spring but begins to fade and look untidy around the time the flowers are at their peak. For this reason, it is advantageous to plant them behind or amongst other perennials, such as geraniums, salvias, or hostas. The emerging foliage of these companion plants will artfully conceal the declining allium leaves, allowing the magnificent flower heads to appear as if they are floating above the other plants in the border.
Before planting, take the time to prepare the soil thoroughly. Loosen the earth to a depth of at least 30 centimeters and amend it with organic matter like compost or well-rotted manure to improve its structure and fertility. If you are dealing with heavy clay soil, incorporating horticultural grit is essential to enhance drainage. This initial soil preparation creates an ideal environment for the bulbs to establish their roots and will pay dividends in the health and vigor of the plants for years to come.
More articles on this topic
The process of planting bulbs
Planting Allium aflatunense bulbs is a straightforward process that follows a few simple but important rules. The general principle for planting depth is to set the bulb at a depth that is approximately three to four times its own height. For a typical Persian onion bulb, this will translate to a planting depth of around 15 to 20 centimeters from the base of the bulb to the soil surface. This depth helps to protect the bulb from temperature fluctuations and provides stability for the tall flower stalk that will emerge in the spring.
When you are ready to plant, dig individual holes for each bulb or excavate a larger trench for planting a group or drift. It is crucial to place the bulb in the hole with the pointed end facing upwards and the flatter, root-end facing down. Placing the bulb upside down or on its side will force the emerging shoot to expend extra energy reorienting itself, which can delay growth and weaken the plant. After placing the bulb in the hole, backfill with the prepared soil, gently firming it down to eliminate any large air pockets.
Proper spacing between bulbs is essential to prevent overcrowding and to allow each plant enough room to develop fully. Space Allium aflatunense bulbs approximately 15 to 20 centimeters apart. This provides sufficient space for the broad foliage to spread out in the spring and ensures good air circulation around the plants, which can help to reduce the risk of fungal diseases. Planting in groups of five, seven, or more creates a much more dramatic and natural-looking display than planting them in single, straight rows.
After planting, it is important to water the area thoroughly. This initial watering helps to settle the soil around the bulbs and provides the moisture needed to encourage the initiation of root growth. Continue to provide water if the autumn weather is particularly dry, but cease watering once the cold weather arrives and the ground begins to cool significantly. A layer of mulch, such as chopped leaves or straw, can be applied after the ground has frozen to provide extra insulation and protect the newly planted bulbs from freeze-thaw cycles.
More articles on this topic
Propagation through bulb division
One of the easiest and most reliable methods for propagating Allium aflatunense is through the division of established clumps. Over a period of three to five years, a single parent bulb will produce numerous smaller offset bulbs, forming a dense cluster. While this multiplication is a sign of a healthy plant, it can eventually lead to overcrowding, resulting in increased competition for resources and a subsequent decline in the size and quality of the flowers. Dividing these clumps is a necessary maintenance task that also serves as an excellent method of propagation.
The optimal time to divide the bulbs is during their dormant period in late summer or early autumn, after the foliage has completely died back. Using a garden fork, carefully excavate the soil around the entire clump, giving it a wide berth to avoid spearing any of the bulbs. Once the soil is loosened, gently lift the entire mass of bulbs out of the ground. Take care during this process to minimize damage to the bulbs and their basal plates, where the roots emerge.
Once the clump is lifted, you can proceed with the separation. Often, the individual bulbs and offsets will separate quite easily with a gentle pull and twist. For more tightly packed clumps, you may need to carefully work them apart with your fingers. Your goal is to separate the clump into individual bulbs or smaller clusters. During this process, inspect the bulbs and discard any that appear soft, mushy, or show any signs of disease or damage, as these will not grow well and could introduce pathogens into the soil.
After separating the bulbs, they should be replanted as soon as possible to prevent them from drying out. Select the largest and healthiest bulbs for replanting in your desired locations, following the standard guidelines for depth and spacing. Smaller offsets can also be planted; they may take a year or two to reach a sufficient size to produce a flower, but they will eventually mature into blooming plants. This simple act of division not only rejuvenates your original planting but also allows you to significantly increase your stock of these beautiful alliums at no cost.
Propagation from seed
Propagating Allium aflatunense from seed is a more time-consuming and patient process than division, but it can be a rewarding experience and can yield a large number of new plants. To begin, you must first collect the seed. After the flowers have faded, allow the seed heads to remain on the plant and mature. As they dry, you will notice small, black seeds forming within the individual capsules. Once the seed head is completely dry and brittle, cut it from the stalk and shake it inside a paper bag to release the seeds.
The seeds of many allium species, including Allium aflatunense, often require a period of cold stratification to break their dormancy and trigger germination. This process mimics the natural winter conditions they would experience in their native habitat. You can achieve this by sowing the seeds in pots or seed trays in the autumn and leaving them outdoors in a protected location, such as a cold frame, over the winter. The natural cycle of cooling and warming temperatures will prepare the seeds for germination in the spring.
Alternatively, you can stratify the seeds artificially. Place the seeds in a small plastic bag with a bit of moist vermiculite or a damp paper towel. Seal the bag and place it in the refrigerator for a period of 6 to 8 weeks. After the cold treatment, the seeds can be sown in pots filled with a sterile seed-starting mix. Sow the seeds thinly on the surface and cover them with a very light layer of the mix or fine grit. Place the pots in a warm, bright location to encourage germination.
Be prepared to exercise patience, as it takes several years for a plant grown from seed to reach flowering size. The initial seedlings will resemble tiny blades of grass. It is important to keep them well-watered and provide them with light but regular feeding. After their first year, the tiny bulblets can be carefully transplanted into individual pots or a nursery bed to grow on. Typically, it will take at least three to four years of growth before the bulbs are large enough to produce their first spectacular flower.