The process of establishing a new climber starts with careful planning and an understanding of the species’ biological requirements. You must select a location that offers enough room for expansion while providing the necessary environmental conditions for success. Planting is not just about putting a root ball in the ground; it is about creating a habitat where the plant can thrive for years. Following professional techniques during this initial stage will ensure that your new vine gets the best possible start in life.
Preparation of the site is the most important step before you even bring the plant home from the nursery. You should clear all weeds and competing vegetation from a wide area to give the young roots plenty of space to grow. Improving the soil with high-quality compost will provide a nutrient-rich environment that encourages rapid establishment. Taking the time to do this correctly will save you months of catch-up work later in the growing season.
Propagation is a rewarding way to expand your garden collection or share plants with friends and fellow enthusiasts. You can choose from several different methods depending on the time of year and the resources you have available. Whether you use seeds, cuttings, or layering, each technique requires patience and attention to detail to be successful. Witnessing a new plant grow from a small piece of parent material is one of the greatest joys of gardening.
Successful establishment depends on consistent follow-up care during the first few months after the planting or propagation process. You should monitor the moisture levels closely, as young plants have not yet developed the deep root systems of mature specimens. Providing temporary shade during heatwaves can also help reduce transplant shock and keep the foliage from burning. Your attentiveness during this vulnerable period will define the future vigor and health of the entire vine.
Choosing the ideal site
The location you choose will determine the overall health and growth rate of your vine for its entire lifespan. You should look for a spot that receives plenty of sunlight on the foliage while keeping the root zone shaded. A north or east-facing wall is often ideal, as it provides a stable environment with protection from the hottest afternoon sun. Ensure that there is a sturdy structure nearby that the plant can use as it begins its rapid ascent.
More articles on this topic
Soil quality is a non-negotiable factor when selecting the perfect home for your new climbing plant in the garden. You should avoid areas where water tends to stand after a rainstorm, as this indicates poor drainage and potential root issues. A deep, loamy soil that is rich in organic matter will provide the best foundation for a vigorous and healthy specimen. If your garden has thin or rocky soil, you may need to dig a larger hole and backfill it with better material.
Spatial requirements must be considered because this species can grow several meters in a single season under the right conditions. You should ensure that the plant has enough vertical and horizontal room to expand without interfering with other valuable garden features. Avoid planting it too close to delicate shrubs that could easily be smothered by the climber’s dense and heavy foliage. Thinking ahead about the mature size of the plant will prevent many headaches and pruning tasks in the future.
Accessibility for maintenance is a practical consideration that many people forget when they are caught up in the excitement of planting. You should be able to reach the base of the plant easily for watering, mulching, and the occasional application of fertilizer. Ensure there is enough space around the site to set up a ladder safely for pruning and training the upper branches. A well-placed plant is much easier to care for and will ultimately look better because it receives the attention it needs.
The professional planting process
Digging the hole is the first physical step, and it should be at least twice the width of the current root ball. You want to loosen the surrounding soil to make it easier for the new roots to penetrate and explore their new home. I always recommend adding a handful of bone meal or a similar slow-release phosphorus source to the bottom of the hole. This encourages strong root development, which is essential for the long-term stability of a heavy, woody climber.
More articles on this topic
Preparing the plant itself involves checking the roots and ensuring that they are not circling tightly inside the nursery pot. If the plant is root-bound, gently tease the roots outward with your fingers to encourage them to grow into the surrounding soil. You should soak the root ball in a bucket of water for about twenty minutes before planting to ensure it is fully hydrated. This simple step can significantly reduce transplant shock and help the plant recover more quickly from the move.
The depth at which you place the plant in the hole is a subject of much debate among professional horticulturists and gardeners. Many experts suggest planting this specific genus slightly deeper than it was in the pot to encourage more stems to grow from below the soil. This technique provides a safety net; if the top of the plant is damaged, new shoots can emerge from the protected underground buds. Firm the soil gently around the roots to remove large air pockets, but avoid packing it so hard that you crush them.
Initial watering and mulching are the final tasks that seal the deal for a successful planting session in your garden. You should apply several gallons of water immediately to settle the soil and ensure that the roots have direct contact with moisture. Follow this with a thick layer of organic mulch, keeping it a few inches away from the main stems to prevent rot. This mulch will keep the roots cool and moist, which is exactly what this plant needs to start its new life successfully.
Propagation through seeds
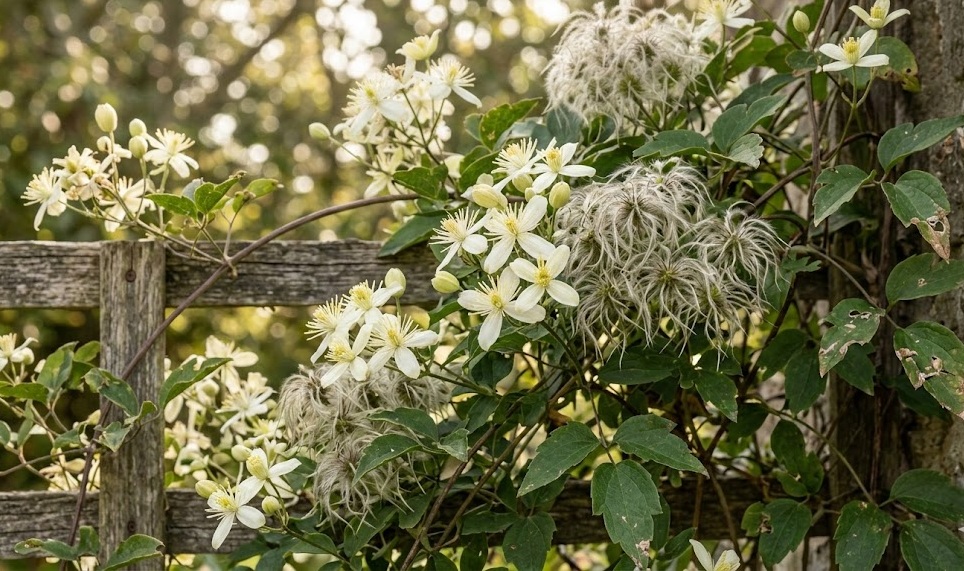
Collecting seeds from mature plants in the late autumn is a cost-effective way to start a large number of new vines. You should look for the characteristic fluffy seed heads that give the plant its common name and wait until they are dry. Store the seeds in a cool, dry place until you are ready to begin the sowing process in the early spring. Keep in mind that seeds may not produce plants that are identical to the parent, leading to interesting variations.
Sowing the seeds requires a well-draining seed starting mix and a shallow tray or a series of small individual pots. You should barely cover the seeds with a fine layer of grit or vermiculite, as they sometimes require light to trigger the germination process. Keep the soil consistently moist but never soggy, and place the containers in a bright spot away from direct, harsh sunlight. Patience is required, as germination can be erratic and may take several weeks or even months to occur.
Pricking out the seedlings is a delicate task that you should perform once the young plants have developed two sets of true leaves. Carefully lift each seedling by its leaves, not the stem, and move it into a larger pot filled with a standard potting medium. Be sure to keep the roots as intact as possible during this transition to minimize any growth checks or potential failures. Provide a small stick or a piece of wire for the young climber to grab onto as it begins its first upward growth.
Hardening off the young plants is the final step before they are ready to be moved into their permanent positions in the garden. You should gradually expose them to outdoor conditions over a period of two weeks, starting with a few hours in a sheltered spot. This process allows the plant tissues to toughen up and adapt to the wind, temperature fluctuations, and intensity of the sun. Once they are accustomed to the outdoors, you can plant them out using the professional techniques described previously.
Cuttings and layering techniques
Softwood cuttings taken in the early summer are one of the fastest ways to create an exact clone of a particularly vigorous plant. You should select healthy, non-flowering shoots and cut a section that includes at least two sets of leaves and a node. Remove the lower leaves and dip the base of the cutting into a rooting hormone powder to stimulate new root growth. Place the cuttings in a pot of sandy compost and keep them in a humid environment until roots begin to form.
Semi-ripe cuttings are taken later in the season when the base of the new growth has started to become slightly woody and firm. These are often more resilient than softwood cuttings but may take a little longer to produce a functional root system for the plant. You should follow the same general procedure, ensuring that the cuttings stay hydrated and are protected from extreme environmental conditions. Once you see new growth at the tips, it is a clear sign that the roots have successfully established.
Layering is a simple and highly effective method that takes advantage of the plant’s natural ability to root where stems touch the ground. You should choose a low-growing, flexible stem and gently nick the underside of the bark near a node to stimulate growth. Pin this section to the ground and cover it with a few inches of moist soil, leaving the tip of the shoot exposed. After a year, the stem should have developed its own roots, allowing you to sever it from the parent plant.
Managing the newly propagated plants requires a bit more attention than dealing with established specimens in the landscape or garden. You should keep them in a nursery area where you can easily monitor their progress and provide protection from pests like slugs or snails. Regularly check the pots to ensure the roots are not becoming cramped and move them to larger containers as needed. When they are strong enough, these new vines will be ready to take their place in your grand gardening design.