The successful cultivation of this versatile vegetable begins with a thoughtful approach to both planting and propagation. While many gardeners choose to start with nursery transplants, growing from seed offers a wider variety of choices and a more rewarding experience. Understanding the biological needs of the seedling is the first step toward achieving a robust and healthy crop. This professional guide will walk through the essential stages of getting the plants started in the right environment.
Propagation typically begins in late winter or early spring, depending on the specific climate and the desired harvest time. Starting seeds indoors provides a controlled environment where temperature and moisture can be managed with precision. This early start gives the plants the long growing season they require to develop thick, succulent stalks. Many professional growers use heated seed trays to ensure consistent and rapid germination of the tiny black seeds.
Direct sowing is an alternative method used by those with a longer growing season or a preference for simpler techniques. This involves preparing a fine, crumbly seedbed and sowing the seeds in shallow drills once the soil has warmed up. While this method requires more careful thinning later on, it eliminates the stress of transplanting for the young plants. Choosing between indoor starting and direct sowing depends on the specific goals and resources of the agricultural operation.
Healthy propagation results in sturdy seedlings that are ready to face the challenges of the outdoor garden. A professional approach involves monitoring the light levels and air circulation to prevent the seedlings from becoming leggy or diseased. As the plants grow, they must be hardened off gradually to acclimate them to the outdoor conditions. This transition period is crucial for ensuring a high survival rate once the planting process begins in the main beds.
Seed selection and sowing
Choosing the right variety is the foundation of a successful planting strategy for the upcoming season. There are early-maturing types suitable for summer harvests and hardier varieties designed to withstand the cold of winter. Professional growers often select seeds based on their resistance to local pests and their ability to thrive in specific soil conditions. Reading the technical data provided by seed suppliers helps in making an informed decision for the garden.
More articles on this topic
Sowing the seeds requires a steady hand and a fine-textured seed-starting mix that retains moisture while allowing for drainage. The seeds should be buried only a few millimeters deep, as they are quite small and have limited energy reserves. Providing a consistent temperature of around 15 to 20 degrees Celsius is ideal for triggering the germination process. It is important to keep the surface of the soil moist but not waterlogged during this delicate initial phase.
Once the first green shoots appear, they resemble small blades of grass and require plenty of bright light. If growing indoors, using supplemental LED grow lights can prevent the seedlings from stretching toward the nearest window. Proper spacing during the initial sowing phase reduces the risk of damping-off disease, which can quickly wipe out a whole tray of seedlings. A professional setup ensures that every seed has the best possible start in life.
Labeling the different varieties and sowing dates is a simple but essential task for any organized gardener. This information becomes invaluable when evaluating the performance of different types at the end of the season. Keeping a detailed log of the propagation process helps in refining techniques for future years and improving overall efficiency. A systematic approach to seed sowing sets the tone for a professional and productive growing season.
Transplanting techniques
Transplanting is perhaps the most critical moment in the life cycle of the plant as it moves to its permanent location. The seedlings are typically ready for the move when they have reached the thickness of a pencil and are about 15 to 20 centimeters tall. Before the actual transplanting takes place, the garden bed should be thoroughly weeded and the soil loosened to a good depth. This preparation ensures that the young roots can establish themselves quickly in their new home.
The traditional “dibber” method is often used by professionals to create deep, narrow holes for the individual plants. Each seedling is dropped into a hole that is approximately 10 to 15 centimeters deep, ensuring that only the top leaves remain above the surface. Unlike many other vegetables, these plants should not have the soil firmed around them immediately after planting. Instead, the holes are filled with water, which naturally washes enough soil over the roots to hold them in place.
Spacing is another vital consideration that affects the final size and health of the harvested crop. Leaving about 15 centimeters between individual plants and 30 centimeters between rows allows for adequate air circulation and room for growth. This spacing also makes it easier to perform maintenance tasks like weeding and mounding later in the season. A well-organized layout is the mark of a professional agriculturalist who values both efficiency and plant health.
Immediately after transplanting, the young plants may appear a bit wilted as they adjust to the outdoor environment. Providing consistent moisture during the first two weeks is essential for helping them overcome transplant shock. It is also a good idea to protect them from strong winds or intense midday sun if the weather is particularly harsh. With proper care during this transition, the seedlings will soon begin to produce new, vibrant green growth.
Direct sowing in the field
For those who prefer a more natural approach, direct sowing into the final growing site can yield excellent results. This method is often used for late-season varieties that do not need the extra time provided by an indoor start. The soil must be prepared to a very fine tilth, as the small seeds can easily be lost in large clods of earth. Sowing in straight, well-marked rows makes it much easier to distinguish the young seedlings from emerging weeds.
The depth of the sowing should be consistent across the entire row to ensure even germination and growth. Using a rake or the back of a hoe to lightly cover the seeds protects them from birds and prevents them from drying out. Irrigation is crucial during the germination period, as the top layer of soil can dry out very quickly in the sun. A light misting or a soaker hose is often the best way to deliver water without disturbing the seeds.
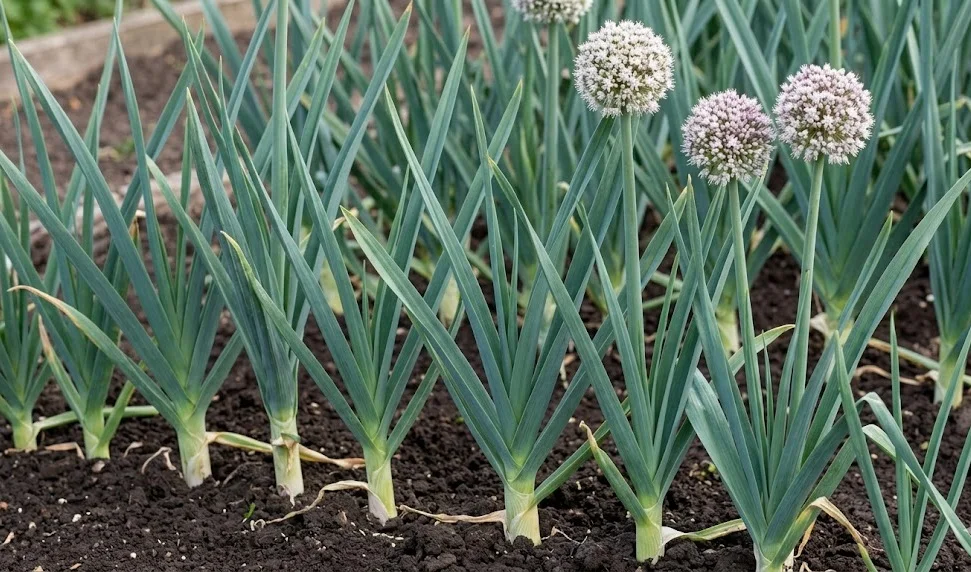
Once the seedlings have reached a few centimeters in height, thinning becomes necessary to prevent overcrowding. This involves removing the smaller or weaker plants to leave the strongest individuals at the desired spacing. Thinning should be done in stages to ensure that a full stand of plants is maintained even if some are lost to pests. The removed seedlings can often be used in the kitchen as delicate “green onions” for salads.
Managing a direct-sown crop requires a high level of vigilance against weeds during the first few weeks. Because the seedlings are so small and grow slowly at first, they can easily be overwhelmed by faster-growing invasive plants. Using a specialized hand tool for precision weeding around the young plants is a common professional practice. Direct sowing is a rewarding technique that connects the grower directly with the natural rhythms of the soil.
Vegetative propagation and offsets
While most people think of seeds when they think of propagation, some varieties can also be increased through vegetative means. Certain heirloom or perennial types produce small offsets or “pips” at the base of the mature plant. These miniature clones can be carefully detached and replanted to create new individuals for the following season. This method ensures that the unique characteristics of a specific plant are preserved exactly as they are.
The best time to collect these offsets is during the main harvest in late autumn or early winter. The small bulbs found around the base should be handled gently to avoid damaging the tiny roots that may have already started to form. Storing them in a cool, dry place until the following spring allows them to remain dormant until the planting season begins. This practice is a traditional way of maintaining a consistent and reliable supply of plants year after year.
Planting the offsets follows a similar process to transplanting seedlings, though they are often more resilient from the start. They should be placed at the same depth they were growing at previously to encourage quick establishment. Because they already have a small bulbous base, these plants often grow faster than those started from seed. Professional growers use this technique to maintain rare varieties that may not always produce viable seeds.
Understanding the different ways to propagate allows for a more flexible and robust gardening strategy. Whether starting from seed, transplanting, or using offsets, each method has its place in a professional agricultural plan. Experimenting with different propagation techniques helps in discovering what works best for a specific microclimate and soil type. Sharing propagation tips and materials with other gardeners is a great way to build a community around the love of horticulture.