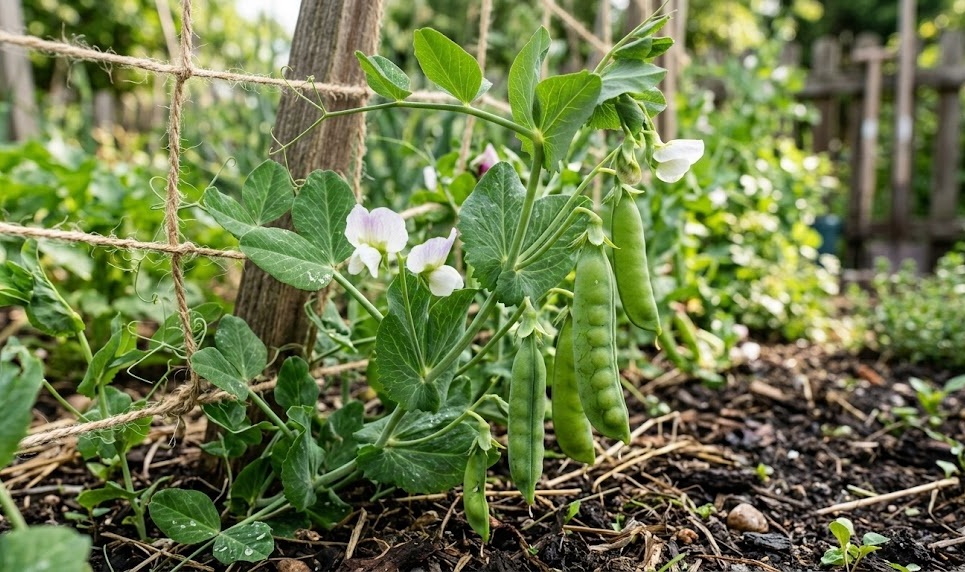
Successful propagation of green peas begins with selecting high-quality seeds that are suited to your specific climate and soil conditions. You should look for reputable suppliers who provide fresh stock from the current growing season to ensure high germination rates. Understanding the difference between bush and climbing varieties is essential for planning your garden layout and infrastructure. Investing time in seed selection sets the stage for a healthy and productive garden full of sweet, vibrant legumes.
Direct sowing is the preferred method for most professional gardeners because peas have sensitive root systems that do not like to be disturbed. You should wait until the soil is workable and has reached a temperature of at least five degrees Celsius before planting. In many regions, this occurs early in the spring as soon as the ground has thawed and the risk of heavy frost has diminished. Planting your seeds directly into their permanent home allows them to develop a deep and resilient root structure from day one.
Before you put the seeds into the ground, it is often beneficial to soak them in room temperature water for several hours or overnight. This process softens the hard outer shell and signals the embryo inside that it is time to begin the germination process. You will notice that the seeds swell significantly during this time, which can give them a head start in the soil. Be careful not to leave them in the water for too long, as they can eventually drown or begin to rot.
Inoculating your seeds with beneficial nitrogen-fixing bacteria is a professional secret that can significantly boost your plant health and yield. You can purchase these inoculants as a fine powder that you dust onto the damp seeds just before you plant them. These bacteria form a symbiotic relationship with the roots, allowing the plants to pull nitrogen directly from the air. This natural process reduces the need for synthetic fertilizers and leaves your garden soil richer than it was before you started.
Optimal sowing techniques and timing
The depth at which you plant your seeds is a critical factor that influences how quickly they will emerge from the soil. You should aim for a depth of about three to five centimeters, depending on the texture and moisture content of your garden bed. In heavier clay soils, a shallower depth is often better, while in light sandy soils, you can plant slightly deeper. Ensuring that the seeds are in firm contact with the moist soil is the key to successful and uniform germination.
More articles on this topic
Spacing is another vital consideration that you must plan carefully to avoid overcrowding and promote healthy air circulation. You should place seeds about five to eight centimeters apart within the rows, allowing enough room for each plant to expand. If you are planting multiple rows, leave at least forty to sixty centimeters between them to facilitate easy maintenance and harvesting. Proper spacing ensures that each plant receives adequate sunlight and is not competing too aggressively for the available moisture.
Timing your planting is an art form that depends on the specific weather patterns of your local microclimate. You should aim to have your peas reach maturity before the intense heat of summer arrives, as they will stop producing in high temperatures. Many gardeners practice succession planting, which involves sowing small batches of seeds every two weeks throughout the early spring. This strategy extends your harvest period and ensures a continuous supply of fresh peas for several months.
If you live in an area with a very short spring, you might consider starting your seeds indoors in biodegradable pots. You should use deep containers like paper pots or peat cells that can be planted directly into the ground without removing the seedlings. This method protects the delicate roots from transplant shock while giving the plants a few weeks of growth in a controlled environment. However, direct sowing remains the gold standard for achieving the most robust and productive pea plants.
Creating the ideal germination environment
The moisture level of the soil during the germination phase is a delicate balance that you must manage with constant attention. You should keep the soil consistently damp but never waterlogged, as excess water can cause the seeds to rot before they sprout. If the soil surface dries out and forms a hard crust, the young seedlings may struggle to break through to the light. Gentle irrigation with a fine mist or a watering can is the best way to maintain the perfect moisture level.
More articles on this topic
Soil temperature plays a major role in how many days it will take for your green peas to emerge from the ground. At cooler temperatures, the process may take up to two or even three weeks, while warmer soil can see sprouts in just seven days. You can use row covers or clear plastic sheets to warm the soil early in the season if you are eager to get started. Monitoring the soil temperature with a simple thermometer can help you time your planting for the highest possible success rate.
Protecting your newly sown seeds from garden wildlife is a challenge that you should address immediately after planting. You might find that mice, squirrels, or birds are very interested in digging up the nutritious seeds you have just buried. Covering your planting area with a fine wire mesh or a heavy-duty fabric row cover can effectively block these unwanted visitors. Once the plants are several centimeters tall and have established their first leaves, they are usually less attractive to seed-eating animals.
The physical structure of your garden bed should be loose and friable to allow the young roots to penetrate easily. You should avoid tilling the soil when it is too wet, as this can create large clods that hinder the growth of small seedlings. Using a rake to create a smooth, level surface before sowing ensures that your seeds are at a consistent depth throughout the row. A well-prepared seedbed is the first step toward a uniform and professional-looking crop of green peas.
Strategies for effective propagation
Saving your own seeds is a rewarding way to propagate green peas and develop a strain that is perfectly adapted to your garden. You should select the healthiest and most productive plants from your current crop to set aside specifically for seed production. Allow the pods on these selected plants to remain on the vine until they are completely dry and the seeds rattle inside. This natural ripening process ensures that the embryos are fully developed and ready for a period of dormancy.
Once the pods are dry, you should harvest them and bring them indoors to finish the drying process in a well-ventilated area. You can then shell the peas and store the hard, dry seeds in a cool, dark, and dry place until the next planting season. Labeling your seeds with the variety name and the date of harvest is a professional habit that prevents confusion later. Properly stored pea seeds can remain viable for several years, giving you a reliable source of future crops.
Understanding the genetics of the varieties you are growing is important if you plan to save seeds for future propagation. You should know that peas are primarily self-pollinating, which means they rarely cross-breed with other varieties growing nearby. This makes it relatively easy for you to maintain the purity of a specific heirloom or favorite variety year after year. However, keeping a small distance between different types of peas is still a good practice to ensure absolute consistency.
Vegetative propagation is not commonly used for green peas, as they are annuals that grow very quickly from seed. You will find that the energy and time required to grow these plants from seed is minimal compared to the high yields they provide. Focusing your efforts on mastering the art of seed starting and soil management is the most effective path to success. By treating each seed as a potential powerhouse of nutrition, you will develop a deep respect for the propagation process.