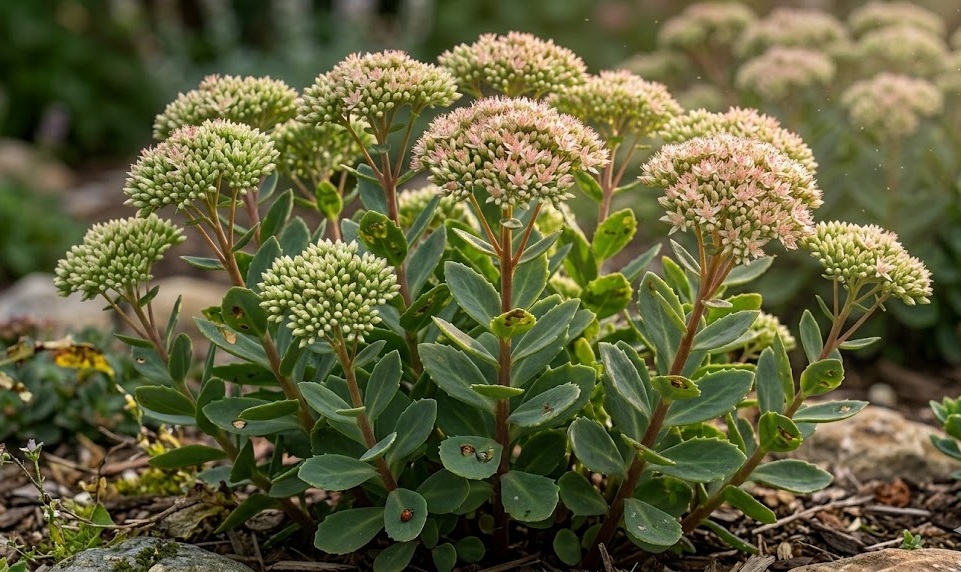
The successful establishment of great stonecrop begins with a thoughtful approach to planting and a strategic plan for propagation. This hardy perennial is exceptionally rewarding because it offers multiple ways to expand your collection with very little equipment or specialized knowledge. Whether you are starting with a nursery-bought container or taking cuttings from a friend’s garden, the timing and technique you use will dictate the vigor of the resulting plants. A professional approach to these early stages ensures that your stonecrops develop the deep root systems necessary for their long-term survival in the landscape.
Site selection and soil preparation
Choosing the right location for your great stonecrop is the most critical decision you will make during the planting process. This plant requires a spot that receives at least six to eight hours of direct sunlight every day to maintain its structural integrity. In lower light conditions, the stems will stretch and become weak, eventually causing the entire plant to collapse under its own weight. Look for open areas in your garden where the sun reaches the ground even during the shorter days of late summer and autumn.
The drainage capacity of the site is equally important, as this succulent cannot tolerate standing water around its roots. You should observe your garden after a heavy rain to identify areas where the water disappears quickly and avoids forming puddles. If your entire garden has heavy soil, consider planting on a slope or creating a raised bed to improve gravity-fed drainage. These elevated positions also help showcase the unique texture and form of the great stonecrop as it matures.
Before you dig your first hole, you must prepare the soil by removing any existing vegetation and improving the structure. Use a garden fork to loosen the earth to a depth of at least ten inches, breaking up any large clods of clay. Incorporate a generous amount of grit, coarse sand, or fine gravel to create the porous environment these roots crave. Avoid adding high-nitrogen fertilizers or large amounts of compost, as these will promote soft, weak growth that is susceptible to disease.
Final preparation involves leveling the area and ensuring that the soil is firm but not compacted. You want the roots to be able to penetrate the soil easily, but the plant needs a stable base to prevent it from leaning. If the soil is very dry, give the area a light watering the day before you plan to plant to ensure there is deep moisture available. This careful preparation sets the stage for a smooth transition from the nursery pot to the permanent garden home.
More articles on this topic
Best practices for spring planting
Spring is the ideal time to plant great stonecrop because it gives the specimen a full growing season to establish its root system before winter. You should wait until the danger of hard frost has passed and the soil has begun to warm up to at least ten degrees Celsius. Planting too early in cold, wet soil can lead to immediate root rot or stunted growth that the plant may never fully recover from. Watch for the first signs of green growth on established perennials in your neighborhood as a signal to start.
When you are ready to plant, dig a hole that is twice as wide as the root ball but no deeper than the original container. Placing the plant too deep in the soil can bury the crown, which is the most sensitive part of the stonecrop to excess moisture. Gently remove the plant from its pot and tease out any circling roots to encourage them to grow outward into the new soil. Position the plant so the top of the root ball is exactly level with the surrounding garden surface.
Fill the space around the root ball with the prepared soil mix, tamping it down firmly with your hands to remove any large air pockets. You should avoid using your feet to compact the soil, as this can crush the delicate feeder roots and reduce the amount of oxygen available to the plant. After planting, give the stonecrop a thorough watering to settle the soil and ensure good contact between the roots and the earth. This initial hydration is important, even for a drought-tolerant succulent, to help it overcome transplant shock.
Finish the planting process by applying a thin layer of stone mulch around the base of the plant, keeping it an inch away from the stems. This mulch helps regulate soil temperature and prevents mud from splashing onto the leaves during heavy rains. For the first few weeks, keep a close eye on the new transplant and water only when the top inch of soil feels completely dry. Once you see new leaves appearing, you can gradually reduce the frequency of watering as the plant becomes more self-sufficient.
More articles on this topic
Propagation by stem cuttings
One of the easiest ways to multiply your great stonecrop is through stem cuttings taken during the active growing season. You can perform this task anytime from late spring through mid-summer when the stems are firm and full of energy. Choose a healthy, non-flowering stem and cut a piece about four to six inches long using a clean, sharp knife. Make the cut just below a leaf node, as this is where the highest concentration of root-forming cells is located.
After taking your cuttings, you must allow the cut ends to “callous” over for a day or two in a shaded, dry location. This step is vital because it creates a protective barrier that prevents soil-borne pathogens from entering the succulent tissue. If you skip this and stick a fresh cutting directly into moist soil, it is very likely to rot before it can form roots. You will know the cutting is ready when the wound feels dry and firm to the touch, rather than soft and wet.
Insert the calloused end of the cutting into a pot filled with a very sandy, well-draining potting mix. You can remove the bottom few leaves to expose more of the stem, but make sure at least two or three sets of leaves remain at the top. Place the pot in a bright spot with indirect light, as direct sun can dehydrate the cutting before it has the means to take up water. Keep the potting mix barely moist, using a spray bottle to provide light hydration rather than a heavy watering can.
Roots usually begin to form within three to four weeks, and you can test this by giving the cutting a very gentle tug. If you feel resistance, it means the new roots have started to anchor themselves into the medium. Once the cutting shows visible new growth at the tip, you can gradually move it into a sunnier location and treat it like a mature plant. This method allows you to create dozens of new plants from a single parent specimen at virtually no cost.
Division of mature rootstocks
Dividing mature clumps is the best way to rejuvenate an old great stonecrop while also gaining new plants for your garden. This process should ideally be done every three to four years in early spring, just as the new growth starts to emerge. Large clumps often become less productive in the center, and division restores their vigor by providing more space and fresh soil. Use a sharp spade to lift the entire root mass out of the ground, taking care to get as much of the root system as possible.
Once the clump is out of the ground, you can often pull it apart by hand or use a clean garden knife to slice through the tough rootstock. Each new division should have at least three to five healthy shoots and a substantial portion of the root system attached. Discard any woody or dead material from the center of the old clump to ensure you are only replanting the most vigorous parts. This process mimics the natural breaking apart of old plants in the wild and keeps your garden looking fresh.
Replant the new divisions immediately into prepared soil, following the same depth guidelines as you would for a new nursery plant. Because these divisions already have an established root system, they usually recover very quickly and may even flower in the same season. Space them at least twelve to eighteen inches apart to allow for future growth and ensure good air circulation between the plants. If you have more divisions than you need, they make excellent gifts for fellow gardeners.
Water the newly divided plants thoroughly to help them settle into their new homes and eliminate any air pockets. You may notice a slight wilt in the first few days, but the great stonecrop is remarkably resilient and will soon stand upright again. By dividing your plants regularly, you maintain a young and healthy population that is better equipped to handle environmental stresses. This simple maintenance task is one of the most effective ways to ensure the longevity of the species in your landscape.