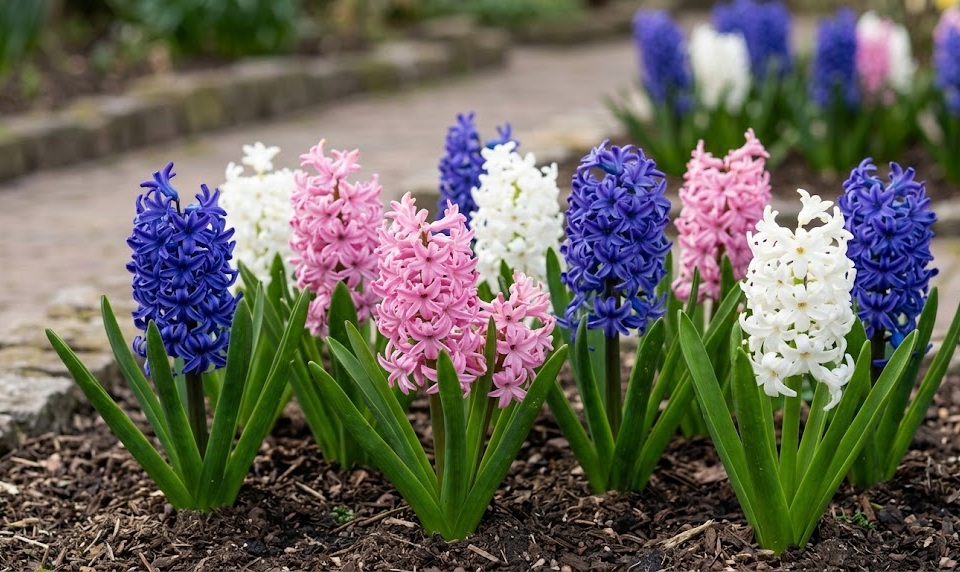
The successful establishment of a hyacinth colony begins with a meticulous planting process that respects the biological requirements of these ornamental bulbs. Achieving a professional-grade display requires more than just placing bulbs in the ground; it involves careful timing, precise depth management, and optimal site preparation. These bulbs are the concentrated energy stores of the plant, and their initial placement determines the quality of the flowers for years to come. By adhering to expert planting protocols, you can ensure that your spring garden becomes a masterpiece of color and fragrance.
Timing is the most critical factor when planning your planting schedule in the late autumn months. You must wait until the soil temperature has dropped sufficiently, usually after the first few light frosts, to prevent the bulbs from sprouting too early. Planting too early in a warm autumn can lead to tender growth that is easily damaged by the onset of severe winter weather. Aim for a window where the ground is cool but not yet frozen, allowing for a few weeks of root development before the deep freeze sets in.
Site selection involves evaluating both the light exposure and the drainage capabilities of your chosen garden area. Hyacinths thrive in positions that receive full sun during the spring months, even if those areas are shaded by deciduous trees later in the summer. The soil must be loose and friable to a significant depth to allow for the natural expansion of the bulb and its roots. Avoid low-lying areas where water tends to collect after heavy rain, as this will almost certainly lead to bulb rot.
Soil preparation should be done several weeks in advance to allow the earth to settle before the bulbs are introduced. Dig the area thoroughly, removing any large stones or persistent weeds that might compete with the young plants. Incorporating a balanced organic compost will improve the soil structure and provide a slow-release source of essential nutrients. This preparation creates an inviting environment that encourages rapid root colonization and helps the plant withstand environmental stresses.
Technical aspects of bulb placement
The depth at which you plant your hyacinth bulbs is a major determinant of their future stability and flower quality. A general rule of professional horticulture is to plant bulbs at a depth that is three times their own height. This deep placement protects the dormant tissue from extreme temperature fluctuations and provides the physical support needed for heavy flower spikes. If you plant them too shallowly, the flower stalks are likely to topple over under the weight of their own blooms.
More articles on this topic
Orientation is another small but vital detail that can affect how quickly the shoots reach the surface. Always ensure the pointed end of the bulb is facing upward, as this is where the embryonic leaves and flowers will emerge. The flat basal plate, which is where the roots will grow, must be in firm contact with the soil at the bottom of the planting hole. While bulbs have a natural ability to orient themselves over time, correct placement saves the plant valuable energy during the early growth phase.
Spacing between the bulbs should be consistent to create a professional, uniform look in your garden beds. Leaving a gap of about ten to fifteen centimeters between each bulb allows for adequate air circulation and prevents competition for soil nutrients. If you are planting in groups for a more natural effect, try to maintain a minimum distance to ensure each plant has room to reach its full potential. Densely packed displays might look good for one year, but they often lead to smaller flowers in subsequent seasons.
After placing the bulbs in their holes, you should backfill the area with the amended soil and firm it down gently with your hands. Avoid stepping on the planting area, as excessive compaction can hinder the emergence of the delicate shoots in the spring. Watering the area immediately after planting is essential to settle the soil around the bulbs and eliminate any large air pockets. This initial hydration also signals to the bulb that it is time to begin the process of root establishment.
Propagation methods and offset management
Propagating hyacinths is most commonly achieved through the separation of natural offsets that form at the base of mature bulbs. These small “bulblets” are genetically identical to the parent plant and can be grown into full-sized flowering bulbs over several seasons. To harvest them, you must carefully lift the mature bulbs during their dormant period in late summer or early autumn. Using a clean, sharp knife, you can gently detach the larger offsets that have already begun to form their own root plates.
More articles on this topic
Handling these offsets requires care, as they are more susceptible to drying out or being bruised than mature bulbs. Once detached, the bulblets should be replanted immediately or stored in a cool, dry place until the autumn planting season. They should be planted at a slightly shallower depth than mature bulbs, reflecting their smaller size and reduced energy stores. It usually takes two to three years of careful feeding and watering for these offsets to produce their first significant flower spikes.
Professional growers sometimes use a technique called “scoring” or “scooping” to stimulate the production of more offsets. This involves making precise cuts into the basal plate of a healthy, mature bulb to disrupt its apical dominance. While this method can produce a high number of new bulblets, it is a specialized task that requires sterile conditions to prevent infection. For the home gardener, relying on natural division is usually the safest and most rewarding way to expand a collection.
Maintaining the health of the parent bulb during the propagation process is essential for continued garden performance. You should only remove offsets that come away easily, as forcing the separation can damage the main bulb’s protective scales. After division, the parent bulbs should be replanted in fresh, nutrient-rich soil to help them recover from the process. This cycle of lifting and dividing every few years keeps the colony vigorous and prevents the decline in flower quality associated with overcrowding.
Seed propagation for genetic diversity
Propagating hyacinths from seed is a much slower process that is primarily used by breeders to create new cultivars and colors. It can take up to six or seven years for a seedling to develop into a bulb large enough to produce a flower. If you decide to try this method, you must allow the flower spikes to form seed pods instead of deadheading them after the bloom fades. The seeds should be harvested once the pods turn brown and begin to split open naturally.
The seeds should be sown immediately into a well-draining seed compost and kept in a cold frame or unheated greenhouse. They require a period of cold stratification to break their dormancy and trigger germination in the following spring. During the first few years, the seedlings will look like tiny blades of grass as they focus all their energy on building a small underground bulb. You must be patient and keep the growing medium consistently moist but never waterlogged during this long developmental phase.
Fertilizing these young seedlings with a weak liquid feed during their active growth period can help speed up their development. However, you must be careful not to over-fertilize, as this can lead to soft growth that is more prone to pests and diseases. Each year, the small bulbs will increase in size and should be moved to larger containers or a dedicated nursery bed. This method is a true test of a gardener’s patience and commitment to the long-term health of their botanical collection.
One of the main advantages of growing from seed is the element of surprise, as the resulting flowers may differ from the parent plants. This genetic variation can lead to interesting new shades of blue, pink, or white that are unique to your garden. While it is not the most efficient way to increase your stock, it provides a deep sense of satisfaction for the dedicated horticulturalist. Understanding both vegetative and sexual reproduction gives you a complete perspective on the life cycle of these magnificent spring bulbs.