Successfully establishing these plants in the landscape requires a strategic approach to both the timing and the technique of planting. Whether starting from nursery-grown specimens or propagating through division, the goal is to minimize stress and encourage rapid root development. These primulas are highly adaptable if their basic needs for moisture and soil structure are met from the very beginning of the process. A professional planting method involves careful site preparation and an understanding of the plant’s unique growth habits during its early stages.
Seed starting procedures
Growing these perennials from seed is a rewarding process that requires patience and attention to specific environmental cues. The seeds are quite small and typically require a period of cold stratification to break their natural dormancy before they will germinate reliably. Professional growers often sow the seeds in the late winter or early spring in a seed-starting mix that is kept consistently moist but not saturated. Providing a cool environment during the germination phase mimics the natural conditions of an alpine spring, leading to stronger and healthier seedlings.
Once the seeds are sown on the surface of the soil, they should be covered with only a very thin layer of fine grit or vermiculite, as some light is often beneficial for germination. Keeping the seed trays in a cold frame or an unheated greenhouse protects them from the worst of the weather while still providing the necessary cool temperatures. Consistency in moisture is the most challenging part of this stage, as the tiny seeds can easily dry out or be washed away by heavy watering. A fine misting system or bottom watering is usually the preferred professional method for hydrating delicate seed trays.
As the seedlings develop their first true leaves, they can be carefully pricked out and moved into individual small pots to continue their growth. This stage requires a gentle touch to avoid damaging the fragile root systems that are just beginning to take hold in the potting medium. Providing a weak liquid fertilizer at this point can help boost growth, but care must be taken not to burn the young tissues with too much nitrogen. Professional management of the seedlings ensures that they are strong enough to withstand the transition to the garden later in the season.
Before planting the young starts into their permanent home, they must be gradually hardened off to acclimatize them to the outdoor conditions. This involves exposing them to increasing amounts of wind and direct sunlight over a period of ten to fourteen days. Skipping this step often results in transplant shock, which can significantly set back the development of the young plants. By following a disciplined seed-starting protocol, a gardener can produce a large number of high-quality primulas for a fraction of the cost of buying mature plants.
More articles on this topic
Division techniques
Division is the most common and effective way to propagate established clumps while maintaining the exact characteristics of the parent plant. This process is best performed every few years to keep the plants vigorous and to prevent the center of the clump from becoming unproductive. Professional division involves lifting the entire plant from the ground with as much of the root ball as possible to minimize the recovery time. This is typically done in the late spring after the flowering has finished or in the early autumn when the weather cools.
Once the plant is out of the ground, the soil should be gently shaken or washed away from the roots to clearly see where the individual crowns are joined. Most drumstick primulas will naturally separate into several smaller rosettes, each with its own set of fibrous roots and a central growing point. If the crowns are tightly joined, a clean, sharp knife can be used to slice them apart with minimal damage to the surrounding tissue. Ensuring that each division has a healthy amount of root material is the key to a successful professional propagation effort.
The newly separated pieces should be replanted immediately at the same depth they were growing previously to avoid burying the crown or exposing the roots. Firming the soil around the new plants eliminates air pockets and ensures good contact between the roots and the earth. Watering deeply right after planting is essential to help the divisions settle in and start the process of rebuilding their root systems. A light application of organic mulch around the new plants will help keep the moisture levels stable during this critical recovery phase.
Monitoring the new divisions for the first few weeks is important, as they will be more sensitive to drought and heat than established plants. If the weather is particularly sunny, providing temporary shade for the newly moved plants can help reduce the amount of moisture they lose through their leaves. Within a few months, these divisions will have established themselves and will be ready to put on a full floral display the following year. Professional division is a vital skill that keeps a garden looking fresh and allows for the easy expansion of a primula collection.
More articles on this topic
Site selection and soil preparation
Choosing the right location in the garden is the most important decision a gardener makes when planting these early-season perennials. They thrive in areas that receive full sun in the early spring but are protected by dappled shade as the trees leaf out and the temperatures rise. A site with a northern or eastern exposure is often ideal, as it stays cooler and more consistently moist throughout the growing season. Professional site selection also considers the drainage patterns of the garden, ensuring that the plants are not located in a low spot where water sits for long periods.
The soil in the chosen location must be prepared thoroughly before any planting takes place to give the primulas the best start possible. Digging in a generous amount of organic matter such as well-rotted manure, leaf mold, or high-quality compost will improve the soil’s structure and nutrient content. This preparation should be done to a depth of at least thirty centimeters to accommodate the deep-reaching roots of a mature plant. In professional landscaping, the goal is to create a rich, loamy environment that remains loose and easy for roots to penetrate.
If the existing soil is heavily alkaline, incorporating elemental sulfur or acidic organic materials can help lower the pH to a more suitable level. Primulas generally prefer a soil that is slightly on the acidic side, which helps them absorb essential minerals like iron and manganese more efficiently. It is also beneficial to clear the area of any perennial weeds or large stones that could interfere with the growth of the young plants. Taking the time to prepare the site correctly will save hours of maintenance work in the future and result in much healthier specimens.
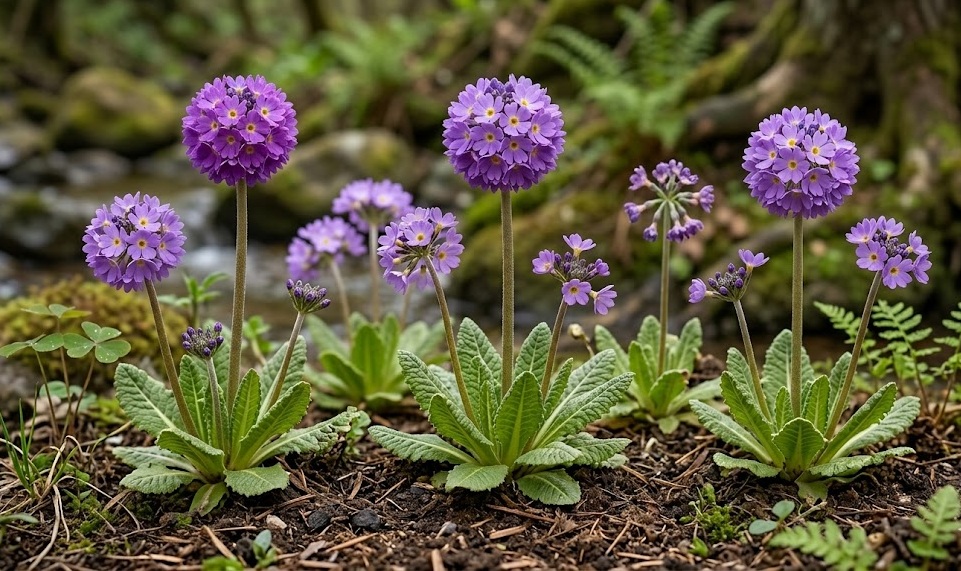
Finally, consider the visual placement of the plants within the overall design of the garden to maximize their impact during the blooming period. Planting them in groups or drifts creates a much more dramatic effect than scattering individual plants throughout a border. Because they are relatively short, they should be placed toward the front of the bed where their intricate globe-shaped flowers can be appreciated up close. A professional eye for placement ensures that the drumstick primulas not only grow well but also contribute significantly to the beauty of the landscape.
Establishing young plants
The first few months after planting are the most critical time for ensuring that a drumstick primula becomes a permanent and healthy part of the garden. Young plants have smaller root systems and are much less tolerant of environmental stresses like drought or extreme heat. Maintaining a consistent moisture level in the soil is the primary task for the gardener during this establishment phase. Professional care involves checking the soil daily and watering deeply whenever the top couple of centimeters feel dry to the touch.
Providing a light application of a balanced, slow-release fertilizer shortly after planting can help the young specimens develop the strong foliage they need for photosynthesis. However, it is important to avoid high-nitrogen fertilizers that might encourage soft, leggy growth which is more susceptible to pests and diseases. The goal is to build a sturdy plant with a robust root system that can support a large number of flowers in the coming years. Most professionals prefer organic options that nourish the soil as well as the plant itself.
In areas with high bird activity, it may be necessary to protect the young plants with a bit of netting, as birds sometimes like to pull at the tender leaves or flower buds. Similarly, keeping an eye out for slugs and snails is important, as they can quickly defoliate a small plant during a damp spring. Using natural barriers or organic controls will protect the young primulas without introducing harmful chemicals into the garden environment. This early protection allows the plant to focus all of its energy on getting established in its new home.
As the plant settles in, you will notice new leaves emerging from the center of the rosette, which is a sure sign that the roots are beginning to function effectively. Once the plant has clearly doubled in size, the frequency of watering can be slowly reduced, though the soil should never be allowed to dry out completely. A successfully established drumstick primula will be well-equipped to survive its first winter and return with a spectacular bloom the following spring. Professional establishment techniques are the foundation of a long-lived and thriving perennial garden.