The process of establishing a successful bean crop begins with a professional approach to soil preparation and seed handling. You must understand that beans are warm-season vegetables that require specific conditions to germinate and thrive without interruption. Careful planning regarding the timing of your planting will prevent the common pitfalls associated with cold soil or unpredictable spring weather. Every step you take during the propagation phase directly influences the ultimate health and productivity of the mature plants.
Selecting high-quality seeds is the first requirement for anyone looking to achieve a professional-grade harvest in their home garden. You should always source your seeds from trusted suppliers to ensure high germination rates and genetic purity. It is helpful to perform a simple germination test if you are using older seeds by placing a few in a damp paper towel. If the majority of the seeds sprout within a week, they are still viable and ready to be sown in your prepared garden beds.
Warming the soil is a professional secret that can significantly speed up the germination process and reduce the risk of seed rot. Beans prefer a soil temperature of at least 16 degrees Celsius, although 21 degrees is often considered the ideal target for rapid emergence. You can use black plastic sheeting to cover the planting area for a few days before sowing to trap solar heat. This simple preparation ensures that the seeds wake up in a welcoming environment that supports immediate and vigorous growth.
Inoculating your bean seeds with Rhizobium bacteria is a technique used by many experts to enhance the natural nitrogen-fixation process. These beneficial microbes are often available as a powder that you can apply directly to the damp seeds just before planting. While many soils already contain these bacteria, adding a fresh inoculum ensures that the symbiotic relationship starts early. This leads to stronger plants, greener foliage, and a more sustainable use of the nutrients already present in your garden soil.
Techniques for direct sowing
Direct sowing is the preferred method for propagating beans because their sensitive root systems do not react well to being moved. You should prepare a clean, level seedbed by removing any large clods of earth or lingering debris from previous crops. Using a garden line will help you create straight rows, which makes future maintenance and cultivation much easier to manage. Ensure that the soil is moist but not saturated before you begin placing the seeds into the ground.
More articles on this topic
The depth at which you plant the seeds is critical for ensuring they have enough protection and moisture to sprout successfully. Generally, you should plant bean seeds about 2.5 to 4 centimeters deep, depending on the texture of your soil. In heavier clay soils, a shallower depth is often better, while in light sandy soils, you can go slightly deeper. Firm the soil gently over the seeds with the back of a hoe to ensure good seed-to-soil contact, which is necessary for water absorption.
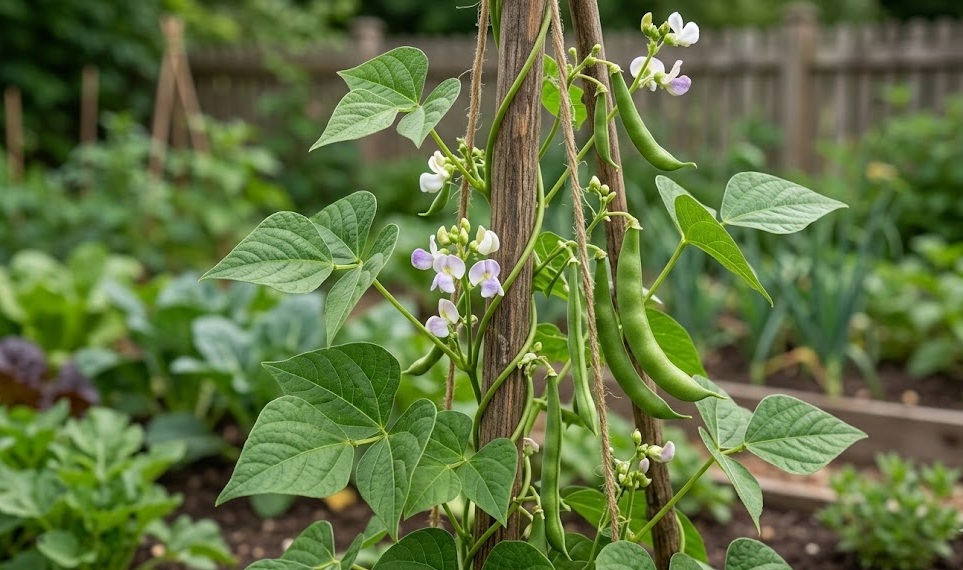
Spacing your seeds correctly from the start will save you the trouble of thinning them later and prevent overcrowding issues. For bush beans, a distance of 5 to 10 centimeters between seeds within the row is usually sufficient for optimal development. Pole beans should be planted in small groups or hills around their supports, with about three to four seeds per stake. Proper spacing allows for adequate light penetration and reduces the competition for water and nutrients as the plants grow.
After sowing, you must be patient and avoid the temptation to overwater the area while waiting for the first sprouts to appear. Excessive moisture in cold soil can cause the seeds to swell and rot before the embryo has a chance to emerge. You should only water the bed if the top few centimeters of soil become completely dry to the touch. Once the “hooks” of the young plants begin to break through the surface, you can gradually increase the amount of water provided to support their growth.
Starting seeds indoors for early harvests
While direct sowing is traditional, some professional gardeners choose to start their beans indoors to get a head start on a short growing season. You must use biodegradable pots, such as those made from peat or paper, to minimize root disturbance during the eventual transplanting. Starting seeds in a controlled environment allows you to bypass the risks of early spring frosts and heavy rain. This method is particularly useful for varieties that require a longer period to reach maturity, such as certain heirloom dry beans.
More articles on this topic
Light and temperature management are the most important factors when growing bean seedlings on a windowsill or under grow lights. You should provide at least 12 to 14 hours of bright light daily to prevent the young plants from becoming leggy and weak. Keep the indoor temperature consistently warm, mirroring the conditions the plants would find in a mid-summer garden. If the seedlings begin to lean toward the light source, rotate the trays regularly to encourage straight and sturdy stem development.
Hardening off is a vital transitional step that you must never skip when moving indoor-grown beans to the outside world. This process involves gradually exposing the tender seedlings to outdoor conditions over a period of seven to ten days. Start by placing them in a sheltered, shady spot for an hour and slowly increase their time in the sun and wind. This gradual adjustment toughens the plant’s tissues and prevents the shock that often leads to stunted growth or death after transplanting.
When it comes time to put your transplants in the ground, you should plant the entire biodegradable pot to keep the roots intact. Ensure the soil in the garden is at the same temperature as the indoor environment to make the transition as seamless as possible. You should water the transplants thoroughly immediately after planting to help settle the soil around the pots and eliminate air pockets. With careful handling, these early starters will quickly establish themselves and provide you with an impressively early harvest.
Saving seeds for future seasons
Saving seeds from your best bean plants is a professional way to develop a strain that is perfectly adapted to your local microclimate. You should identify your healthiest and most productive plants early in the season and mark them so they are not harvested for eating. Allow the pods on these selected plants to remain until they are completely dry and the seeds have become hard. This ensures that the seeds have reached full physiological maturity and contain all the energy needed for next year’s growth.
Genetic purity is something to keep in mind if you are growing multiple varieties of beans in a small area. Although beans are mostly self-pollinating, occasional cross-pollination by insects can happen between different cultivars of the same species. To maintain the characteristics of a specific variety, you should provide some distance between different types or use physical barriers. This professional attention to detail ensures that the seeds you save will grow into plants that look and taste like their parents.
Once the pods are harvested, you should shell the beans and perform a final drying phase in a well-ventilated, indoor location. Spread the seeds in a single layer on a screen or tray and allow them to air dry for another week or two. You can test the dryness by trying to bite a seed; if your teeth leave no mark, the moisture content is low enough for long-term storage. Removing any damaged or discolored seeds at this stage is a good practice to prevent the spread of mold in your containers.
Proper storage is the final step in the propagation cycle and determines the longevity of your saved bean seeds. You should place the clean, dry seeds in airtight glass jars or moisture-proof bags and store them in a cool, dark, and dry place. Including a small packet of silica gel can help absorb any residual moisture and keep the environment stable. Label each container with the variety name and the year of harvest so you can track your success in the coming seasons.