Planting siberian squill is a rewarding task that sets the stage for a spectacular blue carpet in early spring. These small bulbs are surprisingly tough and can adapt to a wide variety of garden conditions if handled correctly. The key to success lies in the timing and the preparation of the planting site before the bulbs arrive. You should aim to complete the planting process while the soil is still workable in the autumn.
Preparing the planting site
The first step in a successful planting project is identifying the best location for your new bulbs to grow. Siberian squill prefers a spot that receives plenty of sunlight during the spring but can tolerate partial shade. Since they bloom before most trees leaf out, the area under deciduous trees is often a perfect choice. You should clear the area of any aggressive weeds or large stones that might hinder the growth of the shoots.
Improving the soil structure is essential if you want your bulbs to thrive and multiply over the years. You can incorporate organic matter such as compost or leaf mold to enhance the nutrient content and drainage. This preparation creates a loose environment that allows the delicate roots to establish themselves quickly after planting. If your soil is particularly heavy with clay, adding some coarse sand will help prevent water from stagnating.
Marking the boundaries of your planting area will help you visualize the final result and ensure even distribution. You can use garden twine or simply sprinkle some flour on the ground to outline the drifts of bulbs. Planning the layout beforehand prevents the common mistake of planting in stiff, unnatural-looking rows. Aim for a naturalistic appearance by scattering the bulbs and planting them exactly where they fall on the ground.
Check the soil moisture level before you start digging to make the work easier and more effective. Soil that is too wet will clump together and make it difficult to achieve the proper planting depth. On the other hand, extremely dry soil can be hard as a rock and may damage the bulbs during the process. A light watering a day before planting can create the ideal consistency for digging and backfilling the holes.
More articles on this topic
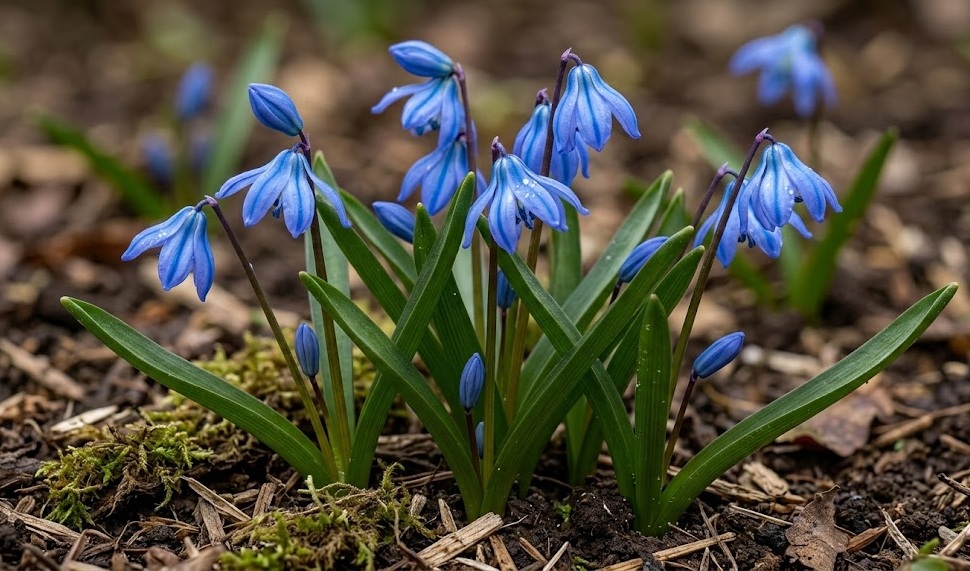
Proper bulb placement and depth
Once the site is ready, you can begin the process of placing the individual bulbs into the ground. Each bulb should be planted approximately eight to ten centimeters deep, measured from the base of the bulb. This depth provides enough protection from freezing temperatures while allowing the shoot to reach the surface easily. If you plant them too shallow, they may be pushed out of the ground by frost heaves.
Spacing is another important consideration if you want to achieve a full and lush appearance in the spring. You should place the bulbs about five to eight centimeters apart to allow room for future growth and expansion. Planting them too closely can lead to premature overcrowding and a decrease in flower production over time. However, grouping them in clusters of ten to fifteen creates a much better visual impact than single bulbs.
When placing the bulb in the hole, make sure the pointed end is facing upward toward the sky. The roots will emerge from the flat base, and the sprout will grow from the pointed tip of the bulb. If you are unsure which end is which, you can plant the bulb on its side, and it will usually correct itself. Press the bulb gently into the loose soil at the bottom of the hole to ensure good contact.
After all the bulbs are in place, you can fill the holes with the excavated soil and firm it down lightly. Avoid packing the soil too tightly, as this can restrict air movement and make it harder for the shoots to emerge. You should water the area thoroughly immediately after planting to settle the soil and trigger root growth. This initial drink is vital for helping the bulbs settle into their new home before the winter arrives.
More articles on this topic
Techniques for successful propagation
Propagating siberian squill is a great way to expand your collection without spending extra money on new bulbs. The most common method for home gardeners is dividing established clumps that have become too dense. This should be done every three to four years to maintain the vigor and health of the mother plants. You will know it is time to divide when you see fewer flowers and more crowded foliage.
The best time to lift and divide the bulbs is just as the foliage begins to turn yellow after flowering. Carefully dig around the clump with a garden fork to avoid damaging the bulbs during the lifting process. Gently pull the small offset bulbs away from the larger parent bulbs using your hands or a small knife. You should replant these divisions immediately in a new location to prevent them from drying out in the sun.
Growing siberian squill from seed is another option, though it requires a significant amount of patience from the gardener. The plants will often self-seed naturally if the environment is favorable and the soil is left undisturbed. If you want to collect the seeds, wait until the pods turn brown and start to split open. Sowing the seeds directly into a prepared nursery bed will yield the best results for future plants.
Seedlings will look like tiny blades of grass during their first year of growth and should be left alone. It typically takes three to five years for a seedling to develop a large enough bulb to produce its first flower. While this process is slow, it is a very satisfying way to create a large population of plants over time. Constant monitoring and protection of these young plants are necessary to ensure they reach maturity successfully.
Post planting care and monitoring
After the planting and propagation tasks are complete, the bulbs require very little attention during their first winter. They are extremely cold-hardy and will remain dormant underground until the first signs of spring appear. You can apply a thin layer of mulch over the planting site to provide an extra layer of insulation. This also helps to prevent weeds from taking over the area before the bulbs have a chance to emerge.
Keep an eye on the area in early spring so you can enjoy the very first shoots as they break through. Once the plants begin to grow, they will need consistent moisture to support their rapid development and blooming phase. If the spring is unusually dry, you should provide supplemental water to keep the soil slightly damp. Avoid overwatering, as the bulbs are still sensitive to rot if the soil becomes waterlogged for long periods.
Check for any signs of disturbance from animals like squirrels or chipmunks who might try to dig up the bulbs. While siberian squill is not their favorite food, curious animals can still cause damage to a newly planted bed. If you notice any holes, simply refill them and firm the soil back into place as quickly as possible. Most gardeners find that the plants are quite resilient and can handle minor setbacks without much trouble.
Finally, remember to let the foliage die back naturally after the flowers have faded and the seeds have set. This allows the bulbs to store the energy they need for the following year’s growth and reproduction. You can plant shallow-rooted annuals over the area to provide color during the summer while the bulbs are dormant. With proper planting and a little patience, your siberian squill will provide beauty for many generations.