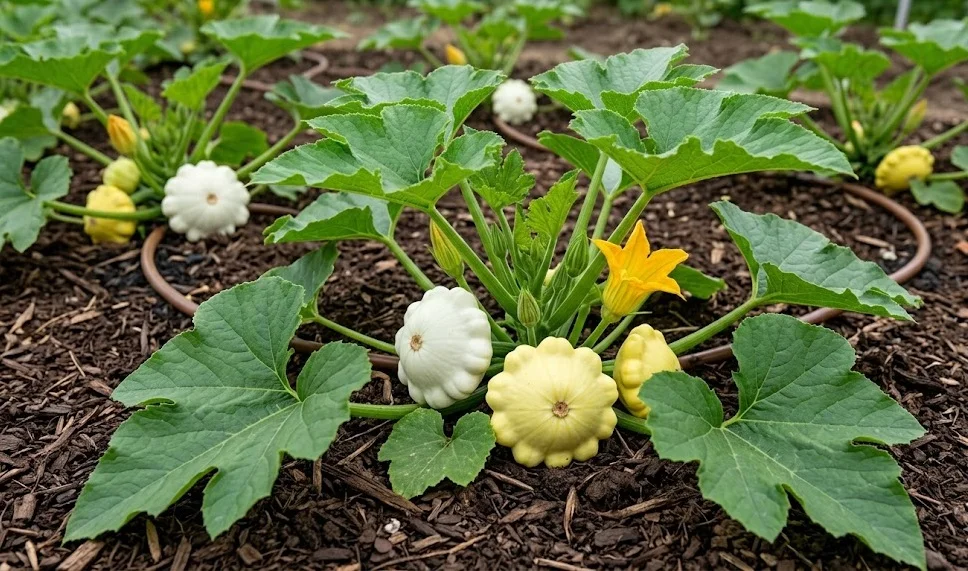
The successful establishment of pattypan squash begins with a strategic planting plan that accounts for the specific soil and climate requirements of the crop. You should select a site that receives full sun for the majority of the day to ensure the plants have enough energy for rapid growth. Professional growers often recommend preparing the soil several weeks in advance by adding plenty of decomposed organic matter to improve fertility. Proper planning at this stage will prevent many common problems during the middle of the summer.
Direct sowing is a popular method for many gardeners because pattypan squash has a sensitive root system that dislikes being disturbed. You should wait until the soil temperature reaches at least eighteen degrees Celsius before placing the seeds into the ground. Planting in small mounds or “hills” can help with drainage and allow the soil to warm up more quickly in the spring. Place about three seeds in each hill and later thin them to the strongest single plant to avoid overcrowding.
If you live in a region with a short growing season, you might prefer to start your seeds indoors about three or four weeks before the last frost. You should use biodegradable peat pots or cow pots that can be planted directly into the garden to minimize root shock. Make sure to provide plenty of light to the young seedlings to prevent them from becoming leggy and weak. Gradually hardening off the plants by exposing them to outdoor conditions for increasing periods is essential for a successful transition.
The depth at which you plant the seeds is also a critical factor in the germination rate of your squash crop. You should place the seeds about two centimeters deep in the soil and cover them lightly with a fine layer of earth. Firming the soil gently over the seeds ensures good contact and helps them absorb the moisture they need to break dormancy. With the right conditions, you can expect to see the first green shoots emerging from the ground in about seven to ten days.
Techniques for successful seed propagation
Selecting high-quality seeds from a reputable source is the first step in ensuring a healthy and productive crop. You should look for varieties that are known for their disease resistance and their suitability for your specific local climate. If you are interested in saving your own seeds, make sure you are growing open-pollinated varieties rather than hybrids. Hybrid seeds often do not produce plants that are true to the parent type in the second generation.
More articles on this topic
To improve the germination rate, some professional gardeners choose to soak their seeds in lukewarm water for a few hours before planting. This process softens the hard outer shell and signals to the embryo that it is time to begin the growth process. You should be careful not to leave them in the water for too long, as this can lead to rot or oxygen deprivation. Once the seeds have been soaked, they should be planted immediately into moist soil to maintain their momentum.
The moisture level in the propagation trays or the garden bed must be kept consistent until the seedlings are well-established. You should use a fine mist or a gentle spray to avoid washing the seeds out of their designated spots in the soil. If the surface of the earth dries out completely, the delicate emerging roots can quickly wither and die. On the other hand, excessively wet soil can lead to “damping off,” a fungal condition that kills young plants at the soil line.
Providing bottom heat can also accelerate the germination process, especially when starting seeds indoors during the early spring. You can use specialized heat mats designed for gardening to maintain a steady temperature under your seed trays. This warmth mimics the natural conditions of summer and encourages the seeds to sprout much faster than they would in a cool room. Once the majority of the seeds have sprouted, the heat can be reduced to prevent the plants from growing too quickly.
Transplanting seedlings into the garden
When the time comes to move your indoor-grown seedlings to their permanent outdoor home, timing and technique are everything. You should wait for a cloudy day or transplant in the late afternoon to reduce the initial stress caused by the sun. Dig a hole that is slightly larger than the root ball of the seedling to allow for easy placement. If you are using biodegradable pots, make sure to tear off the top rim so it doesn’t wick moisture away from the roots.
More articles on this topic
The soil in the transplant hole should be enriched with a small amount of compost or a balanced starter fertilizer. This provides an immediate source of nutrients that the young plant can use to establish itself in its new environment. You should water the hole thoroughly before placing the plant inside to ensure that the surrounding earth is already moist. Gently firm the soil around the base of the stem to eliminate any air pockets that could dry out the roots.
Proper spacing between the plants is vital for ensuring that each one has enough room to grow without competing for resources. For pattypan squash, you should allow at least ninety to one hundred and twenty centimeters between individual plants. This distance provides the necessary space for the large leaves to expand and allows for good airflow throughout the garden. Crowding the plants can lead to an increase in disease and a decrease in the overall size of the harvested fruit.
After the transplanting process is complete, you should give the area a deep watering to settle the soil and hydrate the plants. You might notice some slight wilting for the first day or two, but the plants should recover quickly as they adapt to the outdoors. Consider using a liquid seaweed extract or a transplant solution to help the roots recover from the shock of the move. Monitoring the weather closely during the first week will help you provide any extra protection that might be needed.
Strategic layout and garden organization
Planning the layout of your garden is a professional task that can significantly improve the efficiency of your maintenance routine. You should group your pattypan squash with other plants that have similar water and nutrient requirements to simplify your irrigation schedule. Consider placing the squash at the edge of the garden where they can overflow onto a path or a lawn without smothering smaller vegetables. This vertical or lateral management helps you make the most of the available space in your yard.
Companion planting is a technique where you grow specific plants together to provide mutual benefits, such as pest repulsion or improved pollination. You might want to plant marigolds or nasturtiums near your squash to help deter common insect pests like aphids or squash bugs. Some gardeners also find that planting corn or beans nearby can create a more diverse and resilient ecosystem. Understanding these relationships allows you to create a garden that works together as a cohesive unit.
Labeling your rows and keeping detailed records is a habit that will serve you well as you gain more experience. You should record the planting dates, the specific varieties used, and any observations you make about the growth patterns. This information becomes an invaluable resource when you are planning your garden for the following year and want to repeat your successes. Clear labeling also ensures that you don’t accidentally disturb a planted area before the seeds have had a chance to sprout.
Finally, you should think about crop rotation as a long-term strategy for maintaining the health of your soil and reducing disease pressure. You should avoid planting pattypan squash or any of its relatives in the same spot more than once every three or four years. This practice breaks the life cycle of soil-borne pathogens and allows the ground to recover the specific nutrients used by the squash. A professional approach to rotation is one of the most effective ways to ensure the continued productivity of your land.