Planting these charming spring bulbs correctly is the foundation for a long-lasting and expanding garden display. Because they are among the earliest flowers to appear, their placement must be considered in the context of the late winter landscape. They thrive when given a location that mimics their native mountain habitats, where drainage is excellent and spring sun is plentiful. Taking the time to prepare the site properly ensures that your investment in these bulbs will pay dividends for many years to come.
The ideal time to plant these bulbs is in the autumn, typically between September and November depending on your local climate. This timing allows the bulbs to establish a root system before the ground freezes solid for the winter. You want to aim for a period when the soil temperature has dropped but the earth is still easy to work with garden tools. Planting too early in the heat of late summer can sometimes trigger premature growth, which should be avoided.
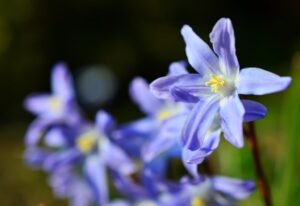
Site selection should prioritize areas that receive full sun or light dappled shade during the early spring months. Since these plants often finish their lifecycle before deciduous trees fully leaf out, they are perfect for planting under large oaks or maples. The soil in these locations is usually rich in organic matter from fallen leaves, which the bulbs find very favorable. Avoid low-lying areas where water tends to collect after heavy rains or melting snow, as this can lead to rot.
Soil preparation is a critical step that should never be rushed or skipped by a serious gardener. You should loosen the soil to a depth of at least fifteen centimeters to ensure the roots can penetrate easily. If your soil is heavy clay, mixing in some coarse sand or fine grit will significantly improve the internal drainage. A well-prepared bed provides the perfect balance of moisture retention and aeration that these small bulbs require to thrive.
Precise planting techniques for success
When it comes to the actual planting process, depth and spacing are the two most important factors to consider. You should plant the bulbs approximately eight to ten centimeters deep, measured from the base of the bulb to the soil surface. Planting them too shallowly can expose them to temperature fluctuations and foraging animals, while planting too deeply may prevent them from emerging. A general rule of thumb is to plant at a depth three times the height of the bulb itself.
More articles on this topic
Spacing the bulbs correctly will determine how quickly you achieve a full and lush carpet of flowers. For a natural look, aim for a density of about fifty to seventy-five bulbs per square meter. You can plant them in small groups of five to ten to create clusters that look more organic than straight rows. Using a specialized bulb planter or a small hand trowel makes the process much more efficient when handling large quantities of bulbs.
The orientation of the bulb in the hole is a detail that many beginners overlook, but it matters for quick emergence. Ensure the pointed end of the bulb is facing upward, as this is where the leaves and flower stalks will emerge. If you are unsure which end is the top, planting the bulb on its side is a safe compromise that allows the plant to find its way. Cover the bulbs with soil and firm it down gently with your hands to remove any large air pockets.
Initial watering after planting is necessary to trigger the dormant bulbs into their initial root-making phase. Provide enough water to soak the soil to the depth of the bulbs, but do not let the area become a muddy mess. This moisture helps the soil settle around the bulb scales, ensuring good contact and preventing dehydration during the autumn. Once the initial watering is done, natural rainfall is usually sufficient until the following spring arrival.
Naturalizing and spreading through seed
One of the most rewarding aspects of growing these flowers is their ability to naturalize and spread throughout a garden on their own. This process happens through two primary methods: the production of offsets and the dispersal of seeds. If the conditions are right, a small initial planting can transform into a vast colony over a decade. To encourage this, you must allow the plants to complete their entire biological cycle without human interference.
More articles on this topic
Seed propagation is a slow but effective way for the plants to move into new areas of your landscape. After the flowers fade, small green seed pods will form at the top of the stems and eventually turn brown as they ripen. These seeds contain a small fatty attachment called an elaiosome, which is highly attractive to local ant populations. Ants will carry the seeds back to their nests, effectively planting them in nutrient-rich soil far from the parent plant.
If you wish to manage the seed propagation yourself, you can collect the ripe seeds and sow them immediately in a dedicated nursery bed. They require a period of cold stratification, so sowing them in the autumn is essential for germination the following spring. Be aware that plants grown from seed may take three to four years before they are mature enough to produce their first flowers. This method requires patience but is an excellent way to produce large numbers of plants for very little cost.
Managing the soil surface is important if you want the seeds to find a place to grow successfully. Avoid using heavy mulches or pre-emergent herbicides in areas where you want the colony to expand naturally. A light layer of leaf litter is the ideal substrate for young seedlings to take root and find protection. By working with the natural tendencies of the plant, you can create a self-sustaining garden feature that requires minimal ongoing effort.
Vegetative propagation and division
Dividing established clumps is the fastest way to increase your stock of blooming-sized plants and rejuvenate older patches. This technique involves physically separating the small bulbs that have formed around the base of the original mother bulb. These offsets are genetically identical to the parent and will often bloom within a year or two of being moved. Professional gardeners typically perform this task every few years to prevent the plants from becoming overly crowded and unproductive.
The best time for division is just as the foliage begins to turn yellow and die back in the late spring. At this stage, the bulbs have finished their primary growth but are still easy to locate in the garden. Use a garden fork to lift the entire clump carefully, making sure to dig wide enough to avoid slicing through the bulbs. Shake off the excess soil so you can clearly see the individual bulbs and how they are attached to one another.
Gently pull the bulbs apart, ensuring that each piece has a portion of the basal plate where the roots grow. You can replant the largest bulbs immediately in their new locations at the standard planting depth. The smaller offsets can be planted in a “nursery row” where they can grow undisturbed until they reach flowering size. Always keep the bulbs shaded and moist during this process to prevent them from drying out in the air.
Soil enrichment during the division process will give the newly moved bulbs a significant advantage in their new homes. Incorporate a small amount of compost or organic bulb fertilizer into the planting holes to provide immediate nourishment. Water the area thoroughly after replanting to settle the earth and help the roots re-establish their connection with the soil. This hands-on approach to propagation is the key to maintaining a vibrant and expanding collection of these spring treasures.