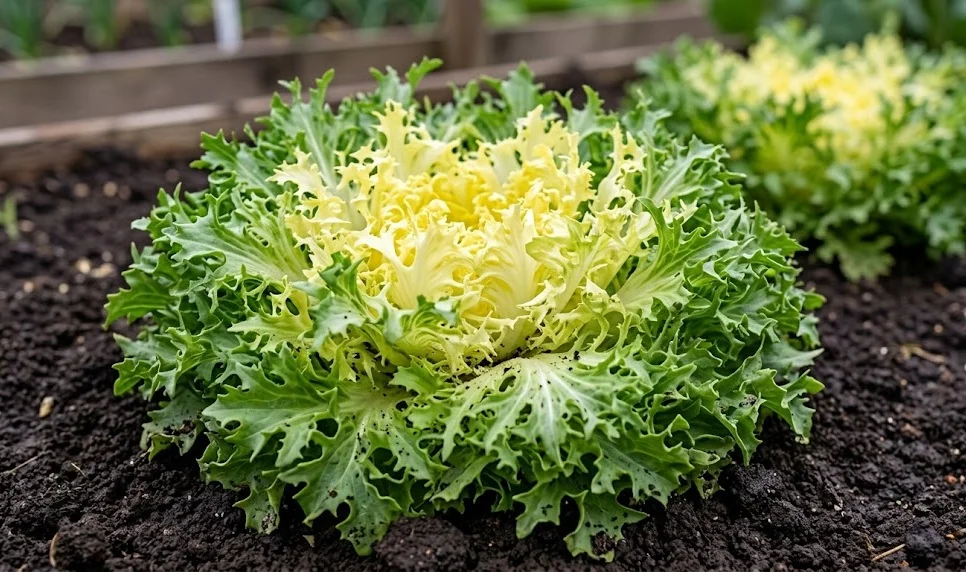
Caring for endive lettuce requires a nuanced understanding of its specific growth cycle and environmental preferences to ensure a high-quality harvest. This leafy green is prized for its bitter complexity, but achieving the perfect texture and flavor profile demands consistent attention from the gardener. Success starts with maintaining a stable growing environment and managing the plant’s unique physiological needs throughout the season. By following professional standards, you can transform a simple garden plot into a productive source of gourmet greens.
Site selection and soil preparation
Choosing the right location for endive is the first step toward a successful crop, as this plant is quite particular about its surroundings. The soil must be rich in organic matter and possess excellent drainage capabilities to prevent root rot during wetter periods. A slightly acidic to neutral soil pH is ideal, typically ranging between 6.0 and 7.0 for optimal nutrient uptake. Preparing the bed with well-rotted compost several weeks before planting will provide the long-term energy these plants need to thrive.
Air circulation is another critical factor that often gets overlooked by novice growers when setting up their vegetable patches. Densely packed plants without adequate airflow are prone to fungal issues, especially in humid climates where moisture lingers on the leaves. Position your endive rows in a spot that catches a gentle breeze but remains protected from harsh, drying winds. This balance helps regulate the microclimate around the foliage, keeping the plants healthy and resilient against environmental stressors.
The physical structure of the soil should be loose and friable to allow the root systems to expand without resistance. Compaction can lead to stunted growth and poor water penetration, which ultimately affects the crunchiness of the leaves. Using a broadfork or a garden fork to aerate the soil without overturning the layers preserves the natural microbial life. A healthy soil biome contributes significantly to the plant’s ability to resist minor pests and nutritional deficiencies throughout the growing season.
Finally, consider the previous crops grown in the chosen area to avoid soil-borne diseases that might affect leafy greens. Rotating endive away from areas where other chicories or lettuces were recently planted is a standard professional practice. This prevents the buildup of specific pathogens and ensures that the nutrient profile of the soil hasn’t been entirely depleted. A thoughtful approach to site selection sets a strong foundation that makes subsequent care much more manageable and rewarding.
More articles on this topic
Managing growth and spacing
Proper spacing is essential for endive because it allows each head to reach its full potential size without competing for resources. Most varieties require at least twelve inches between plants to ensure that the outer leaves can spread comfortably. If the plants are too crowded, they will struggle for light and nutrients, leading to elongated, weak stems. Professional growers often use a staggered planting pattern to maximize space while still providing the necessary room for development.
During the early stages of growth, it is vital to keep the area free of weeds that might sap the energy from your endive. Weeds not only compete for water and minerals but can also harbor pests that find the tender leaves of endive particularly attractive. Regular, shallow cultivation with a hand tool is usually sufficient to manage young weeds without damaging the shallow root system of the lettuce. Applying a thin layer of organic mulch can also help suppress weed seeds while retaining consistent soil moisture.
As the plants mature, you may notice that some leaves become damaged or yellowed near the base of the head. Removing these older, unproductive leaves helps keep the plant clean and reduces the risk of attracting slugs or snails. This practice also improves airflow at the base of the plant, which is where many moisture-related problems begin. A clean growing environment is one of the most effective ways to ensure that your harvest remains pristine and appetizing.
Monitoring the growth rate is helpful for determining when to begin the more intensive care stages, such as blanching. Endive grows steadily when conditions are right, but sudden temperature spikes can cause the plant to rush toward maturity. Keeping a close eye on the center of the head will tell you when the leaves are starting to tighten and fill out. Understanding the rhythm of your specific variety allows you to intervene at exactly the right moment for peak quality.
More articles on this topic
Blanching for flavor refinement
Blanching is a professional technique used to reduce the natural bitterness of endive and produce a more tender, pale heart. This process involves excluding light from the center of the plant for a period of two to three weeks before harvest. Without light, chlorophyll production stops, which softens the flavor and changes the texture of the inner leaves. Many enthusiasts find that unblanched endive is far too bitter for raw consumption in salads.
There are several methods for blanching, but one of the most common involves simply tying the outer leaves together with a soft string or rubber band. You must ensure that the leaves are completely dry before doing this to prevent moisture from becoming trapped inside, which leads to rot. Once tied, the plant resembles a tight cone, and the inner portion begins its transformation away from the sun’s rays. This traditional method is highly effective and requires no specialized equipment beyond a bit of twine.
Alternatively, some gardeners prefer to use large pots or specialized blanching covers to shield the entire plant. This method is often safer in wetter climates because it allows for better ventilation than tying the leaves tightly together. The covers must be heavy enough to stay in place during wind but breathable enough to prevent heat buildup. Whichever method you choose, consistency is key to achieving that signature creamy white or pale yellow center that chefs desire.
The timing of blanching must be precise, as leaving the plants covered for too long can lead to decay or a loss of crispness. Usually, fifteen to twenty days is sufficient depending on the ambient temperature and the specific variety of endive. It is a good habit to check one or two plants after ten days to see how the color transition is progressing. Once the desired level of blanching is achieved, the plant should be harvested immediately to preserve its delicate texture.
Temperature and seasonal considerations
Endive is essentially a cool-weather crop that performs best when the temperatures stay between fifteen and twenty degrees Celsius. It can tolerate light frosts, which often improves the flavor by converting starches into sugars within the leaves. However, extreme cold can damage the cellular structure of the foliage, making it look translucent and limp. Protecting the crop with row covers during unexpected late-season freezes is a wise precaution for any serious grower.
High temperatures are the primary enemy of endive, often causing the plant to bolt or produce a flower stalk prematurely. When a plant bolts, the leaves become incredibly tough and the bitterness increases to an unpalatable level. To combat summer heat, many professionals use shade cloths to reduce the intensity of the afternoon sun. Providing extra moisture during heatwaves also helps cool the root zone and prevents the plant from entering a stress-induced reproductive phase.
In temperate regions, there are two main windows for growing endive: early spring and late summer. The fall harvest is often superior because the cooling temperatures of autumn align perfectly with the plant’s maturation process. Spring crops must be timed carefully so they reach maturity before the intense heat of summer arrives. Planning your planting schedule around these seasonal windows is the best way to ensure a consistent and high-quality supply of greens.
Understanding your local microclimate allows you to make adjustments that standardized growing guides might overlook. For instance, if you live in a valley that traps cold air, your planting dates might be slightly later than those on a nearby hillside. Keeping a garden journal of temperature patterns and plant responses can provide invaluable data for future seasons. This localized knowledge turns a standard gardening task into a refined agricultural practice tailored to your specific land.
Integrated weed management
Weed management in an endive patch requires a proactive approach rather than a reactive one to avoid disturbing the crop. Because endive has a relatively shallow root system, aggressive hoeing can easily cause unintended damage to the primary plant. Hand-pulling weeds near the base of the lettuce is often the safest method to ensure the integrity of the root zone. Consistently removing weeds when they are small prevents them from establishing deep roots that are harder to remove later.
Mulching serves as a secondary line of defense against unwanted vegetation while providing several other benefits to the soil. Clean straw, dried grass clippings, or shredded leaves are excellent organic options that break down over time. This layer prevents sunlight from reaching weed seeds, effectively neutralizing them before they can compete with your endive. Additionally, mulch helps maintain a steady soil temperature, which is crucial for preventing the heat stress that leads to bolting.
In larger agricultural settings, flame weeding or the use of landscape fabric can be employed to manage rows more efficiently. For the home gardener or small-scale farmer, focus on “stale seedbed” techniques where the soil is prepared and weeds are allowed to germinate before being cleared prior to planting. This reduces the overall weed bank in the top layer of soil, making the growing season much smoother. A clean bed allows the endive to focus all its energy on leaf production rather than competition.
Long-term weed control also involves preventing any nearby weeds from going to seed and blowing into the vegetable garden. Managing the borders of your garden plot is just as important as managing the rows themselves. By keeping the surrounding areas mowed or mulched, you significantly reduce the amount of maintenance required within the endive beds. This holistic view of the garden environment creates a more sustainable and less labor-intensive system for the grower.
Harvesting techniques and timing
The timing of the harvest is the final critical decision in the care cycle of endive lettuce. Most varieties are ready for harvest between sixty and ninety days after sowing, depending on the environmental conditions. You can choose to harvest individual outer leaves for a continuous “cut and come again” supply or wait for the full head to mature. For the highest culinary quality, harvesting the entire head after blanching is the preferred professional standard.
To harvest the whole head, use a sharp garden knife to cut the plant off just above the soil line. It is best to do this in the cool of the early morning when the leaves are at their most turgid and hydrated. Avoid harvesting during the heat of the day, as the leaves will wilt quickly and lose their characteristic crunch. If you are harvesting for a market or for storage, immediate cooling is necessary to maintain the freshness and quality of the greens.
After cutting, inspect the base of the head for any signs of pests or disease that might have been hidden during growth. Trim away any damaged or overly tough outer leaves that were not reached by the blanching process. This preparation makes the endive much easier to handle in the kitchen and ensures that only the best parts of the plant are used. A clean, well-trimmed head of endive is a testament to the care provided throughout its life cycle.
If you are growing multiple varieties, remember that their maturity dates will vary, so staggered harvesting is often necessary. Keeping track of which rows were planted first helps you stay organized and prevents any plants from becoming over-mature. Over-mature endive quickly loses its sweetness and becomes excessively fibrous, making it less enjoyable to eat. A disciplined approach to harvesting ensures that every plant you have cared for reaches the table in peak condition.
Post-harvest storage and utilization
Once harvested, endive should be handled gently to avoid bruising the delicate leaves, which can lead to rapid browning. Rinse the heads in cold water to remove any lingering soil or small insects that might be hiding in the folds. Shake off the excess water or use a large salad spinner to ensure the leaves are relatively dry before storage. Proper drying is essential because excess moisture in a storage bag can lead to premature spoilage and sliminess.
The ideal storage condition for endive is in the crisper drawer of a refrigerator, where the temperature is consistently low. Placing the dried heads in a perforated plastic bag or wrapping them in a damp paper towel helps maintain the necessary humidity. Under these conditions, a healthy head of endive can remain fresh and crisp for up to two weeks. However, for the best flavor experience, it is usually recommended to consume the greens within a few days of harvest.
In the professional kitchen, endive is appreciated for its versatility in both raw and cooked applications. The bitter leaves pair exceptionally well with rich ingredients like blue cheese, walnuts, and balsamic vinaigrette. Braising or grilling the endive can also transform its flavor, mellowing the bitterness and creating a buttery texture. Understanding how to use the harvest is just as important as knowing how to grow it, as it completes the agricultural cycle.
If you find yourself with an abundance of endive, consider sharing with neighbors or exploring different preservation methods. While it doesn’t freeze well due to its high water content, it can be kept slightly longer in a cold cellar if the roots are left attached and buried in moist sand. This traditional storage method can extend the availability of fresh greens well into the early winter months. Taking the time to properly store and utilize your crop honors the effort put into every stage of its growth.