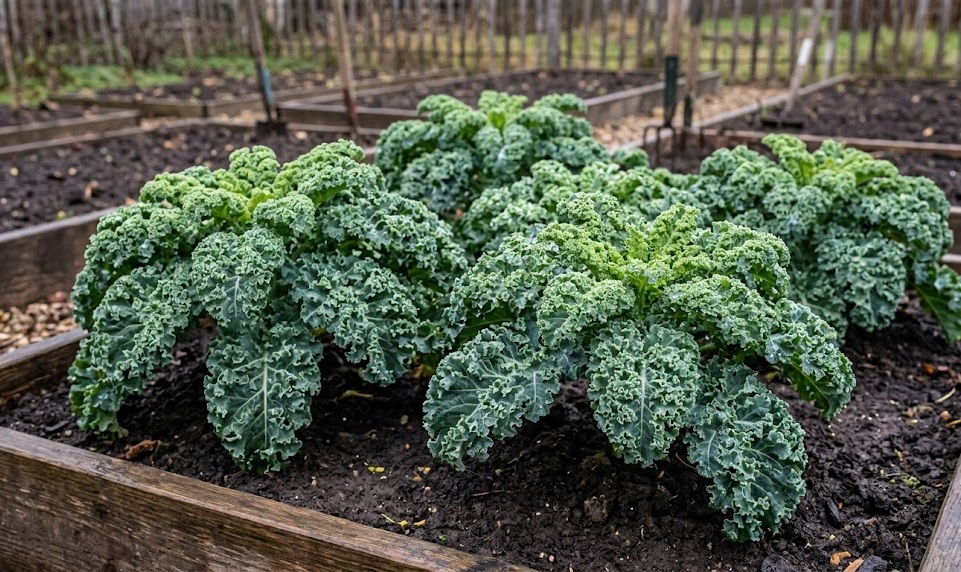
The successful cultivation of curly kale requires a deep understanding of its specific growth habits and environmental preferences within a temperate climate. This hardy biennial is often grown as an annual because of its palatable leaves and remarkable resistance to colder temperatures. Gardeners who wish to maintain a thriving crop must focus on consistent soil moisture, nutrient availability, and protective measures against environmental stress. By following a structured care routine, you can ensure that your plants remain productive from the early spring through the harshest winter months.
Soil health serves as the primary foundation for any productive vegetable garden, especially when dealing with heavy feeders like kale. You should aim for a soil profile that is rich in organic matter and has a slightly acidic to neutral pH level. Well-drained loamy soil is ideal because it allows roots to expand freely while retaining enough moisture to prevent wilting. Before planting, it is highly recommended to incorporate aged compost or well-rotted manure into the top few inches of the garden bed.
Beyond the initial preparation, the physical structure of the soil must remain aerated throughout the growing season to support microbial life. Avoiding soil compaction is crucial, so you should minimize foot traffic near the base of the plants. If the soil becomes too dense, the roots may struggle to access oxygen, leading to stunted growth or yellowing leaves. Periodically loosening the surface with a hand tool can help maintain the necessary porosity for healthy development.
Environmental placement also plays a significant role in how the plant manages its energy throughout the day. While this crop enjoys cooler weather, it still requires a significant amount of light to produce thick, nutrient-dense foliage. You should select a site that receives ample sunlight but offers some protection from the intense midday heat during summer. Proper spacing between individual plants is also necessary to ensure that air can circulate freely around the dense, curly leaves.
Seasonal maintenance routines
As the spring transition moves into the warmer summer months, your care strategy must adapt to the rising temperatures and longer days. During this period, the primary goal is to prevent the plant from becoming stressed by excessive heat or drought. You will notice that the leaves may lose some of their crispness if the environment becomes too dry for extended periods. Consistent monitoring of the soil’s moisture level is the most effective way to prevent this common physiological stress.
More articles on this topic
In the autumn, the care routine shifts toward preparing the plant for the upcoming frosts and shorter photoperiods. Many growers find that the flavor of the leaves actually improves after the first few light frosts of the season. This chemical change occurs because the plant converts starches into sugars as a natural antifreeze mechanism. You should continue to remove any damaged or yellowing lower leaves to keep the plant’s energy focused on new growth.
Winter care involves protecting the crown of the plant from ice accumulation and extreme temperature fluctuations. Although curly kale is incredibly hardy, a sudden deep freeze without snow cover can sometimes damage the vascular system. You might consider using row covers or heavy mulching to provide a buffer against the coldest winds. If the ground does not freeze completely, the plant will continue to provide fresh harvests even during the darkest months of the year.
Once the following spring arrives, the plant will naturally enter its second year of growth and prepare to flower. If you are growing for consumption, this is usually the time to harvest the remaining leaves before the plant bolts. Bolting causes the leaves to become tough and bitter as the plant redirects its nutrients toward seed production. At this stage, you can decide whether to remove the plant or let it flower to attract beneficial pollinators to your garden.
Mulching and weed suppression
Applying a thick layer of organic mulch around the base of your plants is one of the most effective ways to simplify care. Mulch serves several purposes, including moisture retention, temperature regulation, and the prevention of weed germination. Straw, shredded leaves, or wood chips are excellent choices that will eventually break down and enrich the soil. You should apply the mulch at least two inches deep while ensuring it does not touch the actual stem of the kale.
More articles on this topic
Weeds are a significant threat because they compete for the same nutrients and water that your kale needs to thrive. Because kale has a relatively shallow root system, aggressive weeding can sometimes cause unintended damage to the plant. By maintaining a consistent mulch layer, you significantly reduce the amount of time spent pulling unwanted plants. If weeds do emerge, it is best to remove them by hand while they are still small and easy to manage.
In addition to competition for resources, tall weeds can obstruct airflow and create a humid microclimate that favors fungal growth. This is particularly problematic for curly varieties where the intricate leaf structure can trap moisture and spores. Keeping the area around each plant clear ensures that the foliage dries quickly after rain or dew. A clean garden bed is always the first line of defense against many common horticultural challenges.
Over time, the organic mulch will decompose and merge with the topsoil, improving its overall texture and fertility. You should plan to replenish the mulch layer at least twice a year to maintain its effectiveness. This cycle of decomposition mimics the natural forest floor and provides a steady stream of carbon for soil microbes. Choosing the right mulch depends on your local climate and the specific materials available in your region.
Nutrient management strategies
Providing a steady supply of nutrients is essential for maintaining the deep green color and rapid growth associated with high-quality kale. Since the leaves are the primary part harvested, nitrogen is the most critical macro-nutrient for this particular crop. You can provide this through organic fertilizers like fish emulsion, blood meal, or high-quality compost teas. It is better to provide smaller, frequent doses rather than one large application that might leach away.
The timing of fertilizer application should coincide with the plant’s active growth phases in early spring and late summer. If you notice that the newer leaves are appearing pale or yellowish, it may be a sign of nitrogen deficiency. However, you must be careful not to over-fertilize, as excessive nitrogen can attract sap-sucking insects like aphids. A balanced approach ensures that the plant grows strong without becoming overly succulent or vulnerable to pests.
Micronutrients like boron and magnesium also play a role in the long-term health and structural integrity of the plant. A soil test is the most professional way to determine if your garden is lacking these specific elements. If your soil is naturally sandy, you may need to supplement these minerals more often than if you have clay-based soil. Healthy plants with access to a full spectrum of minerals are much better at resisting environmental stressors.
Water-soluble fertilizers are often preferred because they deliver nutrients directly to the root zone where they are needed most. You should always apply these solutions to moist soil to avoid burning the delicate root hairs of the plant. If you prefer a slow-release method, granular organic fertilizers can be scratched into the surface before watering. Regardless of the method, consistency is the key to preventing growth checks that can affect leaf quality.
Structural support and leaf management
As the plants grow taller, they can sometimes become top-heavy, especially if they are located in an area with high winds. While many varieties have sturdy stems, some may benefit from a simple stake or support system. This is particularly true for older plants that have been harvested from the bottom up, leaving a tall, bare stalk. Providing a bit of support prevents the stem from snapping or leaning too far into the mud.
Maintaining the lower portion of the plant is just as important as encouraging new growth at the top. You should regularly inspect and remove any leaves that are touching the ground or showing signs of decay. These lower leaves are often the first to be attacked by soil-borne pathogens or crawling insects like slugs. Keeping the bottom of the stalk clean improves air circulation and makes it easier to monitor soil conditions.
The density of the curly leaves means that they can sometimes trap debris, dust, or even small insects within their folds. If you live in a particularly dusty area, a gentle rinse with a garden hose can keep the foliage clean and functional. Clean leaves are more efficient at photosynthesis, which directly translates to faster growth and better nutrient density. Just be sure to do this in the morning so the plants have time to dry before evening.
Proper harvesting is actually a form of plant care that encourages the production of new foliage. You should always harvest the outermost, oldest leaves first while leaving the central growing point untouched. This allows the plant to continue expanding upward and producing fresh leaves from the center. If you harvest too many leaves at once, the plant may struggle to recover and its overall growth rate will slow down significantly.
Monitoring for health indicators
A professional gardener always keeps a close eye on the visual cues provided by the plant’s foliage and overall stature. Healthy curly kale should have vibrant, stiff leaves that feel turgid and firm to the touch. Any sudden drooping or loss of color is a signal that something is wrong in the root zone or environment. By catching these issues early, you can often correct the problem before the entire plant is affected.
The color of the leaves can tell you a lot about the mineral balance and light levels in your garden. Deep blue-green or purple hues are typical for many varieties, but extreme darkening can sometimes indicate cold stress or phosphorus issues. Conversely, very light green leaves often point to a lack of sunlight or insufficient nitrogen in the soil. Comparing your plants to healthy specimens of the same variety will help you develop an eye for these subtle differences.
You should also look for physical damage such as holes, tattered edges, or sticky residues on the leaf surfaces. Holes are usually the work of caterpillars or beetles, while sticky “honeydew” is a classic sign of an aphid infestation. Early detection allows you to use mechanical or organic controls before the pest population becomes unmanageable. Regular scouting should be done at least twice a week, checking both the tops and bottoms of the leaves.
Finally, observing the growth rate is an excellent way to gauge the overall success of your care routine. During the peak of the growing season, you should see noticeable progress in the size of the central leaves every few days. If growth seems to have stalled despite favorable weather, it may be time to reassess your watering or fertilization schedule. Patience and observation are the two most valuable tools for any aspiring agricultural expert.
Harvesting techniques for longevity
Knowing how and when to harvest is the final step in the care cycle and ensures a long-lasting supply of greens. You should start harvesting when the leaves are about the size of your hand for the best texture and flavor. Using a sharp pair of garden shears or a knife is better than pulling the leaves by hand to avoid damaging the main stem. A clean cut heals faster and reduces the risk of introducing diseases into the plant’s vascular system.
It is best to harvest in the cool of the early morning when the leaves are fully hydrated and at their crispest. If you harvest during the heat of the afternoon, the leaves will wilt quickly and lose some of their nutritional value. Immediately placing the harvested greens in a cool, shaded area or a container of water will help maintain their quality. For long-term storage, the leaves should be washed and dried before being placed in the refrigerator.
You can continue to harvest from the same plant for many months if you follow the “one-third” rule. This rule suggests that you should never remove more than one-third of the total foliage at any given time. This ensures that the plant has enough leaf surface area to continue photosynthesizing and regenerating its biomass. Following this practice allows for a continuous harvest rather than a single, final removal of the entire plant.
As the season ends, you may decide to perform a final harvest of the entire plant or leave it to overwinter. If the plant has become extremely tall and leggy, it might be more practical to start fresh with new seeds or transplants. However, many gardeners enjoy the challenge of keeping a single kale plant productive for as long as possible. With the right care, this versatile vegetable can be one of the most rewarding additions to any kitchen garden.