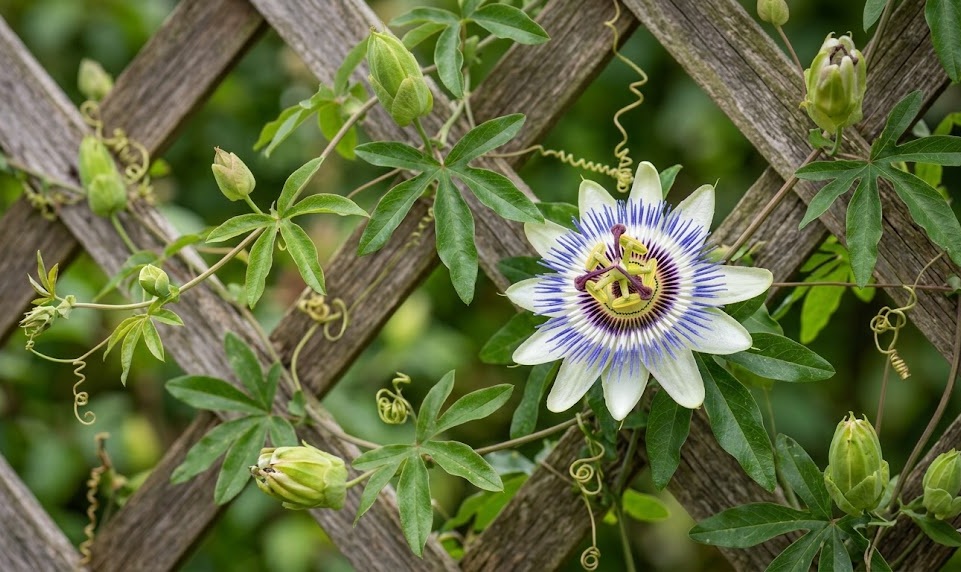
Starting your journey with these remarkable vines begins with choosing the right method for introducing them into your garden space. Whether you decide to start from seeds or use cuttings, the process requires patience and a gentle touch to be successful. You must consider the timing of your planting to ensure the young specimens have the best chance to establish themselves. Understanding the fundamental needs of the plant during this vulnerable phase is the key to long-term gardening success.
Most gardeners prefer to start their planting projects in the early spring when the soil begins to warm up and the days get longer. This timing allows the plant to develop a strong root system before the intense heat of the summer arrives. You should prepare the planting site well in advance by clearing away weeds and improving the soil quality with organic matter. A well-prepared site acts as a welcoming home for your new horticultural addition.
Buying a healthy plant from a reputable nursery is the most common way to begin, but starting your own is far more rewarding. You should look for specimens that have dark green leaves and a clear, strong main stem without any signs of pests. Avoid plants that are root-bound in their pots, as they can struggle to adapt when moved to the open ground. A healthy start is the best insurance against future problems in the garden.
Success in planting also depends on your ability to match the specific variety of the vine to your local climate and soil conditions. You should research the cold hardiness and growth habits of the species you are interested in before making a final choice. Some vines are very aggressive and will quickly cover a large fence, while others are much more delicate and slow-growing. Choosing the right plant for the right place is a hallmark of an expert gardener.
Seed propagation techniques
Propagating these plants from seed is a fascinating process that allows you to observe the very first stages of their life cycle. You should start by soaking the seeds in warm water or orange juice for about twenty-four hours to soften the hard outer coat. This pre-treatment mimics the natural process of passing through the digestive system of a bird or animal in the wild. Once the seeds are plumped up, they are ready to be placed in a high-quality seed-starting mix.
More articles on this topic
Temperature control is critical during the germination phase, as these tropical seeds require consistent warmth to sprout. You should keep the pots in a spot that stays between twenty and twenty-five degrees Celsius throughout the day and night. Using a heated propagation mat can provide the steady bottom heat that many species need to break dormancy. Be patient, as some seeds can take anywhere from a few weeks to several months to show signs of life.
The depth at which you plant the seeds will influence how easily they can push through the soil surface. You should cover them with only a thin layer of fine compost or vermiculite, usually no more than half a centimeter deep. Keep the soil consistently moist but never waterlogged, as the seeds can easily rot if they stay too wet for too long. Covering the pots with a clear plastic dome can help maintain the high humidity levels that young seedlings crave.
Once the first true leaves appear, you should begin to slowly acclimate the seedlings to the environment outside of their protected nursery. This process, known as hardening off, involves moving them to a sheltered outdoor spot for a few hours each day. Gradually increase their exposure to sunlight and wind over a period of two weeks until they are strong enough to stay out permanently. This careful transition prevents the shock that can kill young and tender plants.
Propagation through cuttings
If you want a plant that is genetically identical to a favorite specimen, propagation by cuttings is the most effective and reliable method. You should take your cuttings in the late spring or early summer when the plant is in its most active growth phase. Choose a healthy shoot that is firm but still flexible, and cut a section that is about ten to fifteen centimeters long. Make sure the cutting has at least two or three nodes, which are the points where leaves join the stem.
More articles on this topic
Removing the lower leaves from the cutting will reduce moisture loss and provide a clear area for new roots to emerge. You can dip the bottom of the stem in a rooting hormone powder to speed up the process and improve the success rate. Place the prepared cutting into a pot filled with a well-draining mix of peat and perlite or coarse sand. Creating a small “greenhouse” by placing a plastic bag over the pot will help keep the humidity high around the cutting.
Rooting typically takes about four to six weeks, during which time you should keep the pots in a bright spot but out of direct sunlight. You can check for success by giving the cutting a very gentle tug; if you feel resistance, it means roots have started to grow. Once the root system is well-established, you can move the new plant into a larger pot with standard potting soil. This method allows you to quickly build up a large collection of vines without the long wait of starting from seed.
Softwood cuttings are usually the easiest to root, but you can also try semi-hardwood cuttings later in the summer season. The process is very similar, though semi-hardwood pieces may take a bit longer to produce roots and require more consistent care. Always use a clean, sharp knife or garden snips to make your cuts to prevent crushing the delicate stem tissues. Sharing these home-grown plants with friends and family is a wonderful way to spread the joy of gardening.
Proper planting depth and spacing
When the time finally comes to put your vine in the ground, the depth of the planting hole is a critical factor for success. You should dig a hole that is twice as wide as the root ball but no deeper than the pot the plant came in. Planting too deeply can lead to crown rot, while planting too shallow can cause the roots to dry out too quickly. Aim to have the top of the root ball level with the surrounding soil surface for the best results.
Spacing between plants is important if you are trying to cover a large area like a long fence or a series of arches. You should space the vines at least two meters apart to give each one enough room to expand and receive proper airflow. If you plant them too closely, they will compete for light and nutrients, leading to weaker growth and fewer flowers. Proper spacing also makes it much easier to manage the vines and keep them from becoming an impenetrable tangle.
Before placing the plant in the hole, gently loosen any roots that have started to grow in circles around the root ball. This encourages the roots to grow outward into the new soil rather than continuing to grow in a tight, restrictive knot. You can add a handful of slow-release organic fertilizer to the bottom of the hole to give the plant a gentle boost. Fill in the space around the roots with a mixture of native soil and high-quality compost, firming it down gently with your hands.
Immediately after planting, you should give the vine a deep and thorough watering to settle the soil and remove any air pockets. Applying a layer of organic mulch around the base will help retain moisture and keep the roots cool as the plant adjusts. Be careful not to let the mulch touch the main stem, as this can encourage rot or provide a hiding place for pests. Your new vine is now ready to begin its climb and become a beautiful part of your garden landscape.
Post planting care and establishment
The first few months after planting are the most critical for the long-term survival and health of your new vine. You must monitor the soil moisture daily, especially if the weather is warm or windy, to ensure the roots never dry out. A young plant does not yet have the deep root system required to find water on its own during a dry spell. Consistent care during this time will help the plant establish itself quickly and start putting on new growth.
As the new shoots begin to emerge, you should guide them toward their permanent support structure using soft ties or clips. This early training ensures the vine grows in the direction you want and prevents it from trailing across the ground. You may need to check the ties regularly to make sure they are not becoming too tight as the stems thicken. Once the vine finds its own grip with its tendrils, you can usually remove the temporary supports.
Avoid the temptation to heavily fertilize the plant during the first few weeks while it is still settling into its new home. You want the plant to focus its energy on growing roots rather than producing a flush of soft foliage that might be attractive to pests. Once you see vigorous new growth and the plant looks stable, you can begin a regular feeding schedule. A balanced approach to nutrition will result in a much stronger and more resilient plant over time.
Establishing a routine for checking the plant’s health will help you become more attuned to its specific needs and quirks. You should look for any signs of transplant shock, such as wilting or yellowing leaves, and adjust your care accordingly. Most vines will settle in within a few months and begin to show the rapid growth they are famous for. Your patience and attention to detail during the planting phase will be rewarded with a spectacular display of flowers.