As the days grow shorter and the temperatures begin to drop, these plants naturally prepare themselves for a period of rest. It is important for the gardener to recognize these signals and adjust their care routine to support this transition. You will notice that the growth of new leaves slows down significantly and the plant stops producing new flower buds. This is the ideal time to stop all fertilization, as the plant no longer needs high levels of nutrients.
Reducing the frequency of watering is the next step in preparing the plant for the cooler months ahead. The goal is to keep the soil just barely moist, allowing it to dry out more between waterings than you would during the summer. Excessive moisture during the dormant phase is the leading cause of root rot, as the plant’s metabolism cannot process the water quickly. The roots need oxygen just as much as they need moisture, and dry soil allows for better air exchange.
The foliage may begin to look a bit tired or even start to yellow as the plant moves resources from the leaves into the crown. This is a natural part of the process and should not be a cause for immediate alarm unless there are signs of disease. You can trim away any completely dead or heavily damaged leaves to keep the plant tidy and reduce the risk of mold. Keeping the crown clear of debris ensures that it remains healthy and ready for the spring revival.
In regions with mild winters, the plants may only enter a semi-dormant state and keep some of their green leaves. In colder areas, they may die back to the ground entirely, relying on the energy stored in their thick roots to survive. Understanding your local climate and how it affects the plant’s dormancy is key to a successful overwintering strategy. The deeper the dormancy, the less attention the plant will need until the warmth returns in the spring.
Ideal storage environments
If you live in a climate where the ground freezes, you will need to move your plants into a protected area to ensure their survival. A cool, frost-free basement, a heated garage, or a bright windowsill in a cool room are all excellent options for storage. The ideal temperature for overwintering is between 5 and 10 degrees Celsius, which is cool enough to maintain dormancy but warm enough to prevent freezing. Extreme changes in temperature should be avoided to prevent shocking the plant’s system.
More articles on this topic
Light is still a requirement during the winter, even for plants that have lost most of their foliage. A spot near a window that receives bright, indirect light is usually sufficient to keep the crown healthy. If a natural light source is not available, a simple grow light set on a timer for 8 to 10 hours a day can provide the necessary energy. Without any light, the plant may become excessively weak and struggle to break dormancy when spring arrives.
Humidity in indoor storage areas is often very low, which can cause the dormant roots to dry out too much. While you want to avoid soggy soil, you also don’t want the potting medium to become bone-dry and pull away from the sides of the container. A light misting of the soil surface every few weeks is usually enough to maintain the minimum moisture level required. If the air in your storage area is particularly dry, a small humidifier can help keep the environment stable.
Air circulation remains important even in the winter to prevent the buildup of stagnant air and fungal spores. If storing many plants together, ensure there is some space between the pots to allow for natural air movement. A small fan set on a low speed can be used to keep the air moving in a basement or garage. Good ventilation is your best defense against the “damp-off” issues that can occur in cool, dark storage conditions.
Monitoring during winter
Checking on your plants at least once every two weeks is essential for catching any issues before they become terminal. Look for any signs of mold or mildew on the soil surface or around the base of the plant’s crown. If you spot any fuzzy growth, remove it immediately and increase the airflow to that area. This is usually a sign that the soil is being kept too wet or that the air is too stagnant.
More articles on this topic
Pests can sometimes follow the plants indoors and become a problem even in the middle of winter. Spider mites and aphids are especially fond of the warm, dry conditions found in many homes during the heating season. Inspect the undersides of any remaining leaves and the tips of the crown for any signs of webbing or sticky residue. Treating these issues early with a light application of insecticidal soap can prevent a full-blown infestation.
The moisture level of the soil should be checked by hand during every inspection to ensure it hasn’t dried out completely. The weight of the pot is often a good indicator; a very light pot usually means it’s time for a small amount of water. Remember that the plant’s water needs are minimal, so use a very light touch when rehydrating the soil. It is always better to underwater slightly during the winter than to overwater even once.
Keeping a record of the storage conditions and the plant’s response can be very helpful for future years. Note which areas of your home seemed to work best and if any particular plants struggled more than others. This information allows you to refine your overwintering process and increase your success rate over time. Every winter is a learning experience that makes you a more skilled and successful horticulturalist.
Spring revival procedures
As the days begin to lengthen and the outdoor temperatures rise, it is time to start waking the plants from their slumber. This process should be gradual, starting with a move to a slightly warmer and brighter location within your home. You will soon notice tiny green shoots beginning to emerge from the center of the crown. This is the signal that the plant’s vascular system is waking up and it is ready for more consistent care.
Increasing the watering frequency should be done slowly to match the plant’s increasing demand for moisture. As the new leaves grow larger, they will begin to transpire more water, necessitating more frequent checks of the soil. Once the plant has several sets of new leaves, you can begin to apply a diluted, balanced fertilizer to support the growth. Avoid using full-strength fertilizer immediately, as the young roots are still quite sensitive.
The process of moving the plants back outdoors, known as hardening off, is the most critical part of the spring transition. Start by placing the plants in a shaded, protected spot for just a few hours a day, gradually increasing their exposure. This allows the new foliage to toughen up and adapt to the intensity of the sun and the movement of the wind. Skipping this step often results in sunburned leaves and a significant setback in the plant’s development.
Once the danger of frost has completely passed and the nights are consistently above 10 degrees Celsius, the plants can stay outside permanently. This is also the best time to repot the plants if they have become root-bound or if the old soil has become compacted. Fresh soil and a slightly larger container will provide the room and nutrients needed for a spectacular summer display. With a successful overwintering behind you, you can look forward to another season of beautiful blooms.
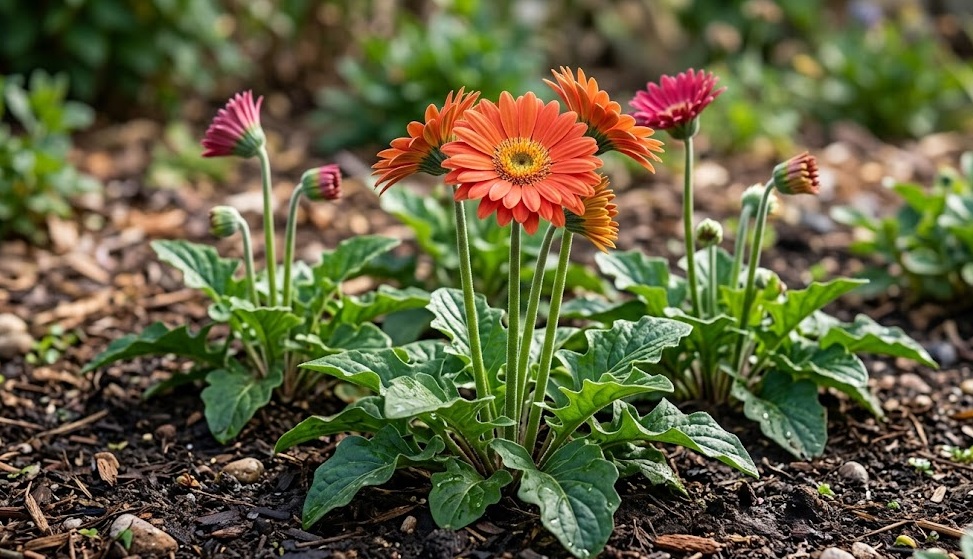
Overwintering Gerberas is a bit of a gamble in cooler climates, but it’s definitely possible with the right approach. I’ve found that the key is to provide them with a cool, bright spot where the temperature stays between 45 and 55 degrees Fahrenheit. This allows the plant to enter a state of semi-dormancy where it can rest without being exposed to freezing temperatures. You should also reduce your watering significantly during this period, as the plant’s metabolic rate is much lower and it doesn’t need as much moisture. I always tell my clients to stop fertilizing by early October to avoid encouraging new growth that won’t have time to harden off before the cold sets in. If you follow these simple steps, your Gerberas have a much better chance of coming back even stronger in the spring.
Dr. Ross, that advice about reducing the water is so important; I lost several Gerberas my first year by keeping them too wet over the winter. I’ve also noticed that they really benefit from being cut back by about a third before being moved into their winter home. This helps reduce the amount of foliage the plant has to maintain and makes it easier to keep an eye out for any pests that might be trying to hitch a ride. I also make sure to check them every few weeks for any signs of mold or rot and I remove any dead leaves immediately. It’s a bit of extra work, but seeing those first new shoots appear in the spring makes it all worth it. I’ve found that they often bloom even more profusely after a good winter rest.