Success in planting and propagating pineapple mint begins with a strategic approach to selecting the right environment and understanding the biological mechanics of how this herb spreads. Unlike many other garden plants that rely heavily on seeds, this variegated mint thrives through vegetative means, making it one of the most rewarding species for home gardeners and professionals alike to multiply. You should prioritize the initial setup of the planting site, as the quality of the soil and the level of light will directly influence how quickly the plant establishes itself. By mastering the fundamental techniques of planting and the various methods of propagation, you can ensure a continuous supply of this fragrant herb for years to come.
When you first decide to introduce this plant to your landscape, you must consider its natural tendency to expand via rhizomes. Planting it directly into an open garden bed without any restrictions can lead to it becoming an invasive force that competes with your other prized specimens. Professional horticulturists often recommend using heavy-duty plastic liners or sinking large pots into the ground to create a physical boundary for the root system. This allows you to enjoy the lush, variegated groundcover effect while maintaining total control over its footprint within your garden design.
The timing of your planting is just as important as the method you choose to ensure the young plants survive the transition. Spring is generally considered the optimal season for planting, as the moderate temperatures and increasing daylight provide the perfect conditions for root development. You should wait until the danger of hard frost has passed and the soil has begun to warm up to at least 10 degrees Celsius. This early start gives the pineapple mint enough time to build a robust root network before the intense heat of summer arrives, which can be stressful for unestablished plants.
Finally, a humanized approach to planting involves observing the specific needs of each individual cutting or division rather than following a rigid formula. You will notice that some young plants take to their new environment immediately, while others might need a bit of extra shade or moisture during the first few weeks. Paying close attention to the turgidity of the leaves and the color of the new growth will tell you everything you need to know about the success of your planting effort. This level of professional observation is what separates a thriving herb garden from one that merely survives.
Site selection and soil preparation
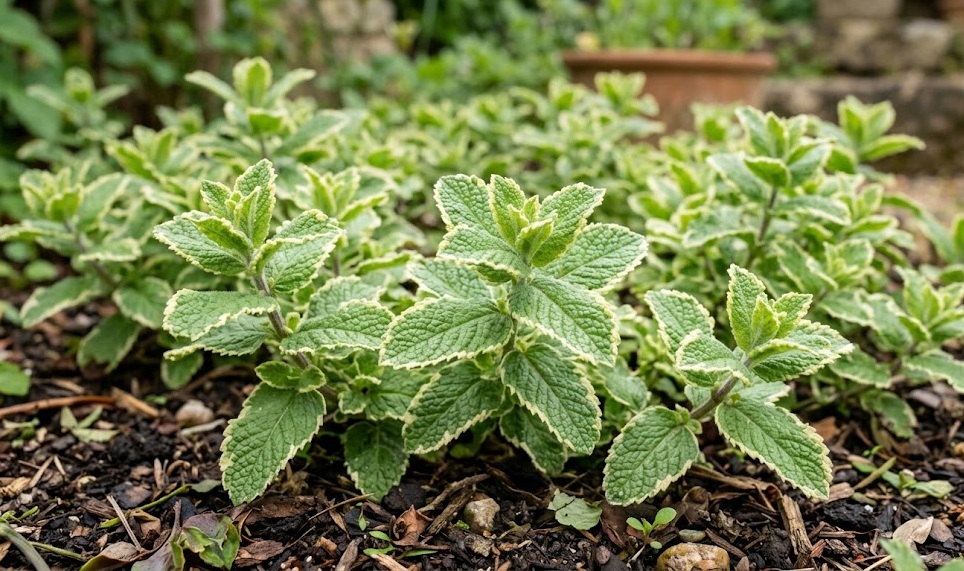
Choosing the perfect location for pineapple mint is a balance between providing enough light for the variegation and protecting the leaves from scorching. You should look for a spot that receives bright, filtered sunlight or a few hours of direct morning sun followed by afternoon shade. If the plant is placed in deep shade, the white margins of the leaves may turn green as the plant tries to maximize its photosynthesis, which ruins the variegated aesthetic. Conversely, full midday sun in hot climates can cause the delicate white edges to turn brown and crispy, detracting from the plant’s beauty.
More articles on this topic
The soil you prepare for planting must be rich in organic matter and capable of holding moisture without becoming a muddy bog. You can achieve this by incorporating high-quality compost, leaf mold, or aged manure into the top fifteen to twenty centimeters of the soil. This organic enrichment not only provides a slow-release source of nutrients but also improves the soil structure, allowing roots to penetrate easily. If your garden has heavy clay or very sandy soil, these amendments are even more critical to creating a hospitable environment for the mint’s shallow root system.
Before you put the plants in the ground, it is wise to clear the area of all perennial weeds that might compete for nutrients and water. Mint roots are relatively shallow, so they can easily be overwhelmed by aggressive weed species during the early stages of establishment. Once the site is cleared, you can rake the soil to a fine tilth, ensuring there are no large clumps or stones that might obstruct root growth. This level of preparation ensures that the pineapple mint can focus its energy entirely on spreading its runners and producing lush foliage.
Drainage is the final technical consideration when preparing your planting site to avoid the risk of root rot. While the plant loves moisture, it cannot tolerate standing water around its crown for extended periods, especially in cooler weather. If you are planting in an area with poor drainage, consider creating a slightly raised bed or a mound to elevate the root zone above the saturation point. You could also mix in a small amount of horticultural grit or perlite to improve the internal drainage of the soil. These professional touches create a resilient foundation that supports the plant’s long-term health.
Propagation through stem cuttings
One of the most effective and popular ways to propagate pineapple mint is by taking stem cuttings from a healthy mother plant. You should select vigorous, non-flowering stems that are about ten to fifteen centimeters long and have several sets of leaves. Using a sharp, sterilized knife or shears, make a clean cut just below a leaf node, as this is where the concentration of natural rooting hormones is highest. Removing the lower leaves will expose the nodes and prevent them from rotting once they are placed in the rooting medium.
More articles on this topic
You have two main options for rooting your cuttings: placing them in a glass of water or directly into a moist potting mix. Rooting in water is often favored because it allows you to see the roots developing in real-time, providing a sense of progress. Simply place the bottom half of the cutting in a clean jar of water and keep it in a bright spot out of direct sunlight. You should change the water every couple of days to keep it fresh and oxygenated, which prevents the growth of bacteria that could kill the cutting.
If you choose to root directly in soil, use a light, well-draining mix such as a combination of peat moss and perlite or a dedicated seed-starting blend. You can dip the ends of the cuttings into a rooting hormone powder to speed up the process, though mint usually roots quite easily without it. Insert the cuttings into the pre-moistened soil and firm it gently around the stems to ensure good contact. Keeping the cuttings in a humid environment, such as under a plastic dome, can help prevent them from wilting while they work on growing new roots.
Within two to three weeks, you should start to see new growth at the tips of the cuttings, which is a clear sign that roots have formed. At this point, you can gradually acclimate the young plants to normal humidity levels by removing the cover for a few hours each day. Once the root system is well-established and filling out the small pot, the new pineapple mint is ready to be transplanted into its permanent home. This method is incredibly reliable and allows you to create an unlimited number of new plants from a single parent.
Division and root propagation
Division is a faster way to create large, established plants and is best performed in the early spring or early autumn. This technique involves digging up an existing clump of pineapple mint and physically separating it into several smaller sections. You should use a sharp spade or a garden fork to lift the plant, making sure to keep as much of the root ball intact as possible. Once the plant is out of the ground, you can pull the root system apart by hand or use a knife to cut through the denser parts of the rhizome.
Each new division must have a healthy amount of roots and at least one or two stems with green foliage to ensure it can survive on its own. It is a good idea to trim back the existing top growth by about half to reduce the stress on the roots while they re-establish themselves in the new soil. Replant the divisions immediately into prepared holes at the same depth they were growing previously. Firm the soil around the roots and water them thoroughly to eliminate any air pockets that could dry out the delicate underground structures.
Another interesting propagation method involves using the runners, or stolons, that the plant naturally produces as it spreads across the soil. You will often see these long, horizontal stems seeking out new territory and occasionally rooting at the nodes where they touch the ground. You can help this process along by pinning a runner to the soil with a small piece of wire and covering the node with a little bit of earth. After a few weeks, the node will have formed its own root system, and you can simply snip the connection to the parent plant.
This “layering” technique is very low-stress for the plant because the new individual continues to receive nutrients from the mother until it is fully capable of feeding itself. It is an excellent way to fill in bare spots in your garden or to create new plants without having to worry about the maintenance of traditional cuttings. Professional gardeners often use this method to maintain a thick, uniform groundcover in larger landscape projects. By utilizing the plant’s natural growth habits, you make the propagation process more efficient and successful.
Post-planting care and establishment
The first few weeks after planting or transplanting are the most critical for the long-term success of your pineapple mint. You must ensure that the soil remains consistently moist, as the young roots are not yet deep enough to access water from the subsoil. However, avoid overwatering to the point where the soil becomes soggy, as this can starve the roots of oxygen and lead to “transplant shock.” A light, daily watering is usually better than a heavy soak once a week during this initial establishment phase.
Providing some temporary shade for newly planted mint can also help reduce the amount of moisture lost through the leaves. If you have planted in a sunny spot, you can use a simple structure like a wooden crate or some leafy branches to cast a shadow over the young plants during the hottest part of the day. Once you see significant new growth and the plants look “perky” even in the sun, you can remove the temporary shade. This extra bit of care during the first ten days can significantly increase your survival rate and the overall vigor of the bed.
As the plants begin to grow, you should start a regular routine of pinching back the growing tips to encourage branching. This prevents the new pineapple mint from becoming “leggy” and helps it form a dense, bushy shape from the very beginning. You can use the pinched-off tips in your kitchen, so nothing goes to waste during this maintenance process. This early training of the plant’s shape is much easier than trying to fix an overgrown, messy plant later in the season.
Finally, keep a close eye on the area for any signs of pests or diseases that might take advantage of the vulnerable young plants. Slugs and snails are particularly fond of the soft, new growth of mint and can do a lot of damage in a single night. Using organic barriers or simply checking the plants in the evening can help you catch these issues before they become a major problem. With these professional planting and propagation strategies, your pineapple mint will quickly become a thriving and beautiful part of your garden landscape.